Gitlab
Protecting Gitlab with Pritunl Zero
This tutorial will explain securing Gitlab with Pritunl Zero using Google G Suite single sign-on. Pritunl Zero will provide an additional layer of protection and authentication between users and the Gitlab server. When creating the Pritunl Zero server it is best to locate the server on the same VPC/local network as the Gitlab server. A demo of this tutorial is available at gitlab.pritunl.com use the username and password demo. The instructions below will provide a more detailed demo including cloning a repository from Gitlab. The second part of this tutorial Gitlab SSH will explain configuring an SSH bastion host with two-factor authentication to protect the Gitlab SSH server.
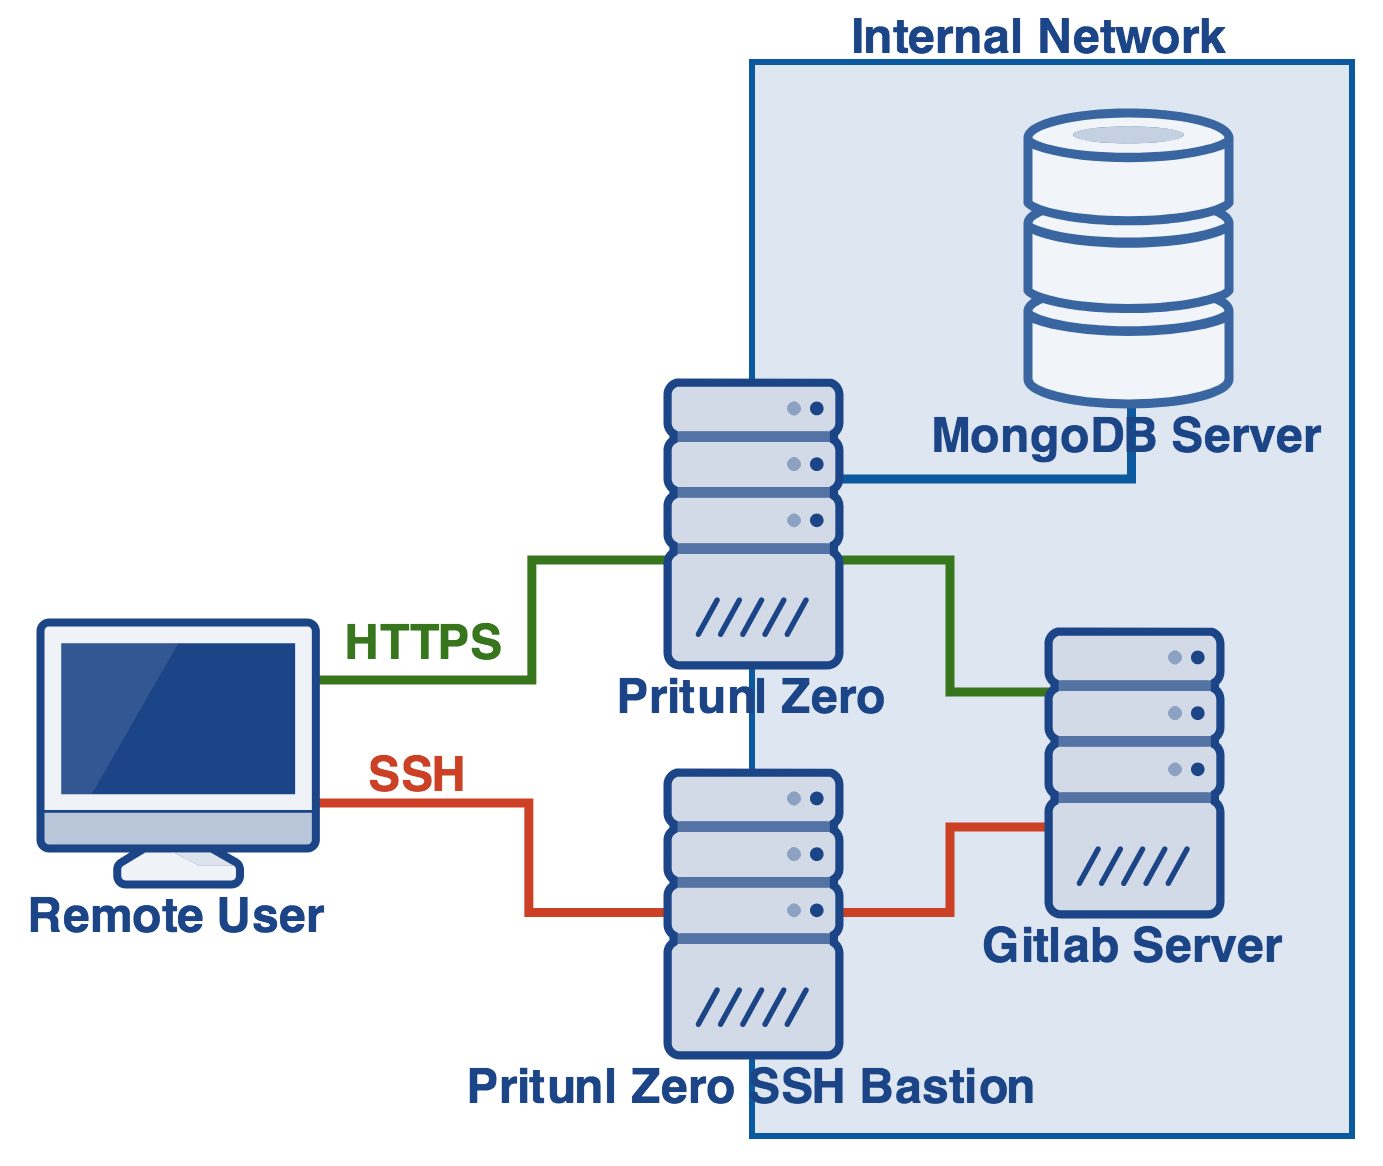
Gitlab and Git SSH Bastion Demo
This demo will demonstrate the work flow for a user accessing Gitlab with Pritunl Zero. The demo is not part of configuring the server and can be skipped. The demo will be run in a temporary Docker container. It is recommend to only run the demo in a Docker container as the Pritunl SSH client will need to be installed and configured.
First go to gitlab.pritunl.com and login with the username and password gitlab. Optionally you can create an account, the email address is not verified. Then run the commands below to clone the demo repository in a temporary Docker container.
# Pull oracle linux 7
docker pull oraclelinux:7

# Start oracle linux container
docker run --rm -ti --entrypoint /bin/bash oraclelinux:7

# Add pritunl repository (copy all lines together)
tee /etc/yum.repos.d/pritunl.repo << EOF
[pritunl]
name=Pritunl Repository
baseurl=https://repo.pritunl.com/stable/yum/oraclelinux/7/
gpgcheck=1
enabled=1
EOF
gpg --keyserver hkp://keyserver.ubuntu.com --recv-keys 7568D9BB55FF9E5287D586017AE645C0CF8E292A
gpg --armor --export 7568D9BB55FF9E5287D586017AE645C0CF8E292A > key.tmp
rpm --import key.tmp; rm -f key.tmp

# Install git and pritunl-ssh
yum -y install pritunl-ssh git

# Add the demo SSH key
mkdir ~/.ssh
tee ~/.ssh/id_rsa << EOF
-----BEGIN RSA PRIVATE KEY-----
MIIEowIBAAKCAQEAxKWRhVZjn7Z1Dw5pLkbpJHXSm5Zn0onoOYeH6e5P1O8O/Mp8
quCY4oQZvf5DQLRMh5EcHGc6z5ruUbhTQyN5ZQQ67pdm4Qbx6vaDm5N/B3UvHgUz
ztIwrWeu3hvvOiTdmj+6zrEaIoYQZASdqSQu3ksjK2x3nnXJD9fZQTbDd7OUC1mv
smQ8TRfYuOQfqywpWy4UbrUK9ScVk9qrGe5j7HlYxEF7innGVaWa6Y8YiZHLe0jL
KFpMSO/9uGZ8Am+G7cvx4o3shHJfUlkNxspZkfmCO89WkkAhiL4g75Qpb8p2yTS1
fFMjwUQSd9jWEte6eK9ml/NVYzU0JNu6/Cb6dQIDAQABAoIBADxv3m+qg2fcvdFo
zm7IoHLyO05SRYpxlAvKWb1N3v9EkcijuvkRmitUCk1YTfce8r5fnNIl7+9KYKCB
FCX4SyD+0dXudlIGvmdGaGByToJOQ7LoSmnwM8G3sgjVcQrftbPojlNkHvIpXfQ/
bu1DD5yGX0LDTWhILwlNf5oJaL3qy1O6ta6gEif7ZtSnkXfcAyltC8ar8xehYmjg
a/URDzc0ll6a3D8zhDlNGcd9GT5CAqeLHizBCitjL4s9SLbdqJAEfu6Bq9IatswX
JaVg0MpFdk0xLAtEAoDdXi5oNugI4GiWXPsFvZxP8vNFPSa9cY+aOxMq4ojXD9ZB
ndTmcOkCgYEA4gWfnDtyG5Ke2sFRhBqDjK7j6JL4VyPikb+mXjp6VghBRnuEEQv7
30bCKoDwld4qmDFCYWM0ZblM6SSxLujQ5J+Eojt4nnVwUGLSlGbnZxf6FWsimtHR
mmeEYp/6q1IUnWe22Re0BT6gM7LZIKM+gjVad4pUIzivCiVD/su4IO8CgYEA3rqJ
Ex4BjC0Rx0n6StcGx0ICEPfURPFdzo8afSaqeU+ed3bPU3AU+mRbgdbGtv24lQHp
qtH+sSY0fl4dA26xrjTLdIYOO+/2yTmfuBPtV3RZ9k0PJF90oagaacs8L7GUFh1o
iheq4WAtRab521y0Sal+14w8rHaCFpyquO3OEtsCgYBb8NOrdtcE9lCeRdNF/I8U
lDPrcJWKxPMuPJqNbBZFltgOtsHTOV+8xIjJR2gWXqhO/oK1IOi4lHb/w8g7f8Mx
rN4ELFL1imokmP52FaH94tf9DHaoKb+son1MrS0HsbznBsBvcN/u3jnGrfL6/sy3
pMJnLCLrrOwvIVeWdwIwiwKBgCQMTskwTxHP7ZOyrnbUbH1teoYihlGOOx+GW8Qr
sOWndD9jlFStzEdmXMUb7NeLIwfC4n3KNQ2Y4GAffVSj4tAOLWuzkrQyt1+EGwyg
9QX1h+XsPOonJOpRGc1Lnncdp5kYs2W+ROLrPQiL6N6PF4Lgku3x/ZPwLkfYnW0G
2BaHAoGBAMgd4DIdecu+CRPqC0/x9hc7UA2OXwlAwiYt8ETAVfsv3XdK+qq2EvbX
tEsbopgjeQtNaNTIeSAnnYVtCCShiLSPhBDrM10pl+6CoFixdRQtDzt/HqqUc3SL
+4+7zXK+mGlZVaIeoCLTqfSGhzLY4S3W8nRieLq7RyLB6y2b1EtM
-----END RSA PRIVATE KEY-----
EOF
chmod 600 ~/.ssh/id_rsa
tee ~/.ssh/id_rsa.pub << EOF
ssh-rsa AAAAB3NzaC1yc2EAAAADAQABAAABAQDEpZGFVmOftnUPDmkuRukkddKblmfSieg5h4fp7k/U7w78ynyq4JjihBm9/kNAtEyHkRwcZzrPmu5RuFNDI3llBDrul2bhBvHq9oObk38HdS8eBTPO0jCtZ67eG+86JN2aP7rOsRoihhBkBJ2pJC7eSyMrbHeedckP19lBNsN3s5QLWa+yZDxNF9i45B+rLClbLhRutQr1JxWT2qsZ7mPseVjEQXuKecZVpZrpjxiJkct7SMsoWkxI7/24ZnwCb4bty/HijeyEcl9SWQ3GylmR+YI7z1aSQCGIviDvlClvynbJNLV8UyPBRBJ32NYS17p4r2aX81VjNTQk27r8Jvp1 root@d97b54c18226
EOF

# Configure pritunl-ssh using the values below
pritunl-ssh
# Enter Pritunl Zero user hostname: zero-user.pritunl.com
# Enter key number or full path to key: 1

# Use cmd or ctrl double click to open the link
# Login with username and password "gitlab" and approve the ssh key

# Clone the demo repository
git clone git@ssh.gitlab.pritunl.com:demo/test.git
This demonstrated the work flow that users will follow when working with Gitlab and Pritunl Zero.
Create DNS Records
First chose three domains one for the Pritunl Zero admin web console, another for accessing the Gitlab web interface and one for SSH access to Gitlab repositories. In this example zero-admin.pritunl.com, gitlab.pritunl.com and gitlab-ssh.pritunl.com will be used. Set the IP address of the first two domains to the public IP address of the Pritunl Zero server. Set the IP address of the SSH domain to the public IP address of the Gitlab server.

Install Gitlab
Install Gitlab if not already installed. When installing set the external URL to the Gitlab domain used above such as EXTERNAL_URL="https://gitlab.pritunl.com". The external URL should use https.
Install Pritunl Zero
Install Pritunl Zero and configure the administrator account with a secure login.
Create LetsEncrypt Certificate
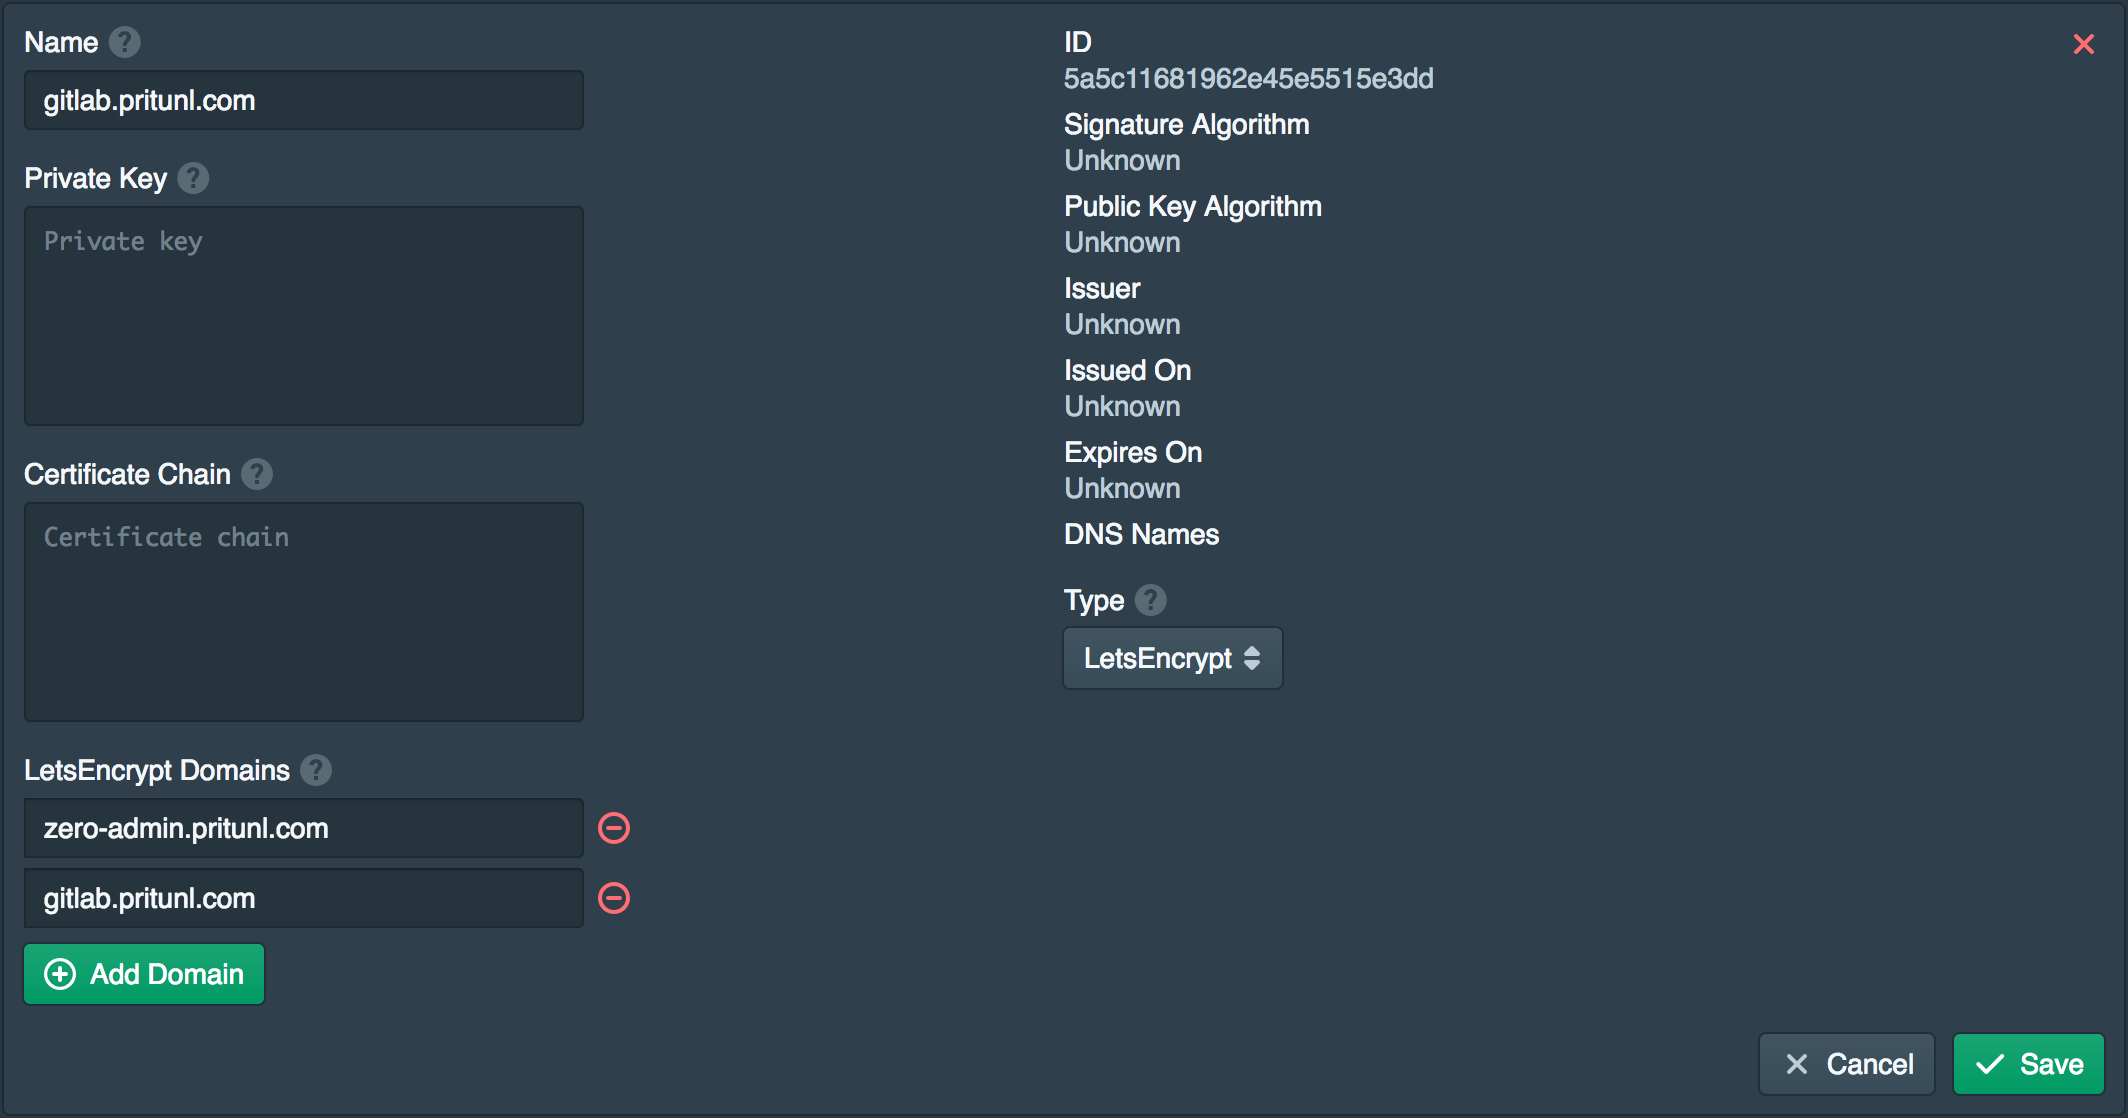
A certificate will be needed for both of the Pritunl Zero domains created above. To do this open the Certificates tab and click New. Then set the Type to LetsEncrypt and add both the domains to LetsEncrypt Domains. You may need to wait for the DNS changes to become available to the LetsEncrypt verification servers.
Configure Node
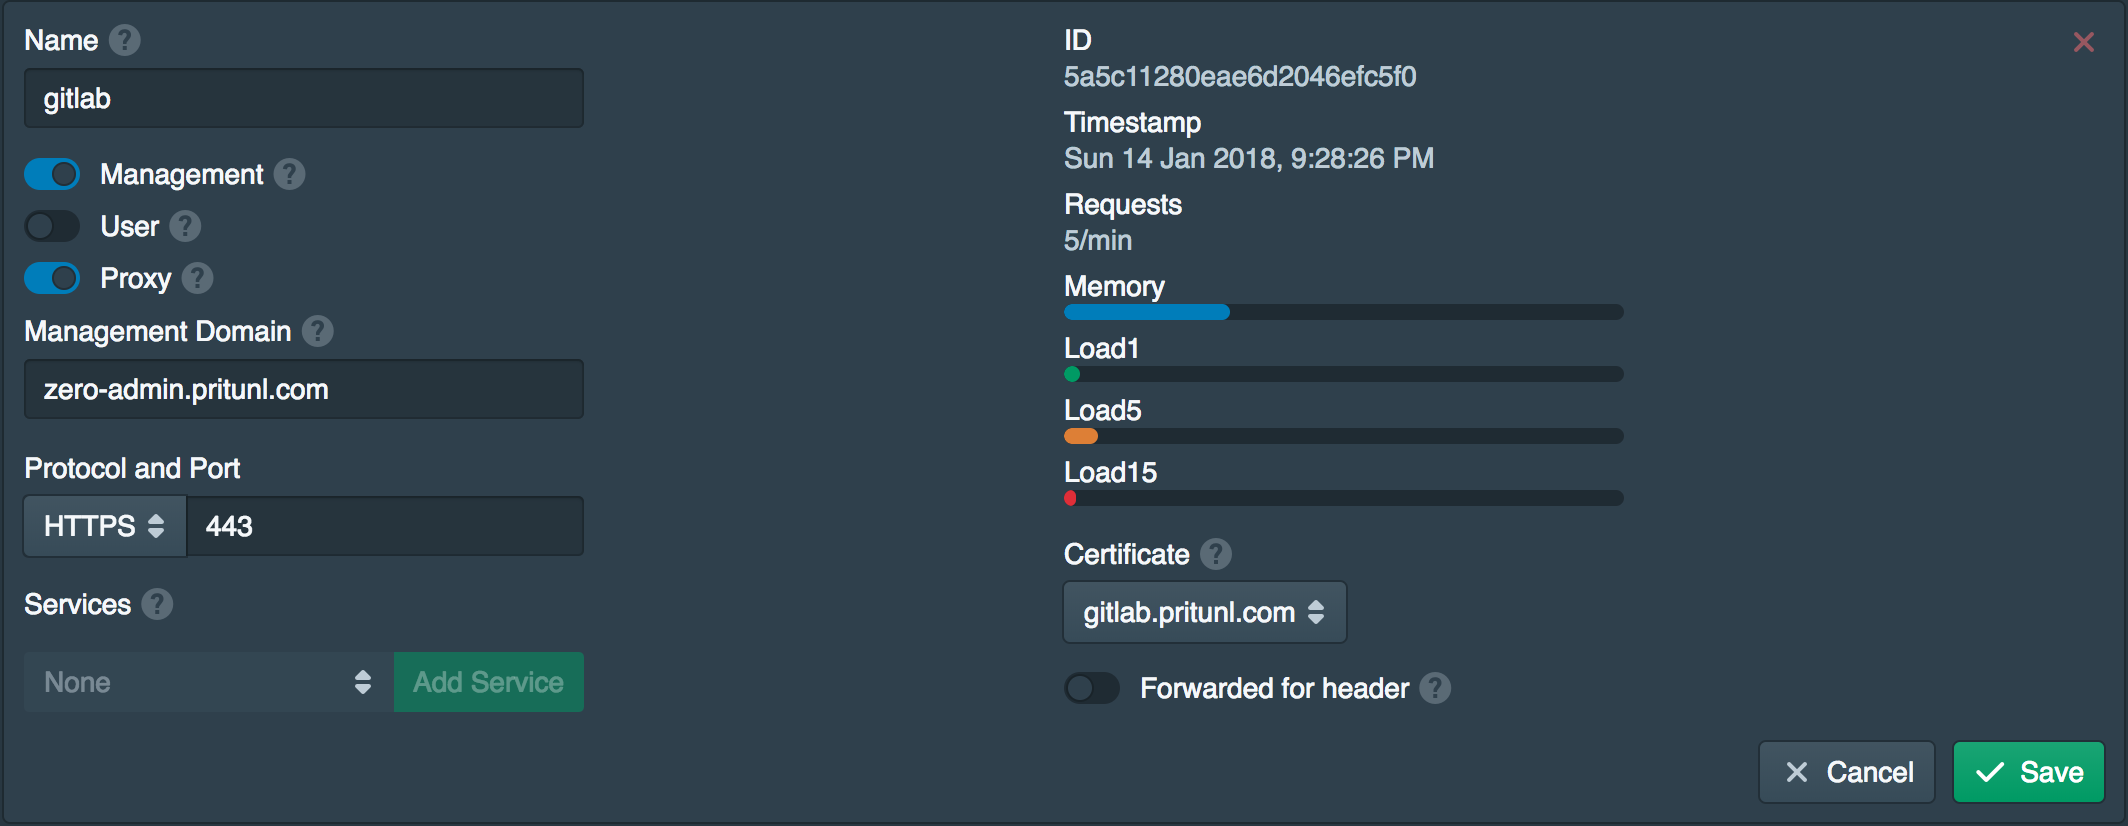
Next go to the Nodes tab and enable the Proxy option. Then set the Management Domain to the admin domain created earlier and set the Certificate to the one created above.
Create Service
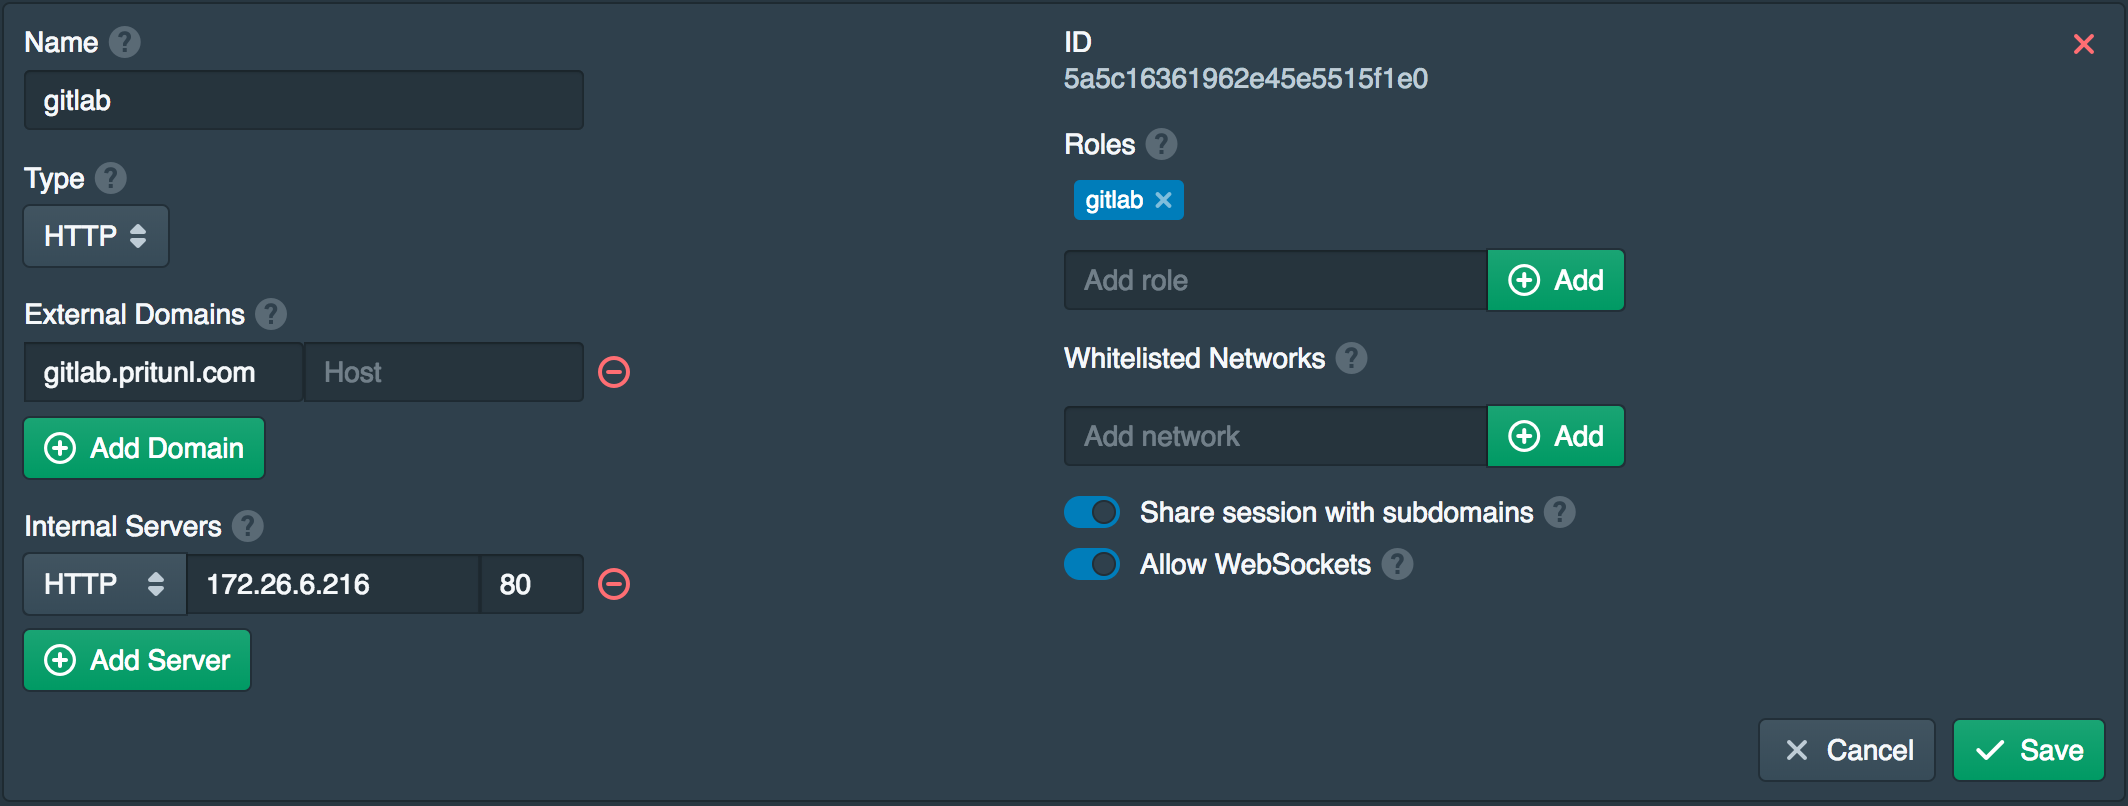
Open the Services tab and click New to create a service for the Gitlab server. Set the External Domains to the Gitlab domain created earlier and the Internal Servers to the local IP address of the Gitlab server. The Internal Servers should be set to HTTP and port 80. Add gitlab to the Roles. All users will need this role to access the Gitlab server.
Add Gitlab Service to Node
Open the Nodes tab and add the gitlab service to the Services.
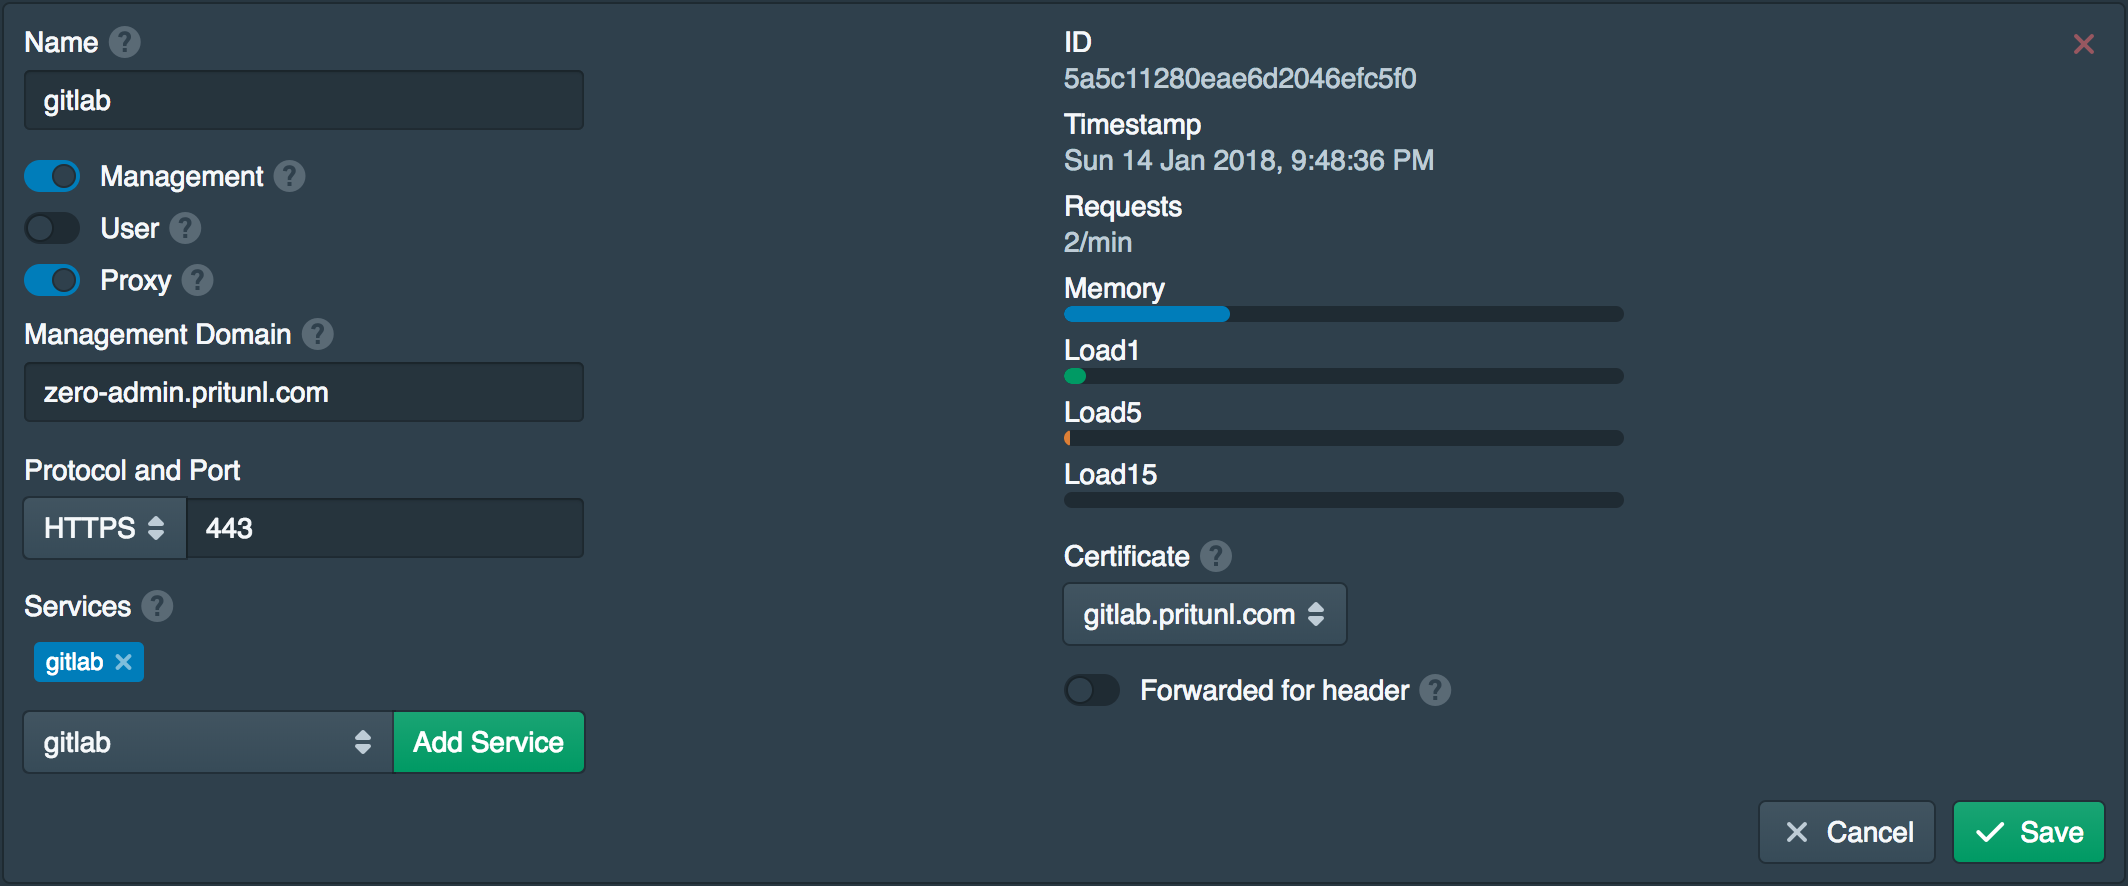
Configure Google Sign-On
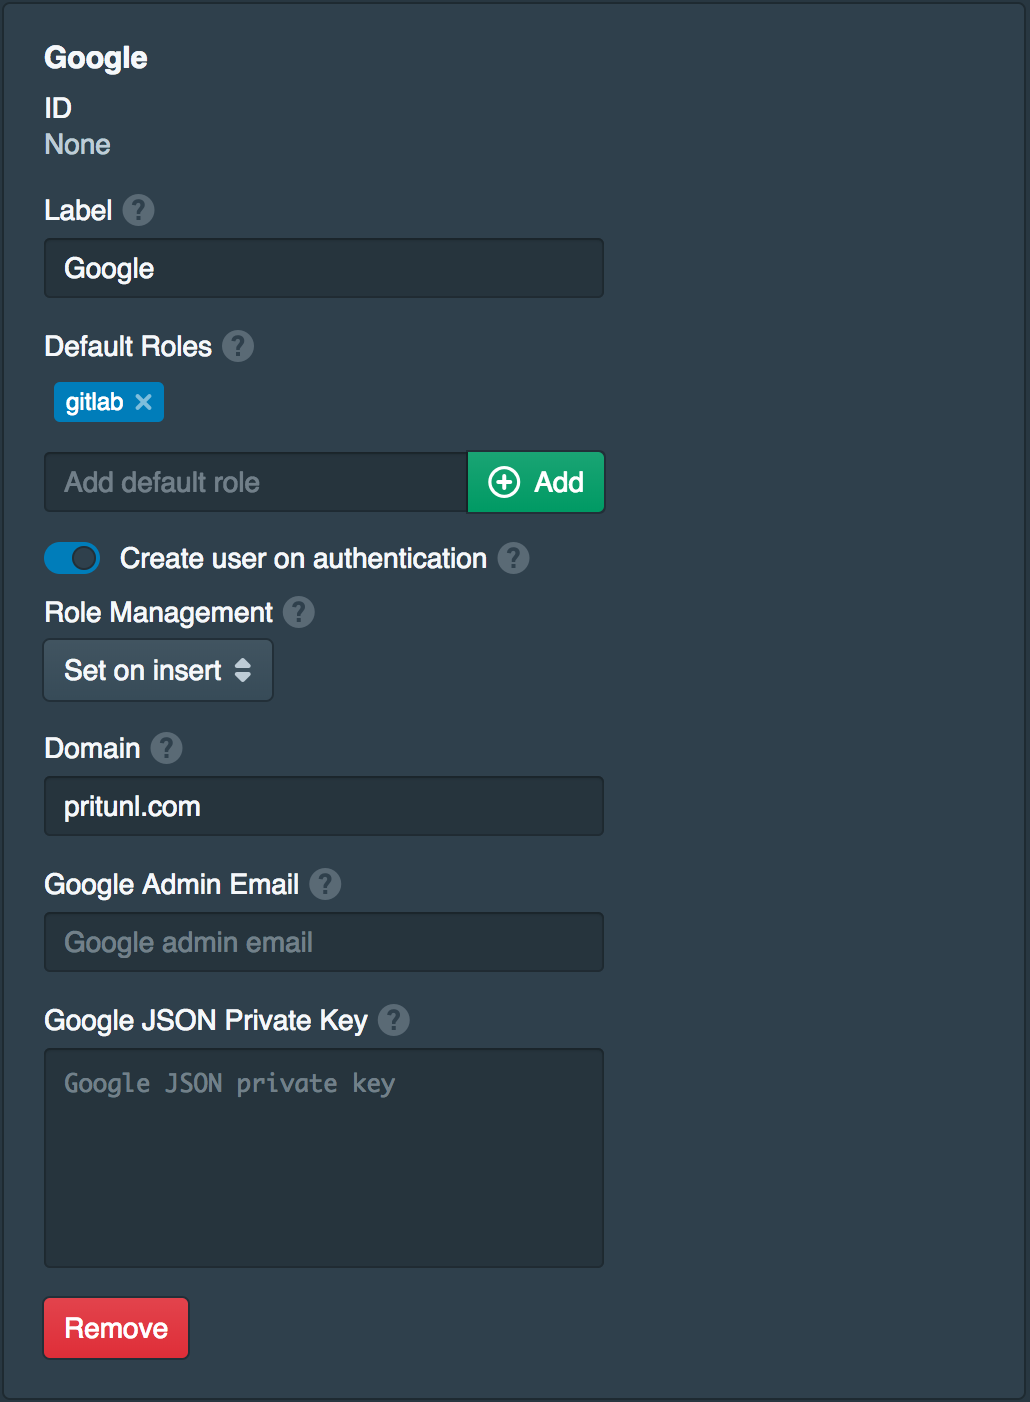
In the Settings tab click Add Provider to add a Google sign-on provider. Set the name to Google and Default Roles to gitlab. Then set the Domain to your Google G Suite domain. This will allow all Google users in your domain to access the Gitlab server. The Google Admin Email and Google JSON Private Key should be left blank. These are used to optionally transfer the groups from Google G Suite to the user roles. Once done click Save.
Create Policy for Gitlab Access
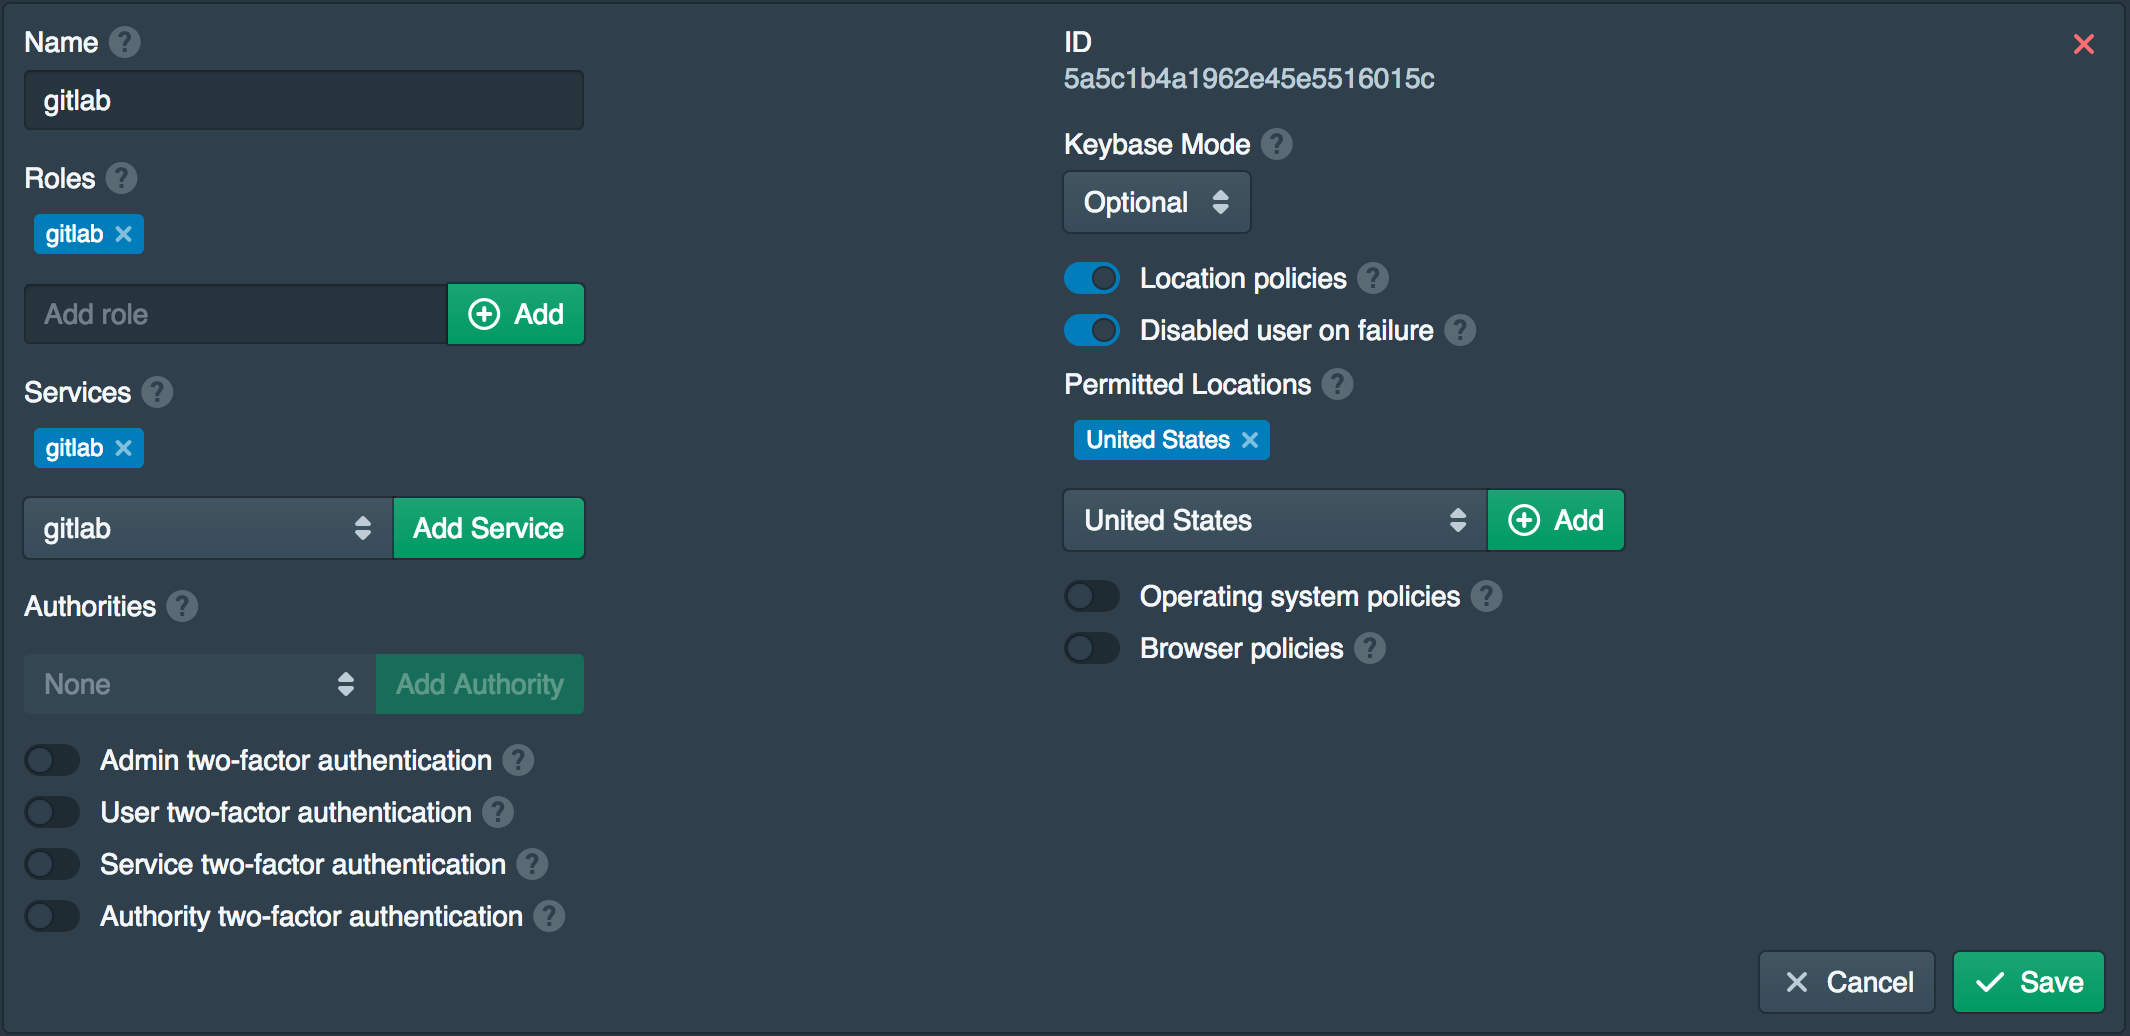
Open the Policies tab and click New. Add gitlab to the Roles, set the Services togitlab and enableLocation policies along withDisable user on failure . AddUnited States to thePermitted Locations*. This policy will disable the user account if a successful login is made from outside the United States. If this occurs an administrator will need to re-enable the user in the admin console.
Configure Gitlab
Edit the Gitlab configuration sudo nano /etc/gitlab/gitlab.rb and set the options below. The options are shown for this example. Use the Gitlab domain and SSH domain from earlier. Ensure https is used in the external URL.
external_url 'https://gitlab.pritunl.com'
nginx['listen_port'] = 80
nginx['listen_https'] = false
nginx['proxy_set_headers'] = {
  "X-Forwarded-For" => "$proxy_add_x_forwarded_for",
  "X-Forwarded-Proto" => "https",
  "X-Forwarded-Ssl" => "on"
}
gitlab_rails['gitlab_ssh_host'] = 'gitlab-ssh.pritunl.com'
Then reconfigure and restart Gitlab with the commands below.
sudo gitlab-ctl reconfigure
sudo gitlab-ctl restart
Configure Gitlab Server Firewall
Configure the firewall of the Gitlab server to only allow SSH connections (TCP port 22) from the internet. Then open HTTP (TCP port 80) to either local addresses only or the the local address of the Pritunl Zero server. This is needed to ensure Gitlab is only accessed through the Pritunl Zero server.
Login to Gitlab
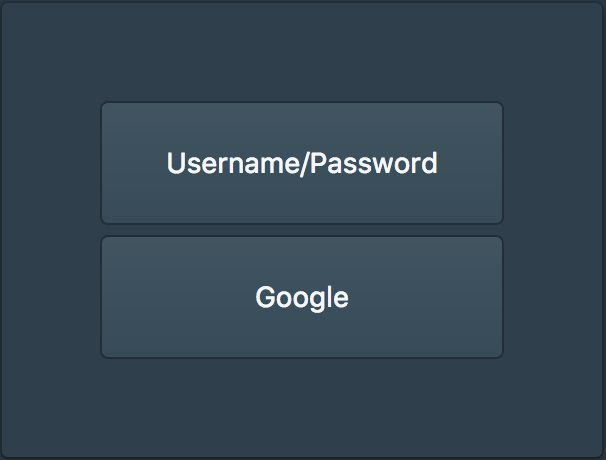
Open the Gitlab url from earlier to access the Gitlab server. In this example this is https://gitlab.pritunl.com. Click Google and login with a Google account in the permitted domain.
Configure Gitlab Access Protocols
With this configuration HTTP access to the Git repositories will no longer be possible. Open the Admin area in Gitlab and go to Settings. Set the Enabled Git access protocols to Only SSH. This will remove the HTTP url from the repository access options.

Deploying
When deploying with single sign-on users work flow with Gitlab should have minimal interferences. More information about Pritunl Zero is available in the Pritunl Zero section of the documentation.
SSH Bastion Host
Refer to the second optional part Gitlab SSH for configuring a SSH bastion host with two-factor authentication to protect the Gitlab SSH server.
Updated about 2 months ago
