Pritunl Zero GitLab
Pritunl Zero GitLab tutorial
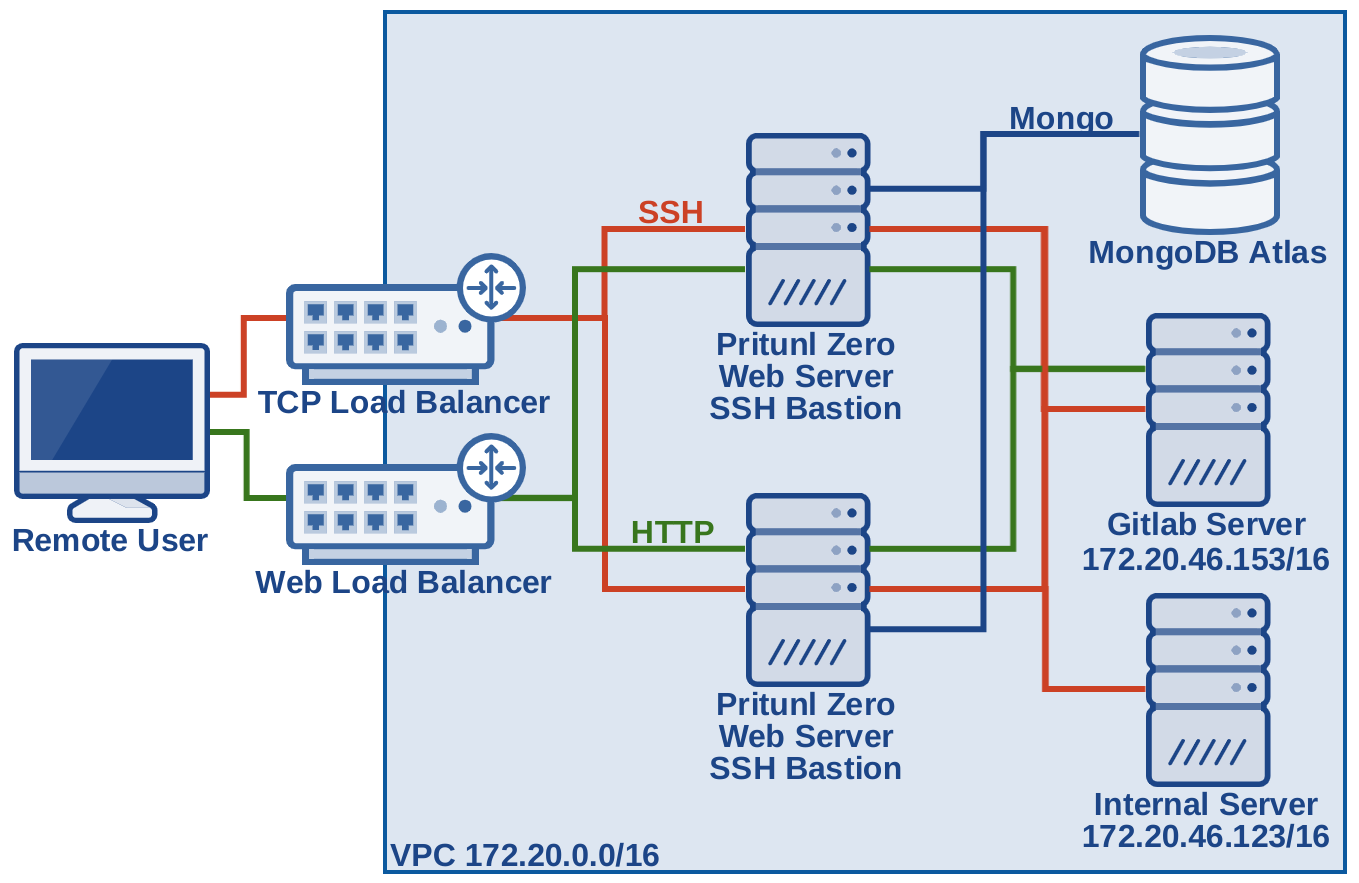
This tutorial will create a production ready Pritunl Zero cluster to demonstrate secure access to a GitLab server and an internal server. The Pritunl Zero nodes will be configured behind a load balancer to provide fault tolerance for one availability zone failure. This tutorial will all be done in a new VPC and won't require modifying existing resources. Additionally U2F authentication will be demonstrated this is optional and will require a YubiKey or Feitian ePass. This tutorial will be completely IPv6 enabled with the exception of the EC2 network load balancer used for SSH which does not currently support IPv6.
The Pritunl Zero system will act as an additional layer of protection replacing what would traditionally be a VPN connection to provide secure access to internal services. Any web or SSH attack on the GitLab server would first require successfully attacking the Pritunl Zero server.
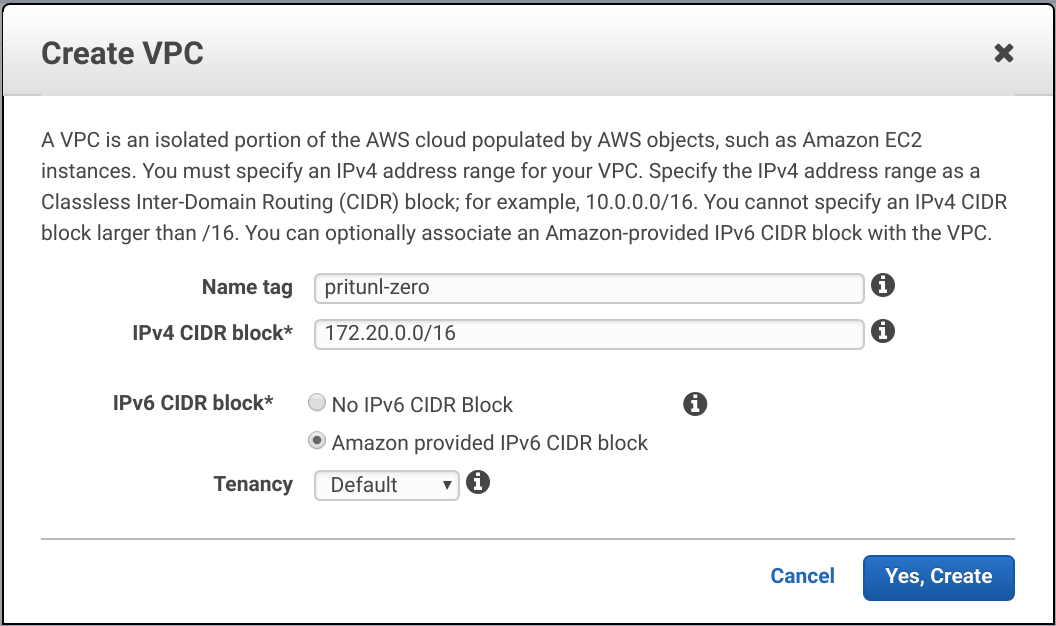
Create New VPC
From the AWS Management Console in the VPC Dashboard click Create VPC. Set the Name tag to pritunl-zero and IPv4 CIDR block to 172.20.0.0/16. Then set IPv6 CIDR block to Amazon provided IPv6 CIDR block and click Create.
After creating the VPC select it and copy the IPv6 CIDR in this example this is 2600:1f14:cb6:f600::/56. This will be needed later.
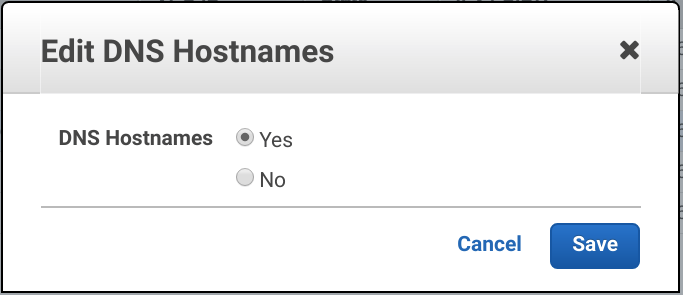
Right click on the VPC and click Edit DNS Hostnames. Then set DNS Hostnames to Yes and click Save.
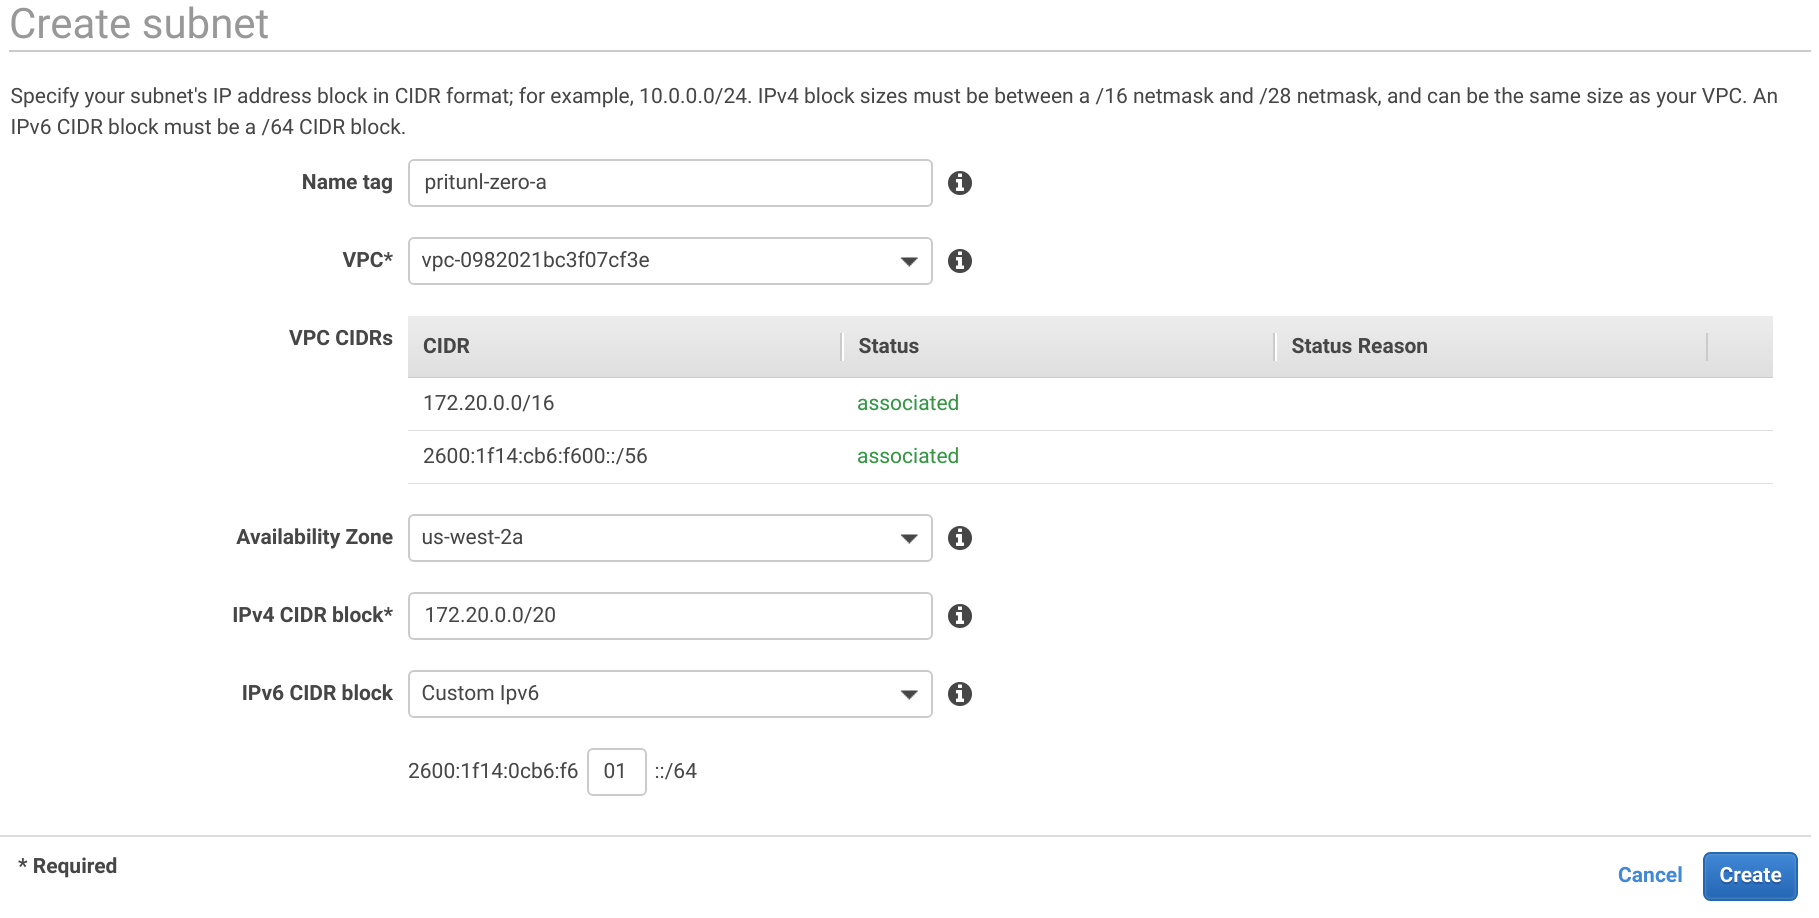
In the Subnets tab click Create subnet. Then create three subnets for each availability zone using the settings below. Some regions provide additional availability zones but only three are needed to provide fault tolerance for a single availability zone failure. For a critical system that needs fault tolerance for two availability zone failures five availability zones will be required for MongoDB quorum. Pritunl Zero nodes do not require quorum for fault tolerance and will work with a single available node.
Subnet A
Name tag: pritunl-zero-a
Availability Zone: us-west-2a
IPv4 CIDR block: 172.20.0.0/20
IPv6 CIDR block: 01
Subnet B
Name tag: pritunl-zero-b
Availability Zone: us-west-2b
IPv4 CIDR block: 172.20.16.0/20
IPv6 CIDR block: 02
Subnet C
Name tag: pritunl-zero-c
Availability Zone: us-west-2c
IPv4 CIDR block: 172.20.32.0/20
IPv6 CIDR block: 03
Right click on each subnet and click Modify auto-assign IP settings. Enable Auto-assign IPv4 and Auto-assign IPv6. Then click Save. This must be done on all three subnets.

In the Internet Gateways tab click Create internet gateway then set the Name tag to pritunl-zero and click Create.

After creating the internet gateway right click it and click Attach to VPC. Then select the VPC and click Attach.

Open the Egress Only Internet Gateways and click Create Egress Only Internet Gateway. Then select the VPC and click Create.

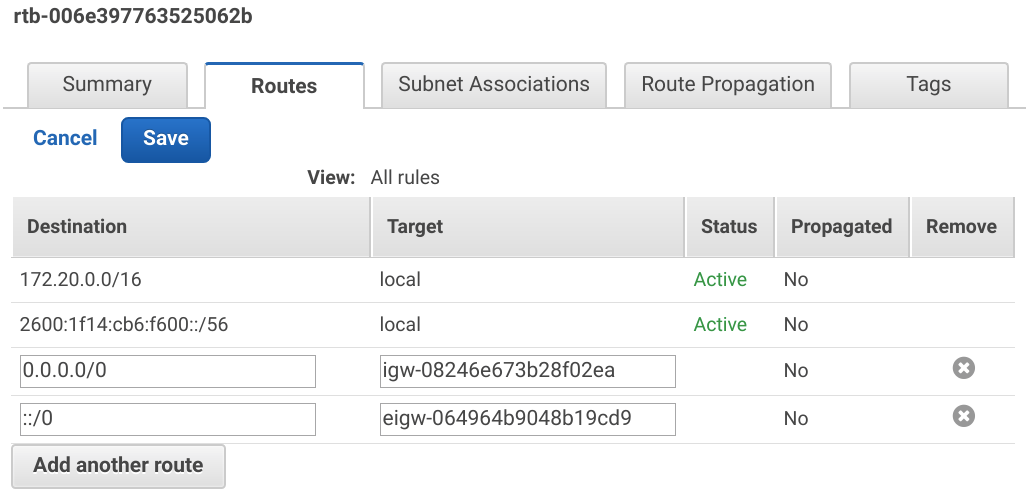
In the Route Tables tab select the VPC and open the Routes tab. Then click Edit and Add another route. Set the Destination to 0.0.0.0/0 and the Target to the igw internet gateway created above. Then click Add another route set the Destination to ::/0 and the Target to the eigw egress only internet gateway created above. Then click Save.
Create Security Groups
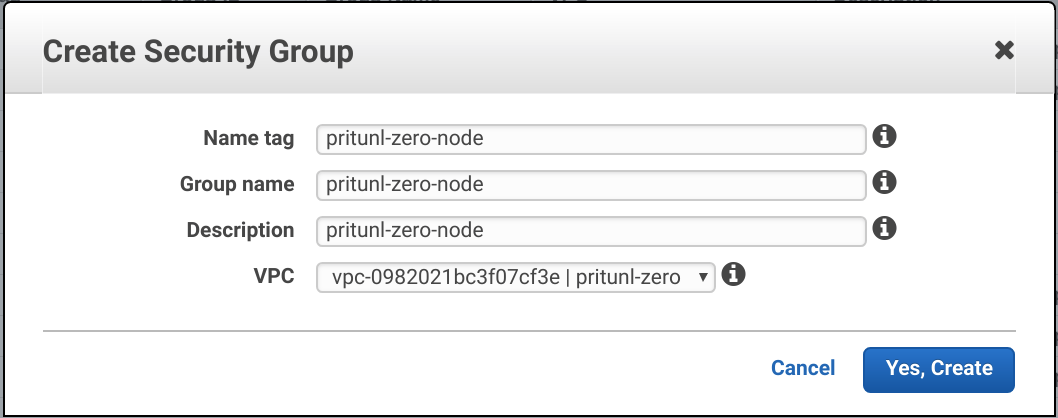
In the Security Groups tab of the VPC Dashboard click Create Security Group to create the three security groups below. Add the security groups to the VPC created above.
Pritunl Zero Node
Name tag: pritunl-zero-node
Pritunl Zero GitLab
Name tag: pritunl-zero-gitlab
Pritunl Zero Instance
Name tag: pritunl-zero-instance
Pritunl Zero Web Load Balancer
Name tag: pritunl-zero-lb-web
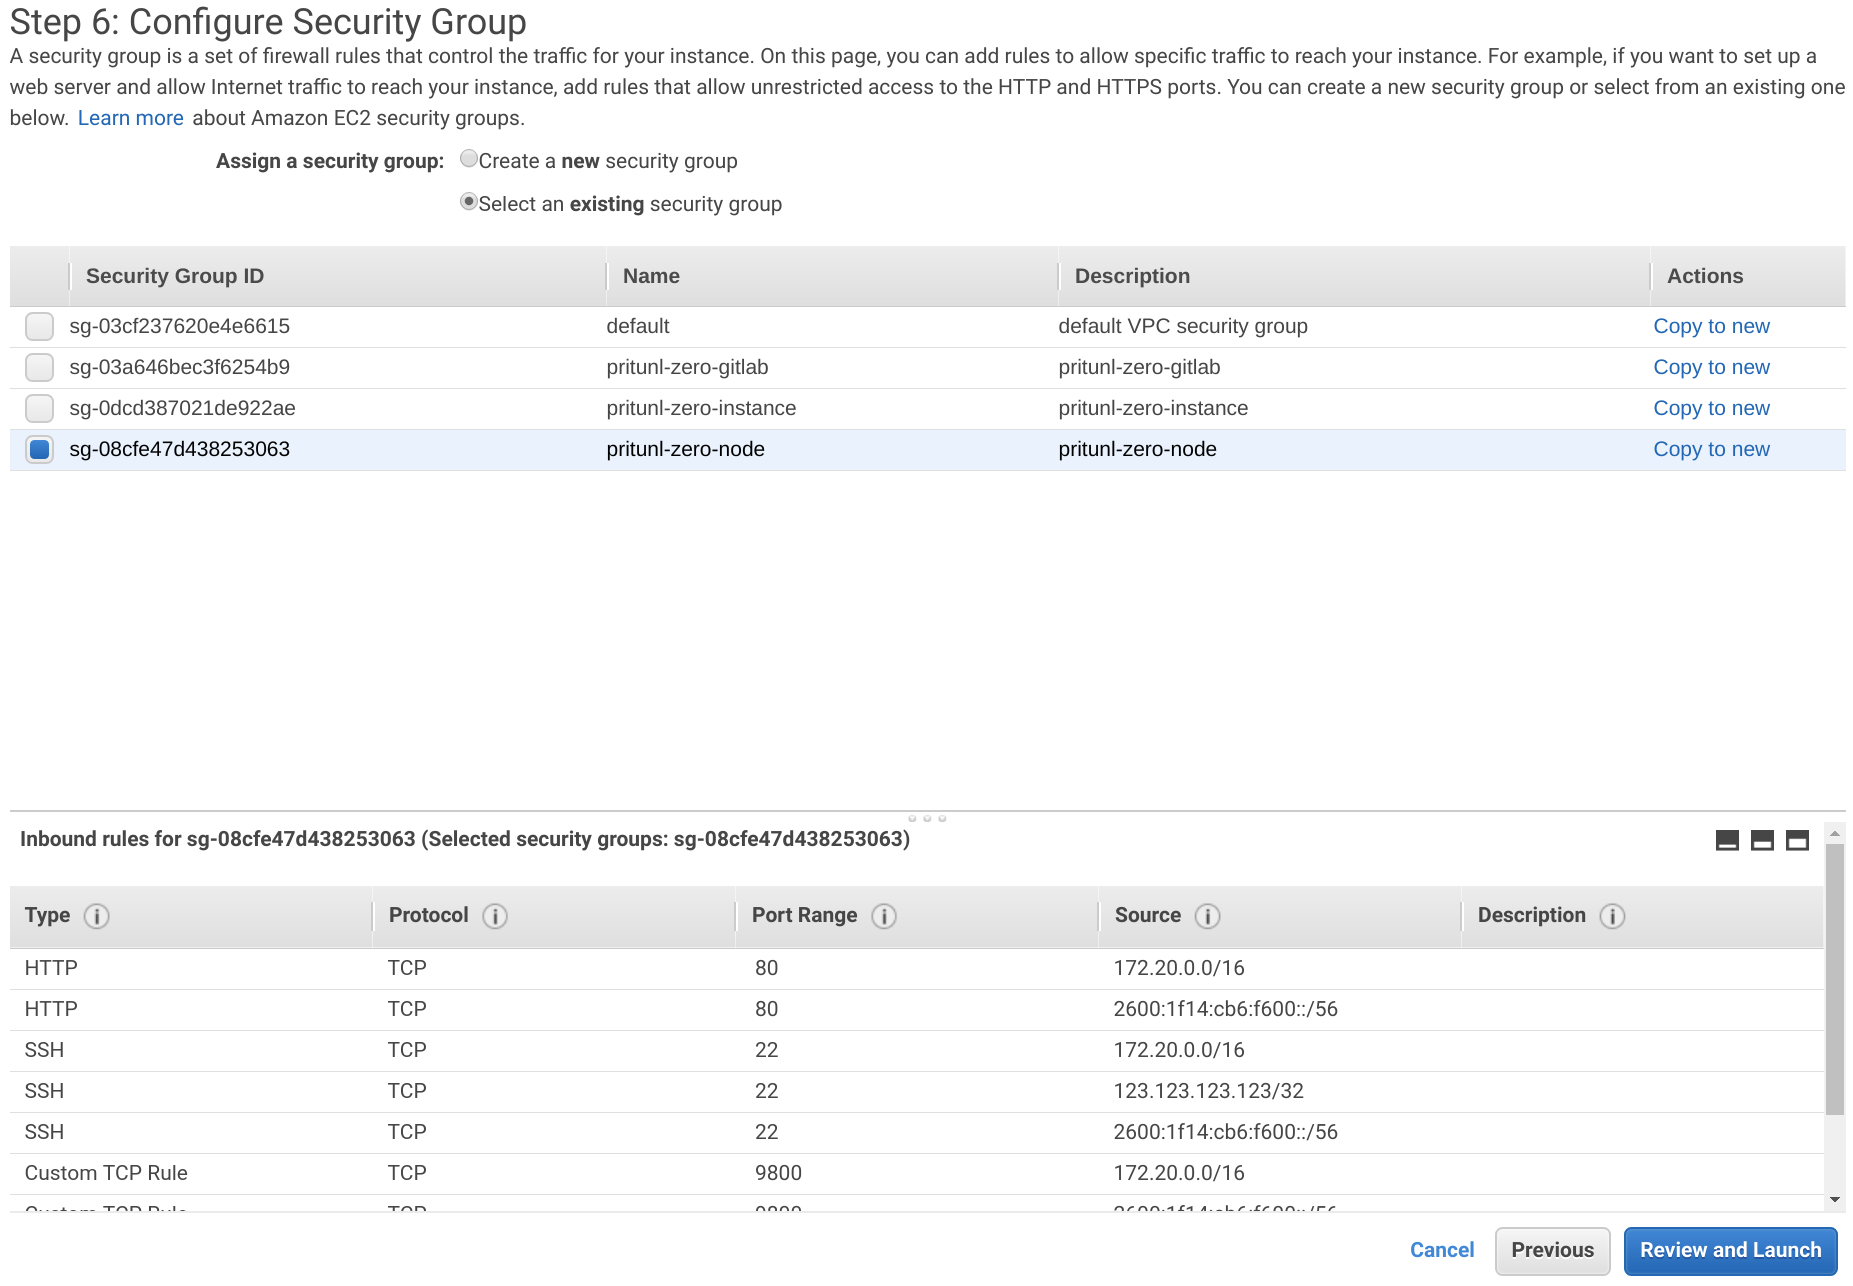
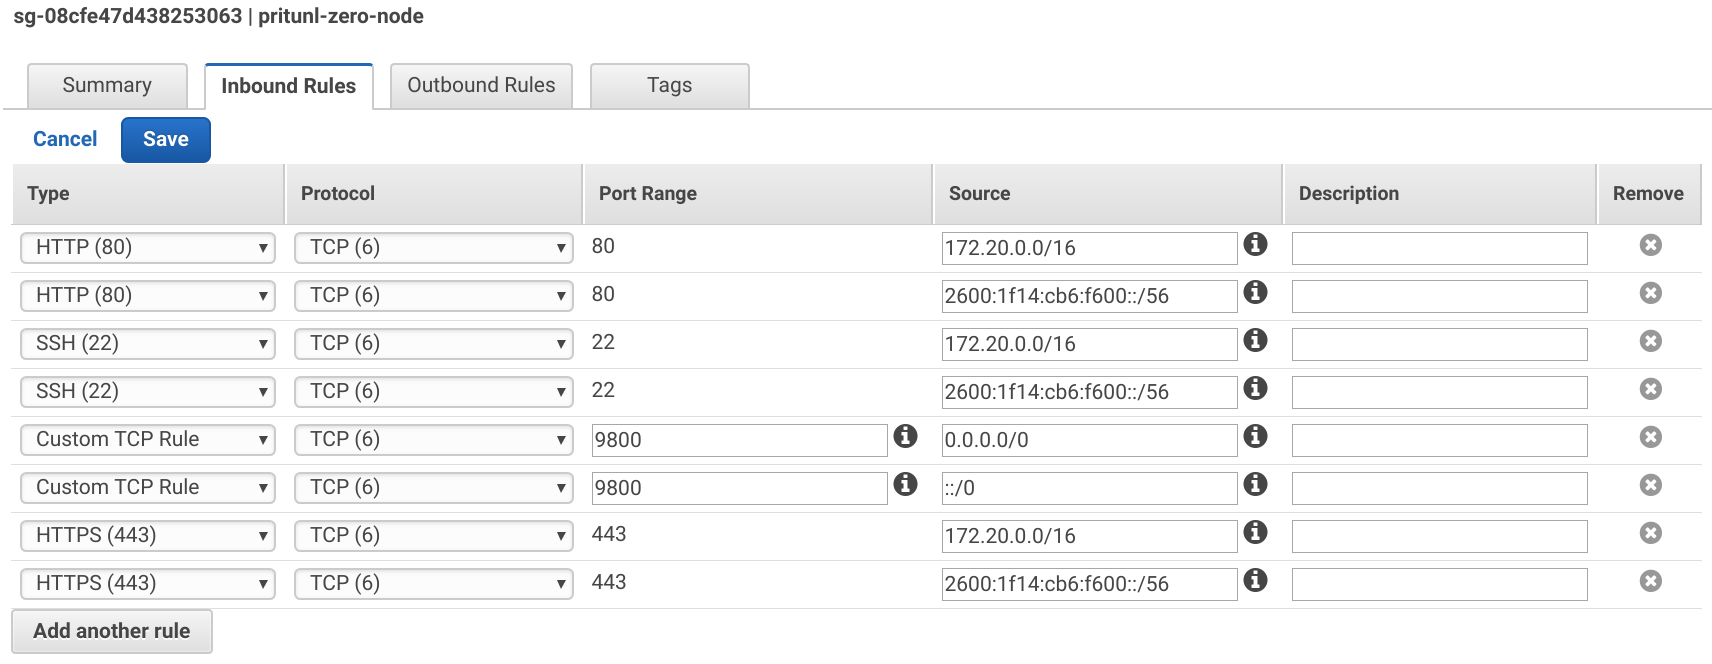
After creating the security groups select the pritunl-zero-node group and apply the Inbound Rules below. Use the VPC IPv6 CIDR from above. Port 9800 will be used for the SSH bastion server. Replace <YOUR_IP> with your IP address.
Type: HTTP
Source: 172.20.0.0/16, <VPC_IPV6_CIDR>::/56
Type: HTTPS
Source: 172.20.0.0/16, <VPC_IPV6_CIDR>::/56
Type: SSH
Source: 172.20.0.0/16, <VPC_IPV6_CIDR>::/56
Type: Custom TCP Rule
Port Range: 9800
Source: 0.0.0.0/0, ::/0
Type: SSH
Source: <YOUR_IP>/32
Type: HTTPS
Source: <YOUR_IP>/32

Select the pritunl-zero-gitlab group and apply the Inbound Rules below.
Type: HTTP
Source: 172.20.0.0/16, <VPC_IPV6_CIDR>::/56
Type: HTTPS
Source: 172.20.0.0/16, <VPC_IPV6_CIDR>::/56
Type: SSH
Source: 172.20.0.0/16, <VPC_IPV6_CIDR>::/56

Select the pritunl-zero-instance group and apply the Inbound Rules below.
Type: SSH
Source: 172.20.0.0/16, <VPC_IPV6_CIDR>::/56

Select the pritunl-zero-lb-web group and apply the Inbound Rules below. Replace <YOUR_IP> with your IPv4 address and <YOUR_IPV6> with your IPv6 address.
Type: HTTP
Source: 0.0.0.0/0, ::/0
Type: HTTPS
Source: 0.0.0.0/0, ::/0

Create EC2 Key Pair
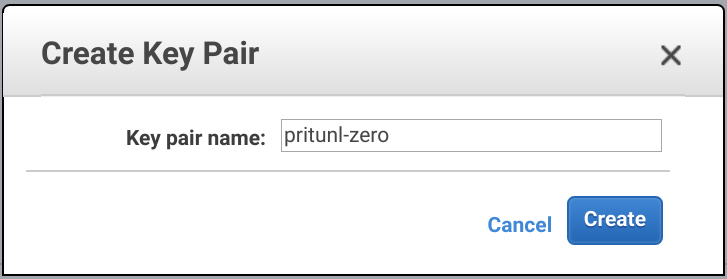
From the EC2 Dashboard in the Key Pairs tab click Create Key Pair. Set the Key pair name to pritunl-zero and click Create.
Open a terminal and move the downloaded key pair to the ~/.ssh directory. Then update the permissions and add IdentityFile ~/.ssh/pritunl-zero.pem to the ~/.ssh/config file.
mv ~/Downloads/pritunl-zero.pem ~/.ssh/
chmod 600 ~/.ssh/pritunl-zero.pem
nano ~/.ssh/config
IdentityFile ~/.ssh/pritunl-zero.pem
Create Pritunl Zero Instances
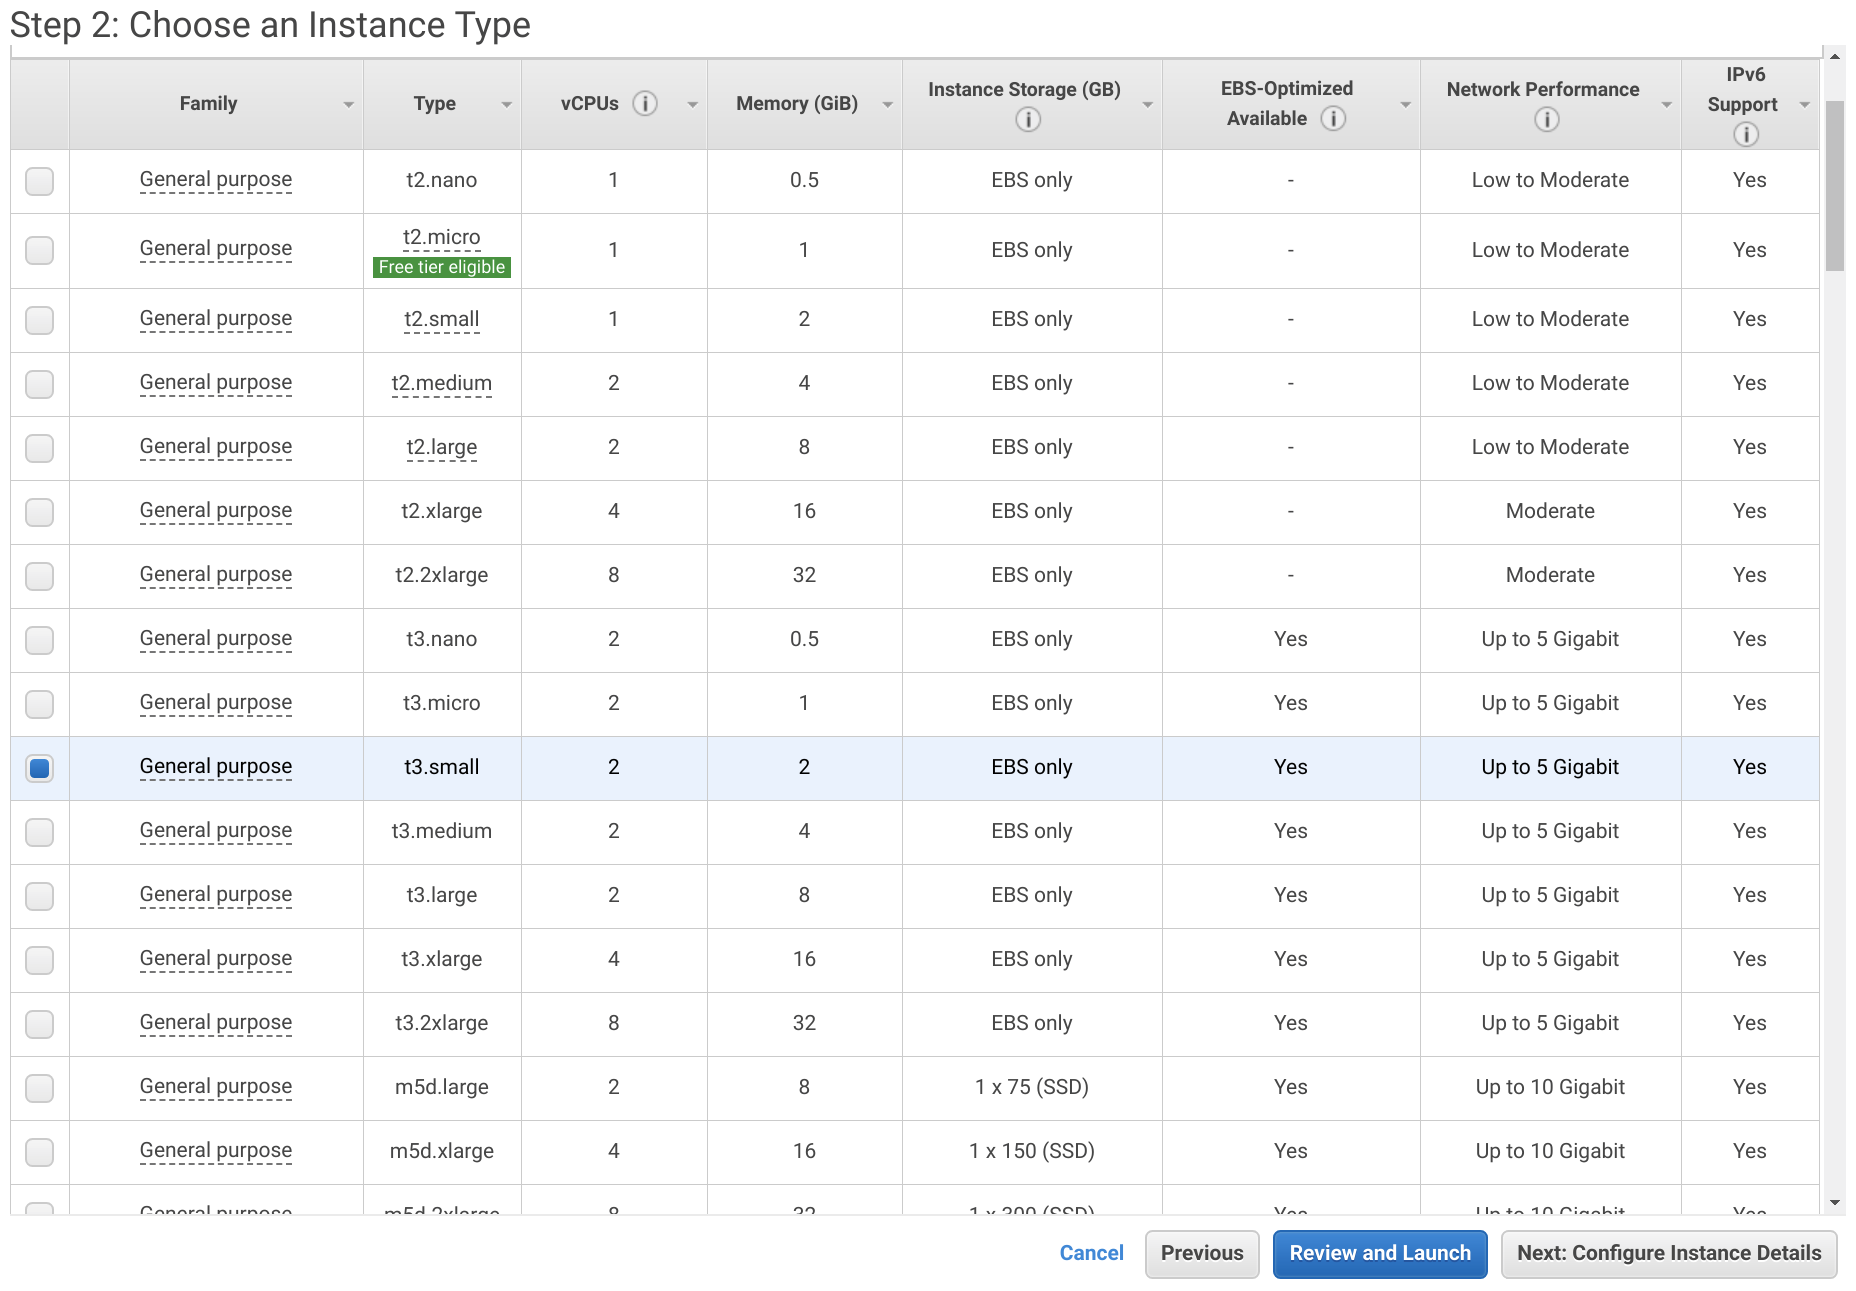
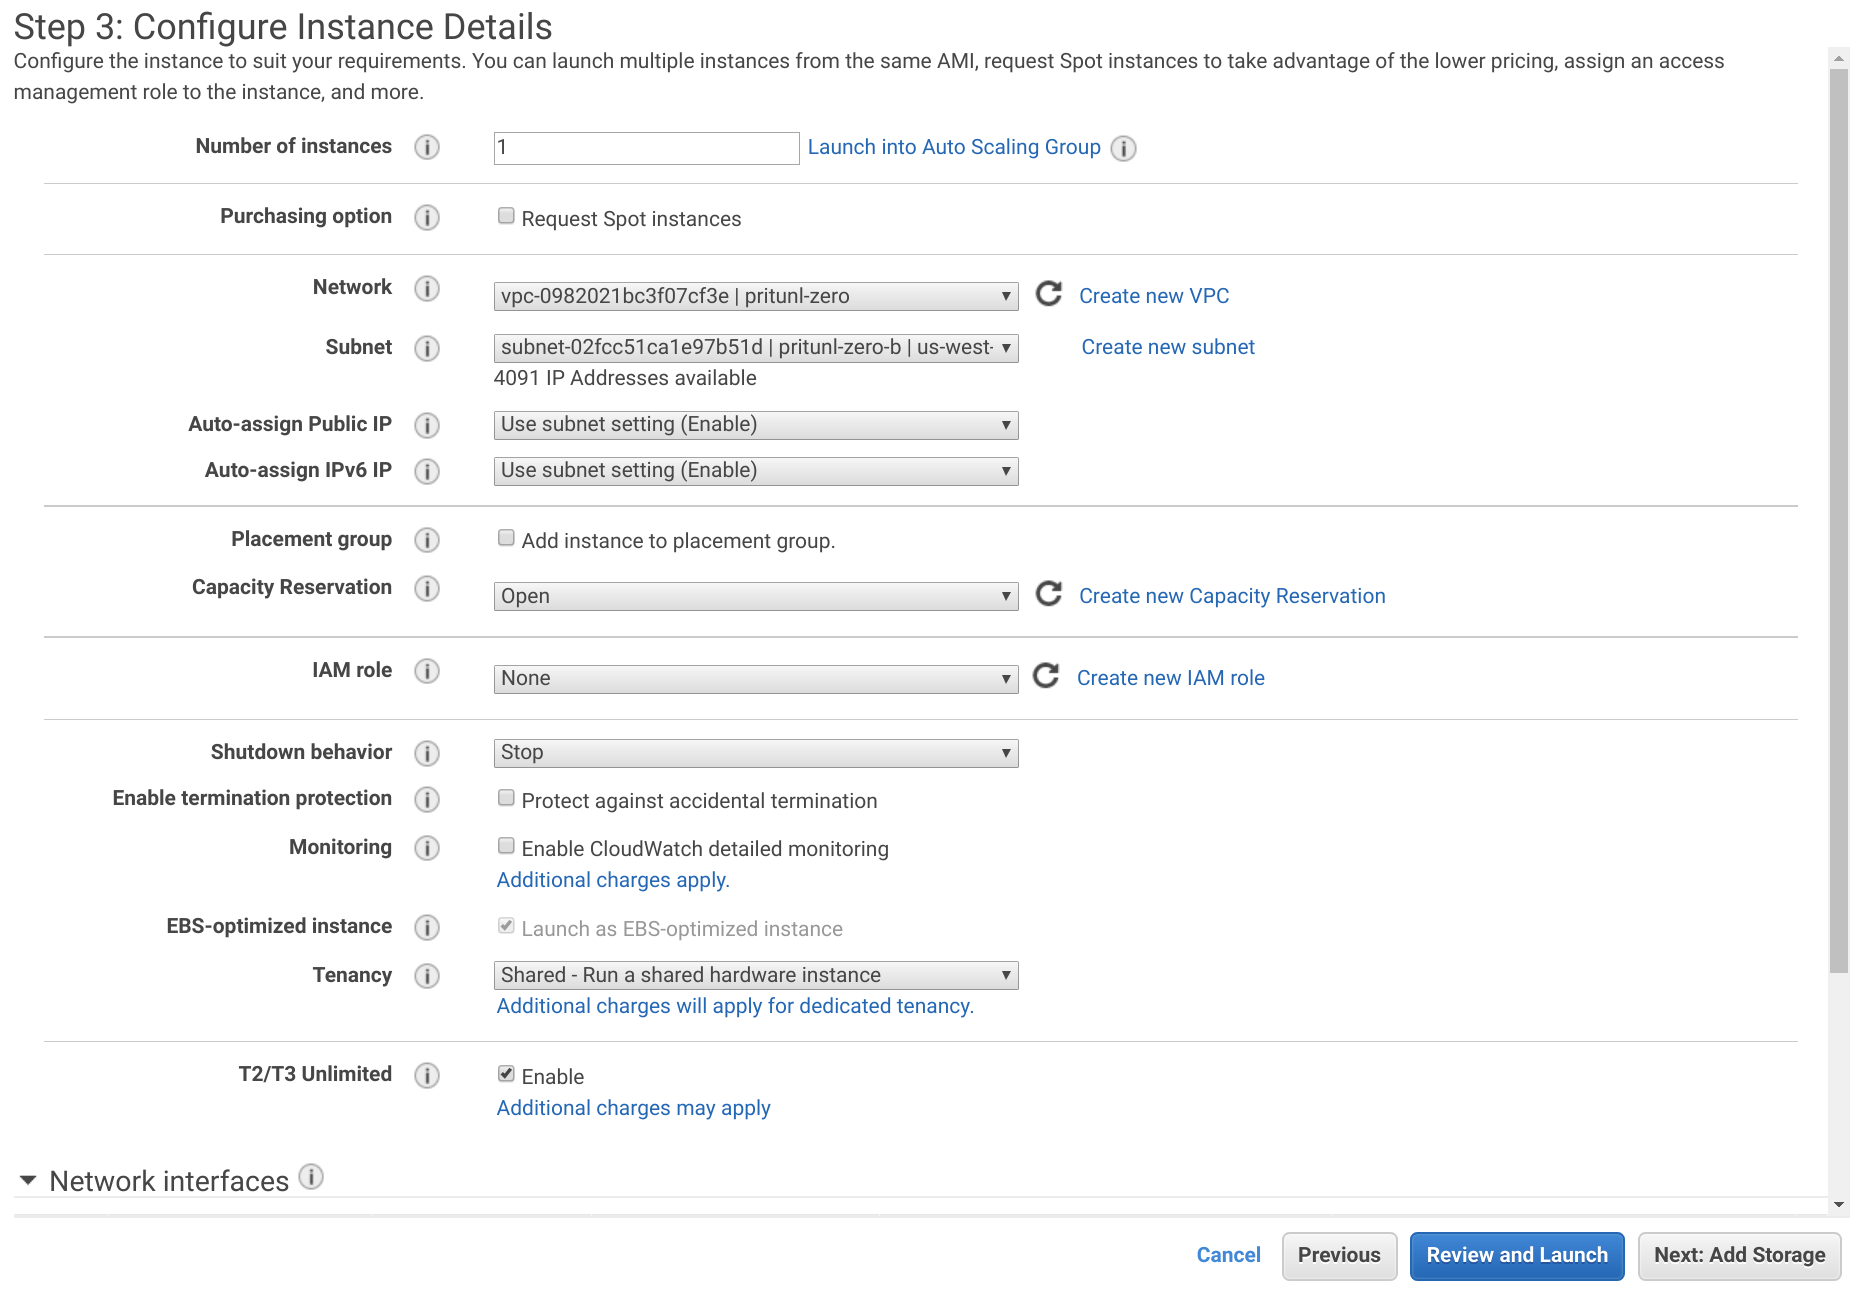
From the EC2 Dashboard click Launch Instance. Select Amazon Linux 2 AMI and set the Instance Type to t3-small. Then click Next: Configure Instance Details.
Set the Network to the VPC created above and the Subnet to pritunl-zero-a.
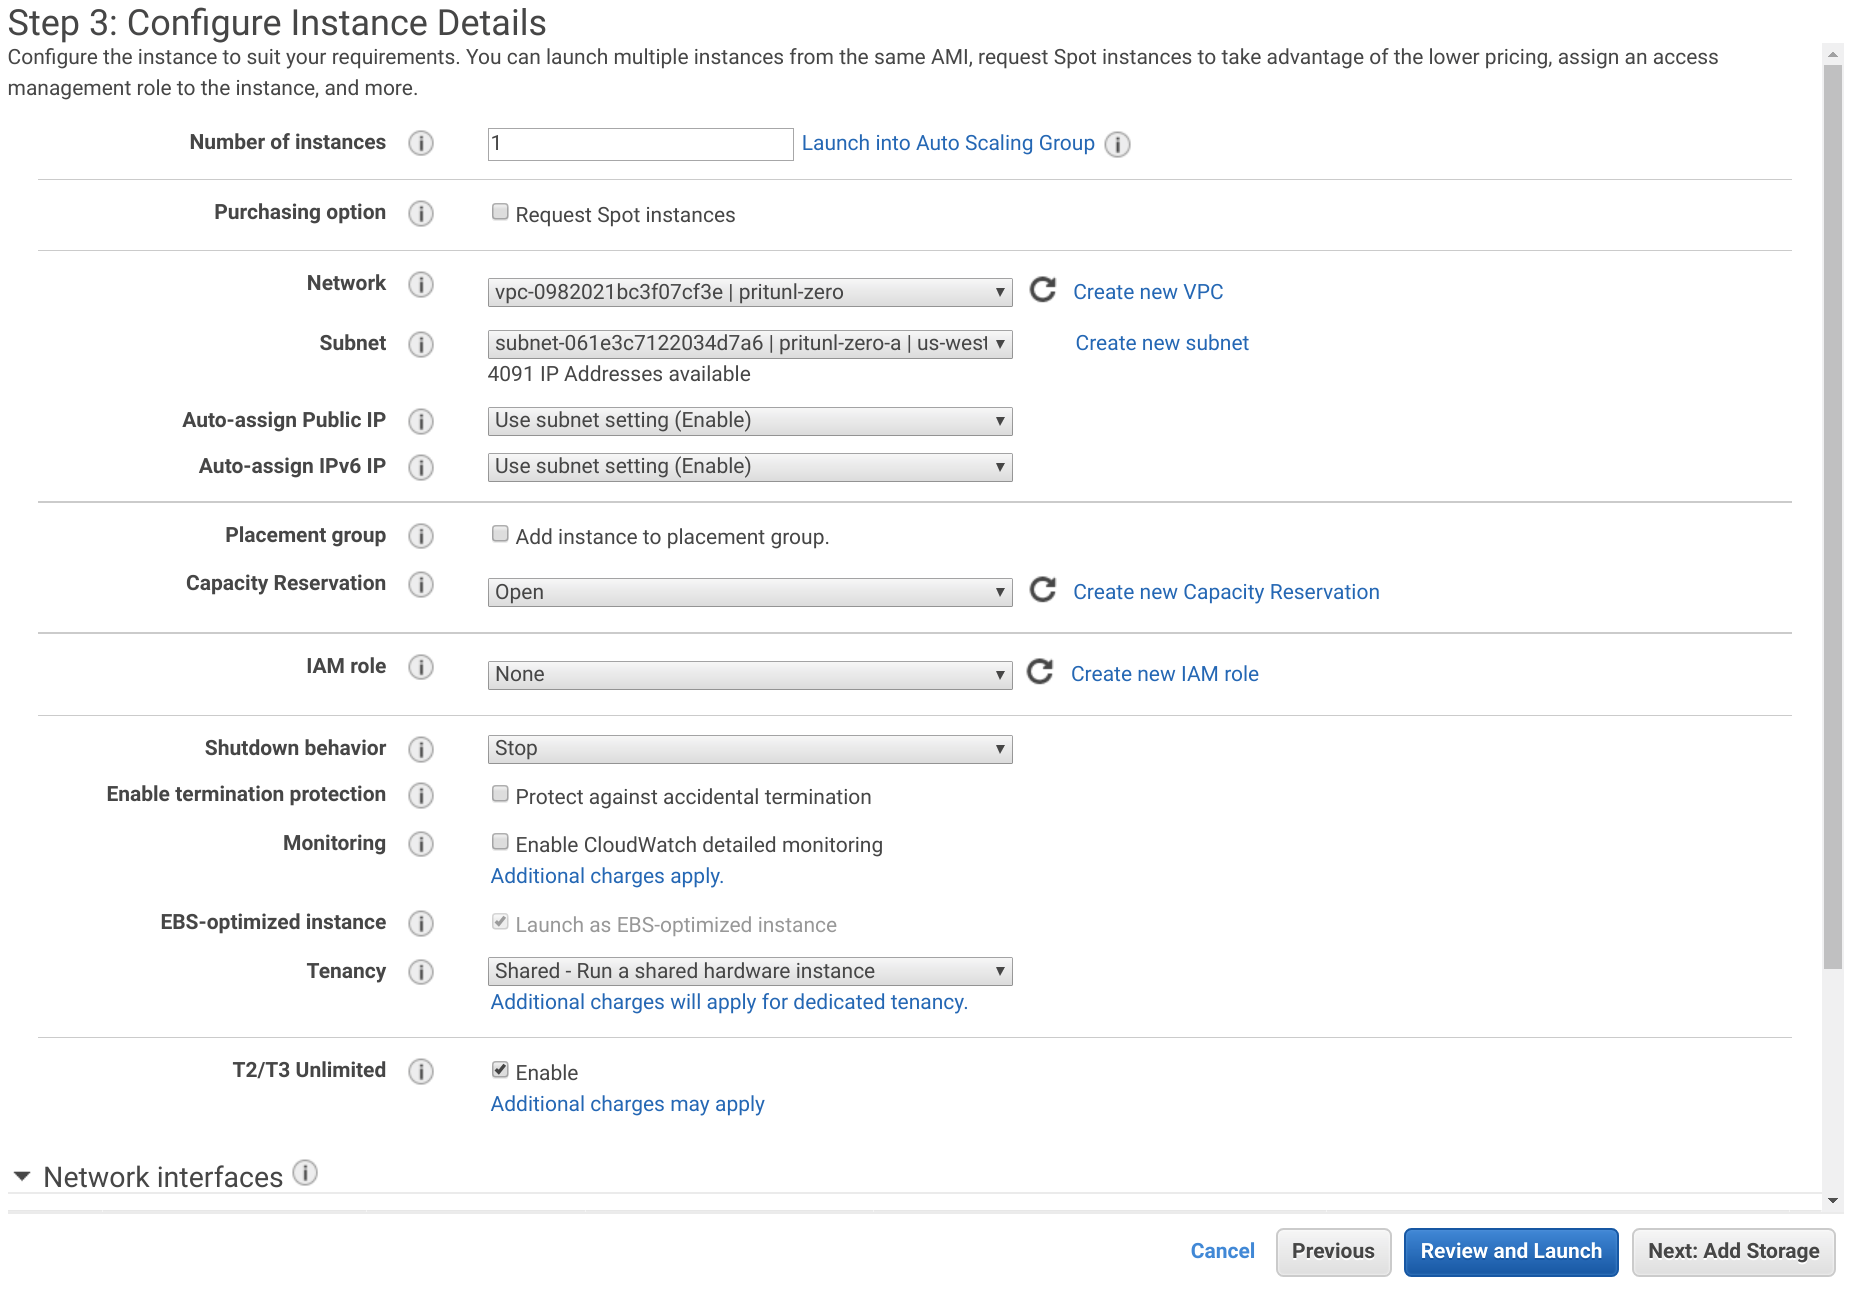
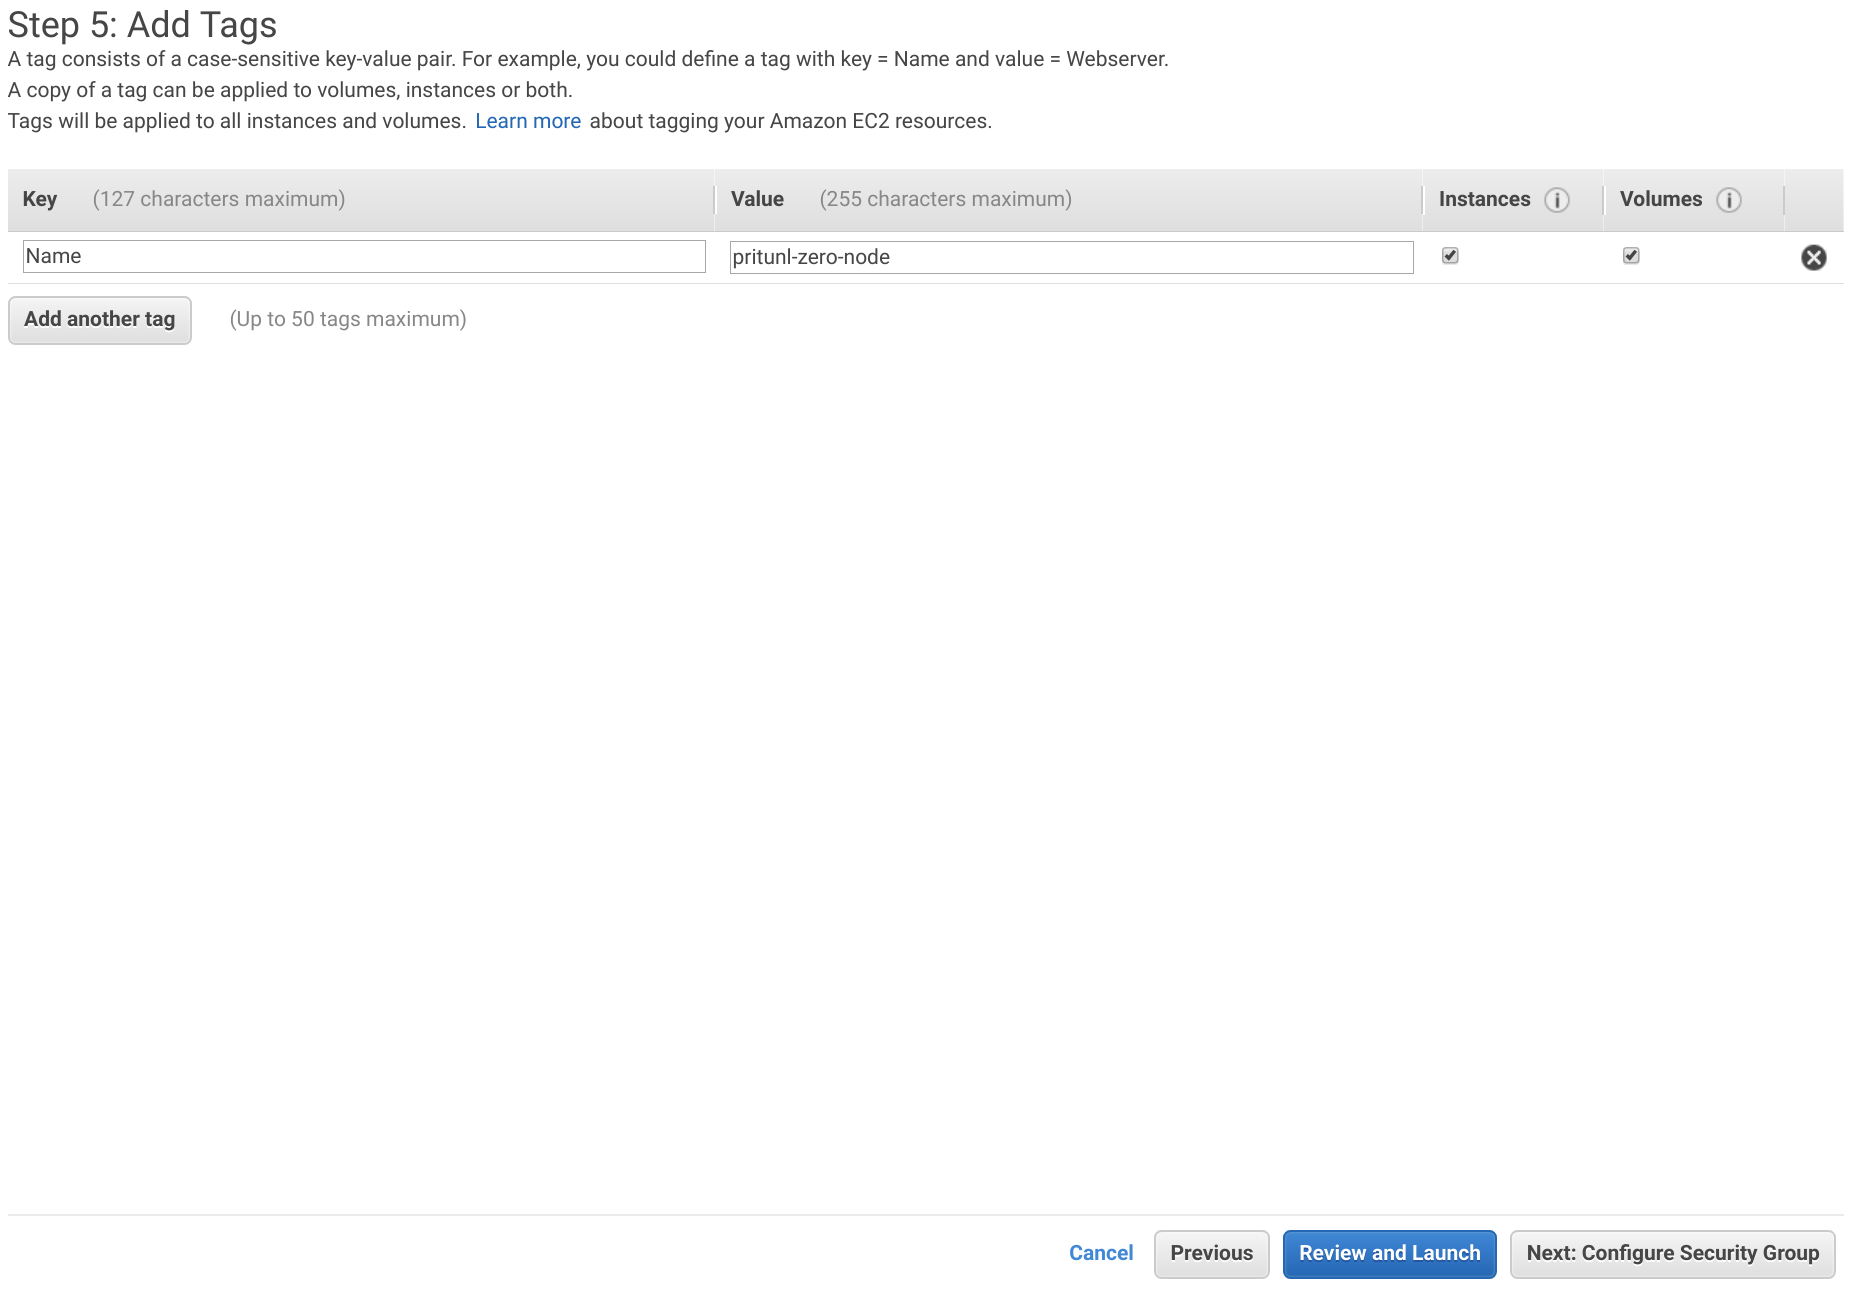
Click Next: Add Storage and then Next: Add Tags. Add a tag with the Key set to Name and the Value set to pritunl-zero-node. Then click Next: Configure Security Groups.
Click Select an existing security group and select pritunl-zero-node. Then click Review and Launch.
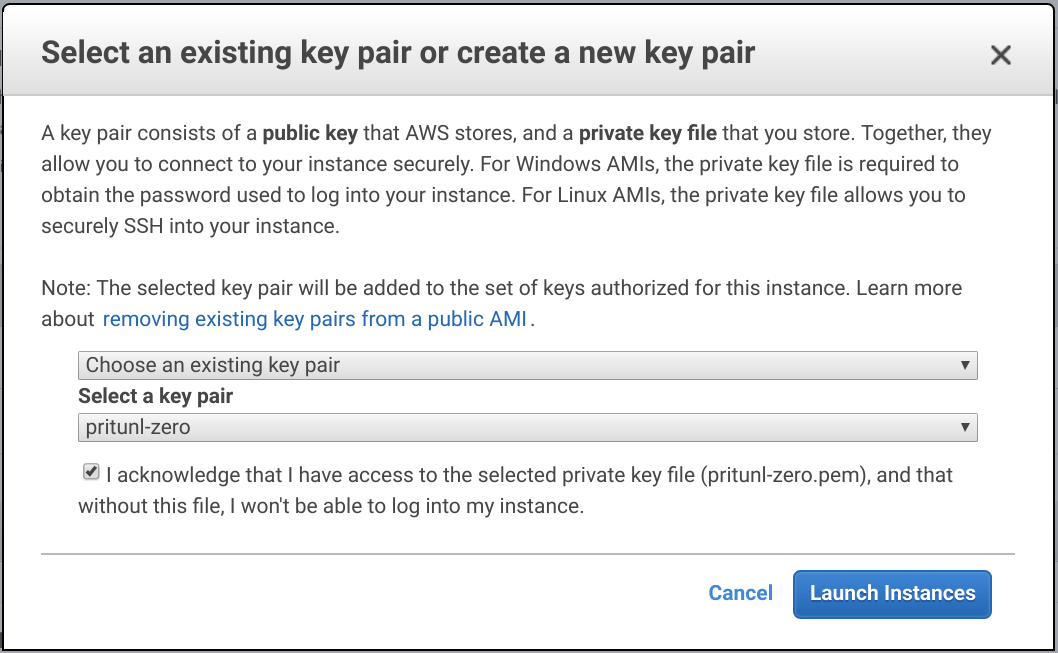
Click Launch and select the pritunl-zero key pair and click Launch Instances.
Repeat the steps above to create an additional instance in the pritunl-zero-b subnet.
Create MongoDB Replica Set
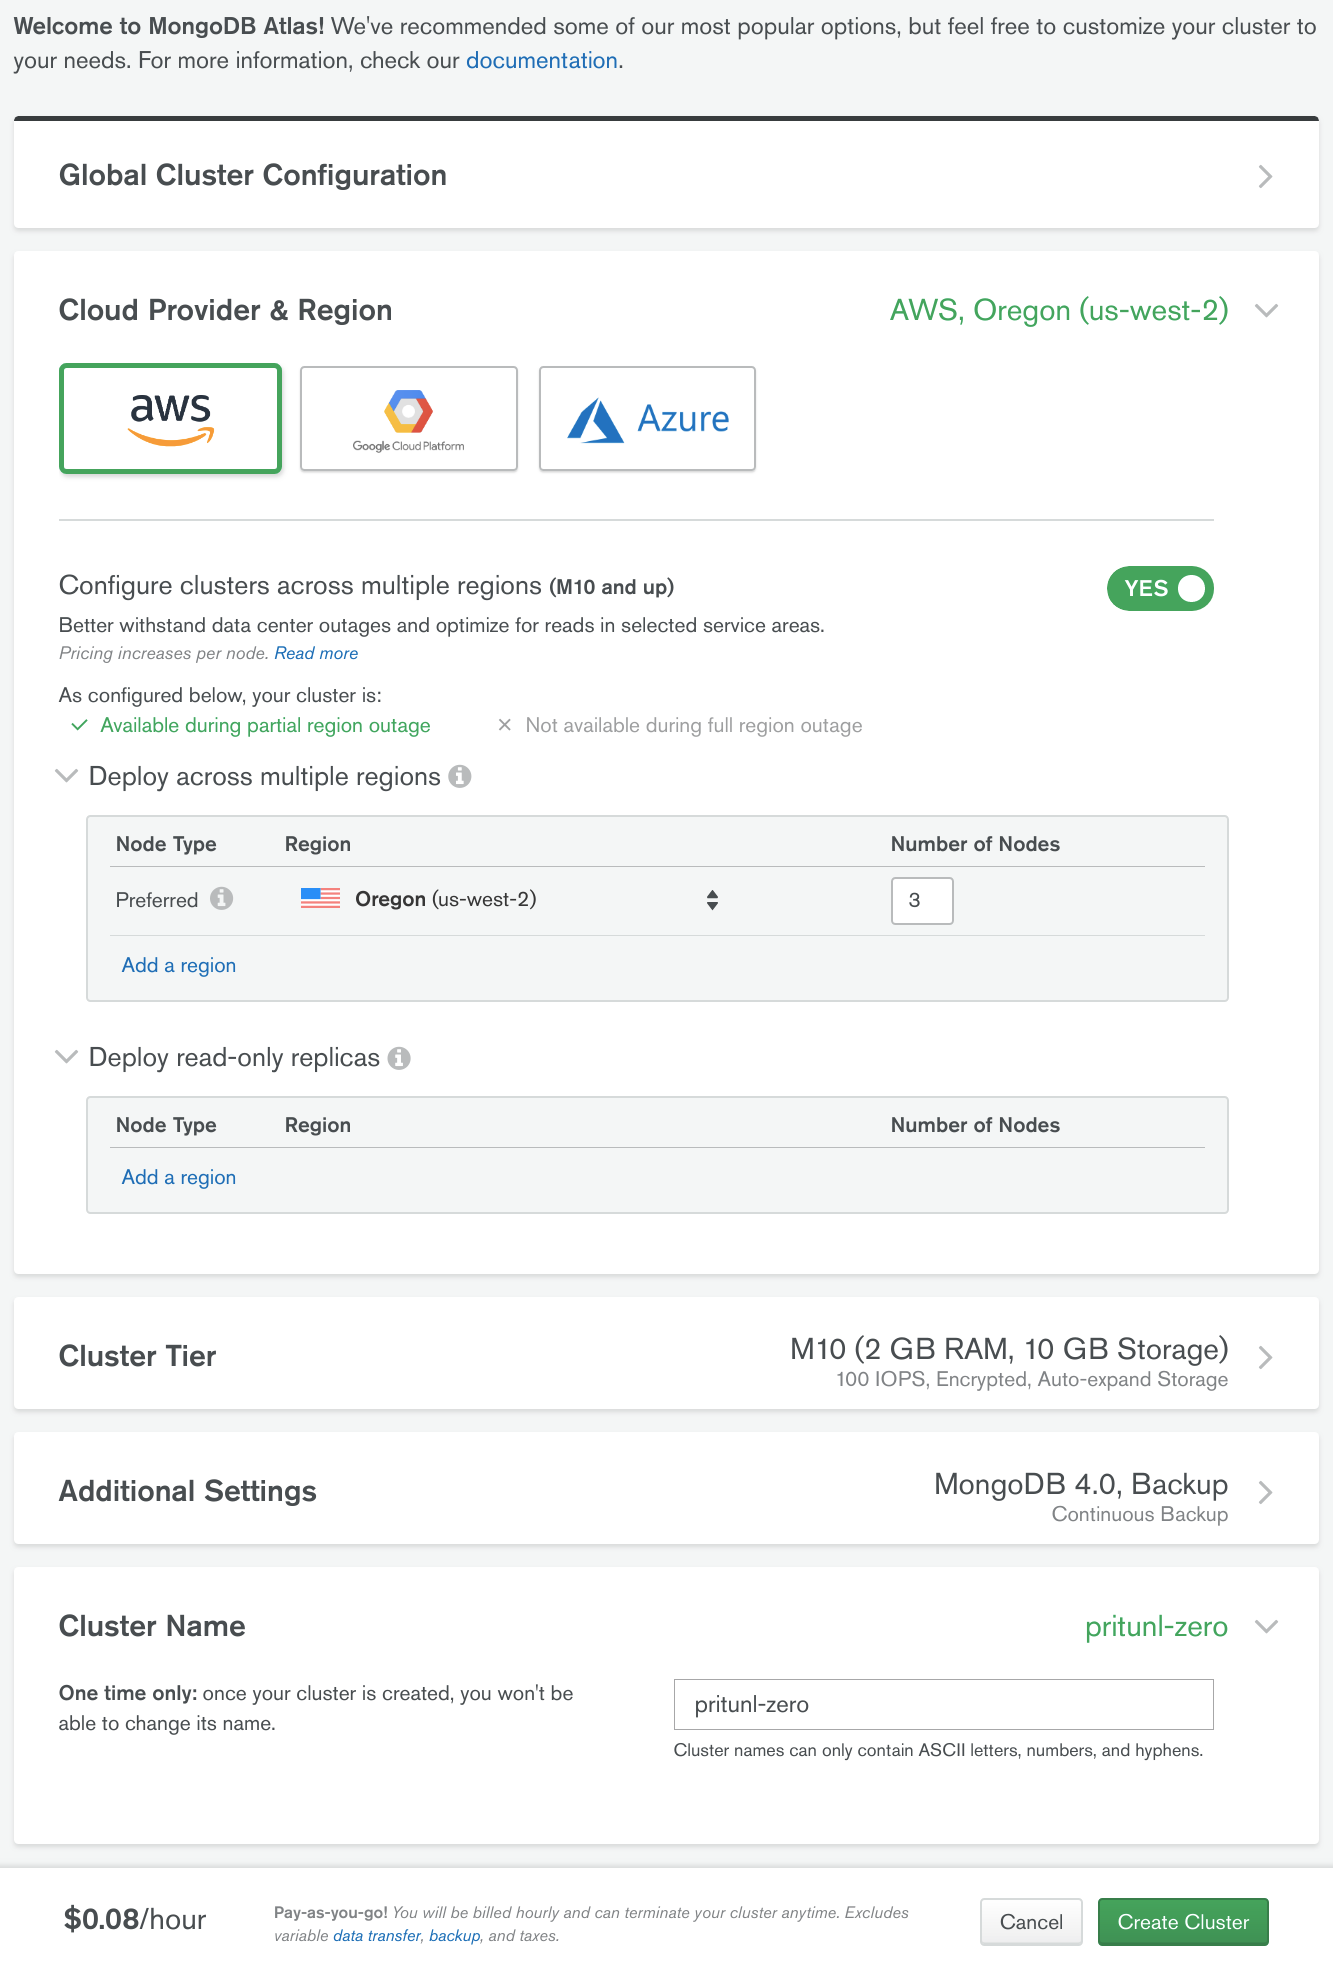
In this tutorial an M10 MongoDB Atlas cluster will be used. This will provide a three node MongoDB replica set that can handle a single availability zone outage. The Atlas cluster will run on AWS in the same region and connections will occur over a secure VPC peering link. Using MongoDB Atlas will provide a significantly more stable and secure cluster that is fully managed and automatically updated.
From the MongoDB Atlas dashboard in the Clusters tab click Build a New Cluster. If you are already using Atlas create a new project for Pritunl Zero. Then enable Configure clusters across multiple regions then set the Region to the same as the VPC above. For this tutorial us-west-2 was used. Set Number of Nodes to 3 and set the Cluster Name to pritunl-zero. Then click Create Cluster.
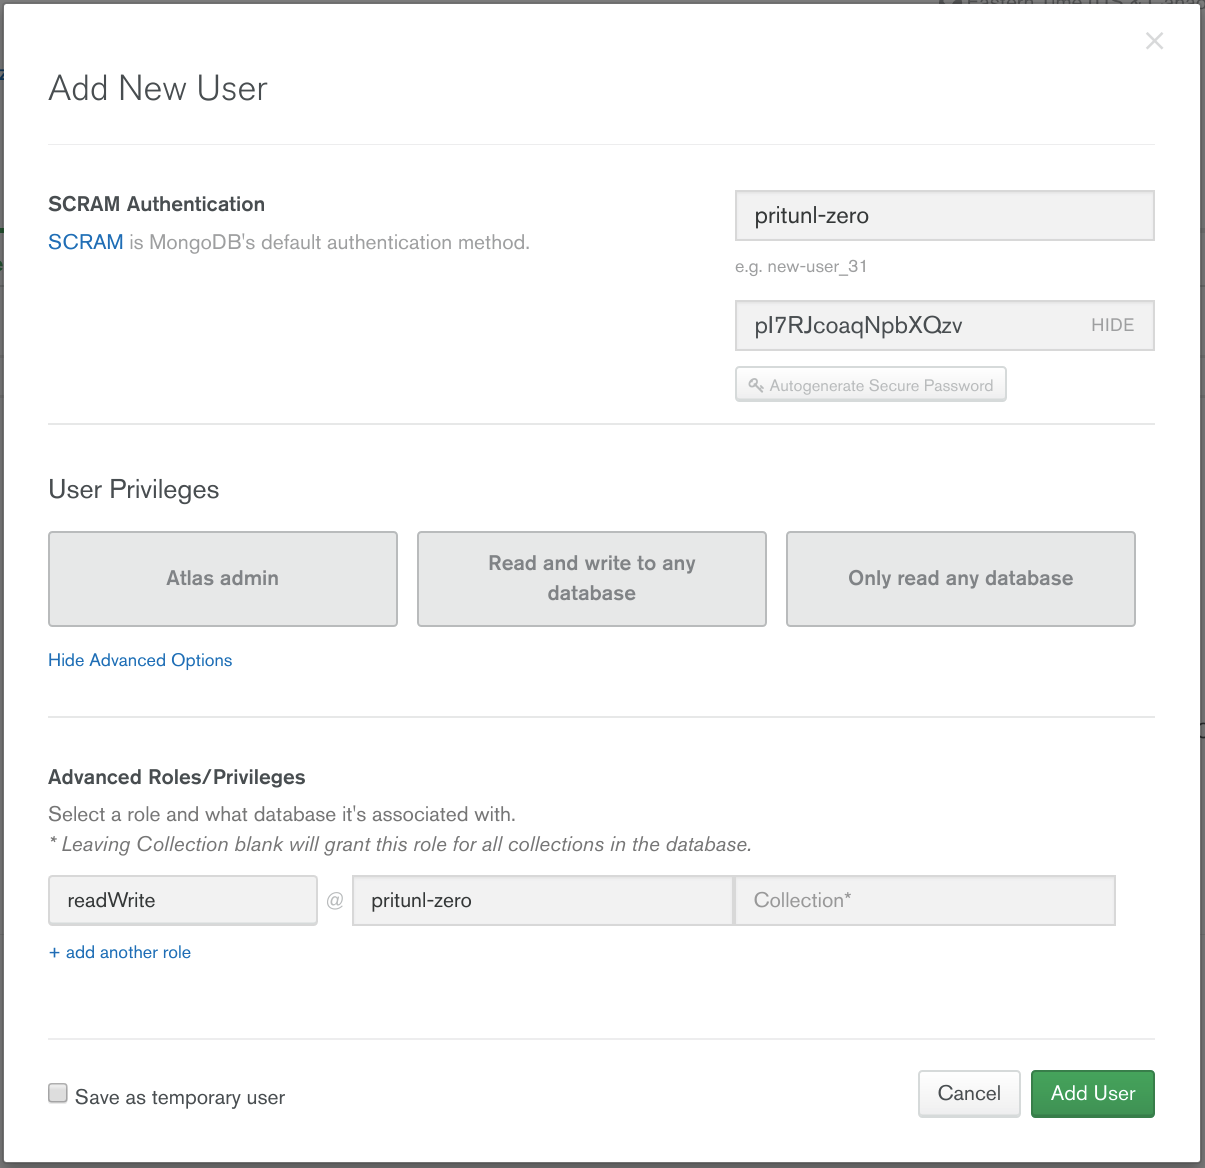
Open the Security tab then click Add New User. Set the Username to pritunl-zero then click Autogenerate Secure Password and Show. Copy the password for the steps below. Then click Show Advanced Options and set the Role to readWrite and the Database to pritunl-zero. Then click Add User.
Open the Peering tab in the Security section and click New Peering Connection. Then from the AWS Management Console open the user menu in the top right and click My Account and copy the Account ID to the Atlas Account ID field. Open the VPC Dashboard and click on the VPC create above and copy the VPC ID to the Atlas VPC ID field. Set the VPC CIDR to 172.20.0.0/16. Set the Application VPC Region to the VPC region in this tutorial us-west-2 is used. Then click Initiate Peering.
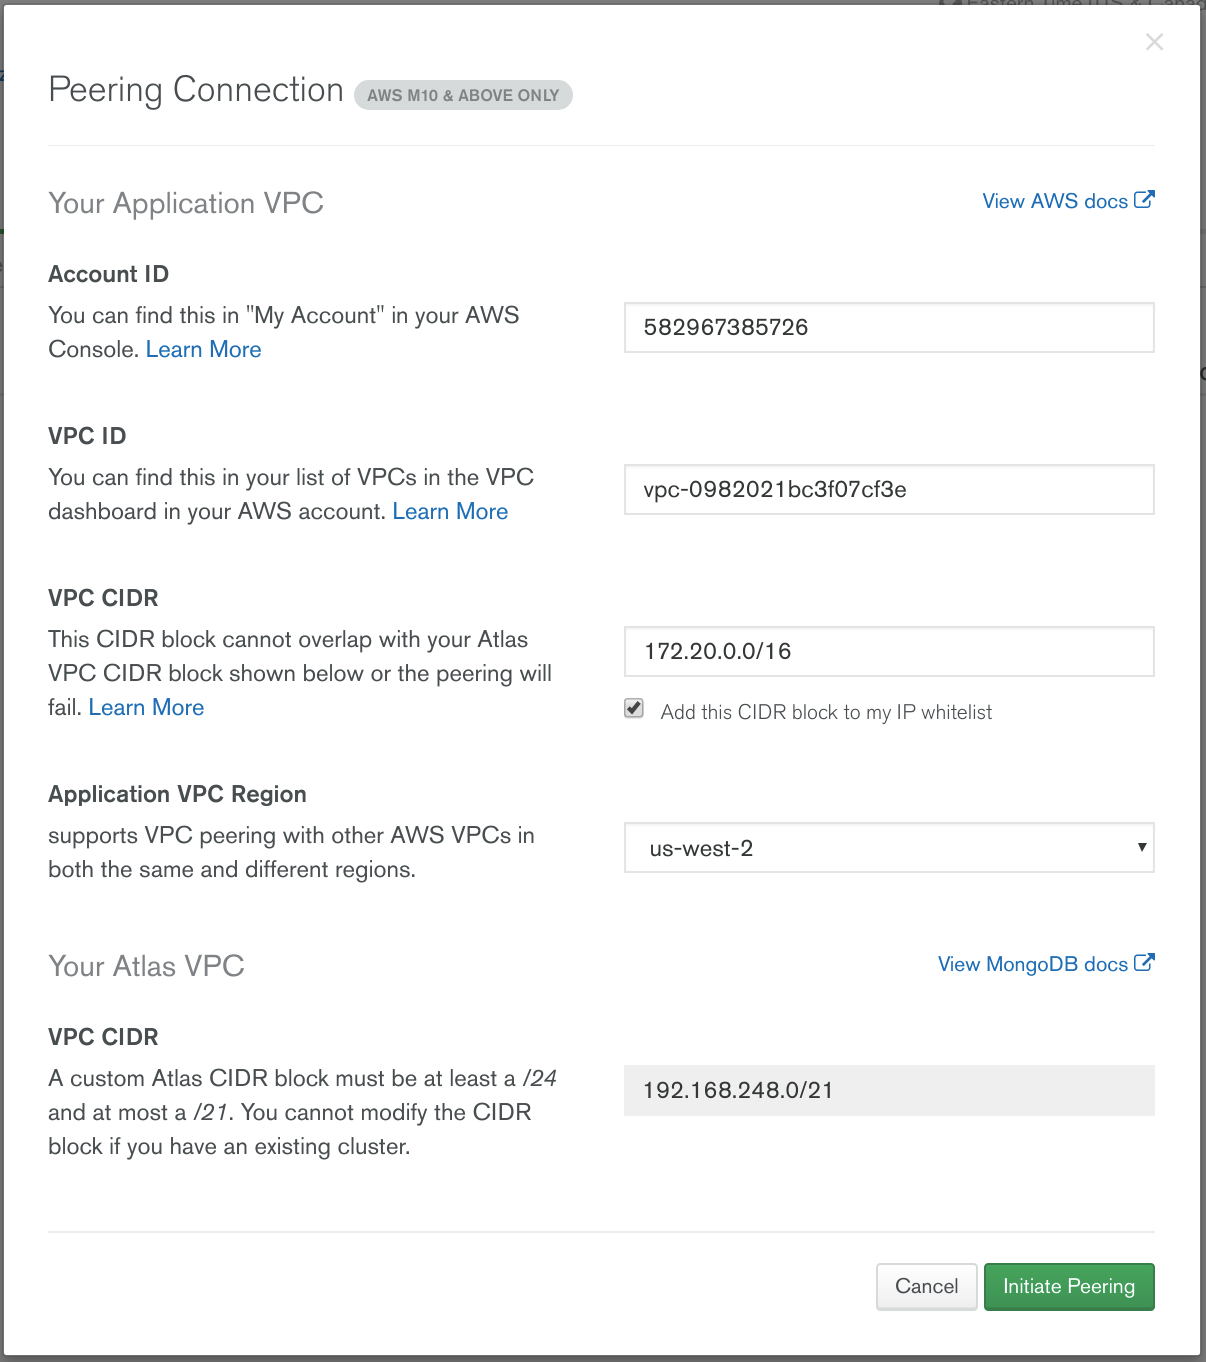
Wait a few seconds until the status of the VPC peering changes to Waiting for Approval. Then open the VPC Dashboard and go to Peering Connections. Right click the pending peering connection and click Accept Request. Then click Yes, Accept.

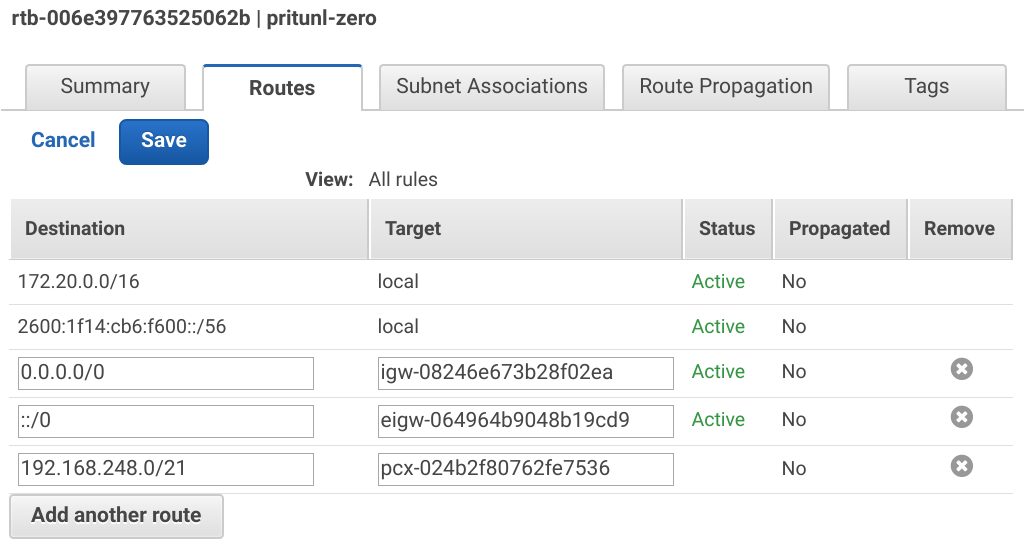
In the VPC Dashboard open the Route Tables tab and select the VPC created above. Then open the Routes tab and click Add another route. Set the Destination to the Atlas CIDR shown on the MongoDB Atlas dashboard. In this example the Atlas CIDR is 192.168.248.0/21. Then set the Target to the pcx peering connection and click Save.
Install Pritunl Zero
Open an SSH connection to the two pritunl-zero-node instances using the username ec2-user. Then use the commands below to install Pritunl Zero and Docker.
ssh ec2-user@123.123.123.123

sudo yum -y update
sudo tee /etc/yum.repos.d/pritunl.repo << EOF
[pritunl]
name=Pritunl
baseurl=https://repo.pritunl.com/stable/yum/amazonlinux/2/
gpgcheck=1
enabled=1
EOF

gpg --keyserver hkp://keyserver.ubuntu.com --recv-keys 7568D9BB55FF9E5287D586017AE645C0CF8E292A
gpg --armor --export 7568D9BB55FF9E5287D586017AE645C0CF8E292A > key.tmp; sudo rpm --import key.tmp; rm -f key.tmp
sudo yum -y install pritunl-zero docker
In the MongoDB Atlas Dashboard open the Overview tab in the Clusters section. Then click Connect on the pritunl-zero cluster. Then click Connect Your Application. Select Standard connection string and copy the connection string. Remove &retryWrites=true from the string, replace the /test database with /pritunl-zero and replace <PASSWORD> in the string with the password of the user created above. Then run the commands below on both Pritunl Zero servers to configure and start Pritunl Zero.
sudo pritunl-zero mongo "mongodb://pritunl-zero:<PASSWORD>@pritunl-zero-shard-00-00-ni77x.mongodb.net:27017,pritunl-zero-shard-00-01-ni77x.mongodb.net:27017,pritunl-zero-shard-00-02-ni77x.mongodb.net:27017/pritunl-zero?ssl=true&replicaSet=pritunl-zero-shard-0&authSource=admin"

sudo systemctl start pritunl-zero docker
sudo systemctl enable pritunl-zero docker
Create Web Load Balancer
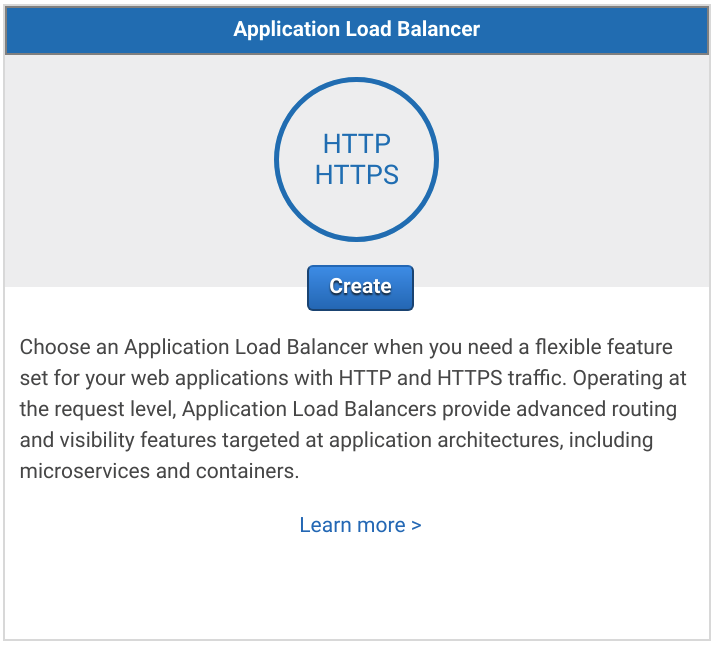
In the EC2 Dashboard open the Load Balancers tab and click Create Load Balancer. Select Application Load Balancer and click Create.
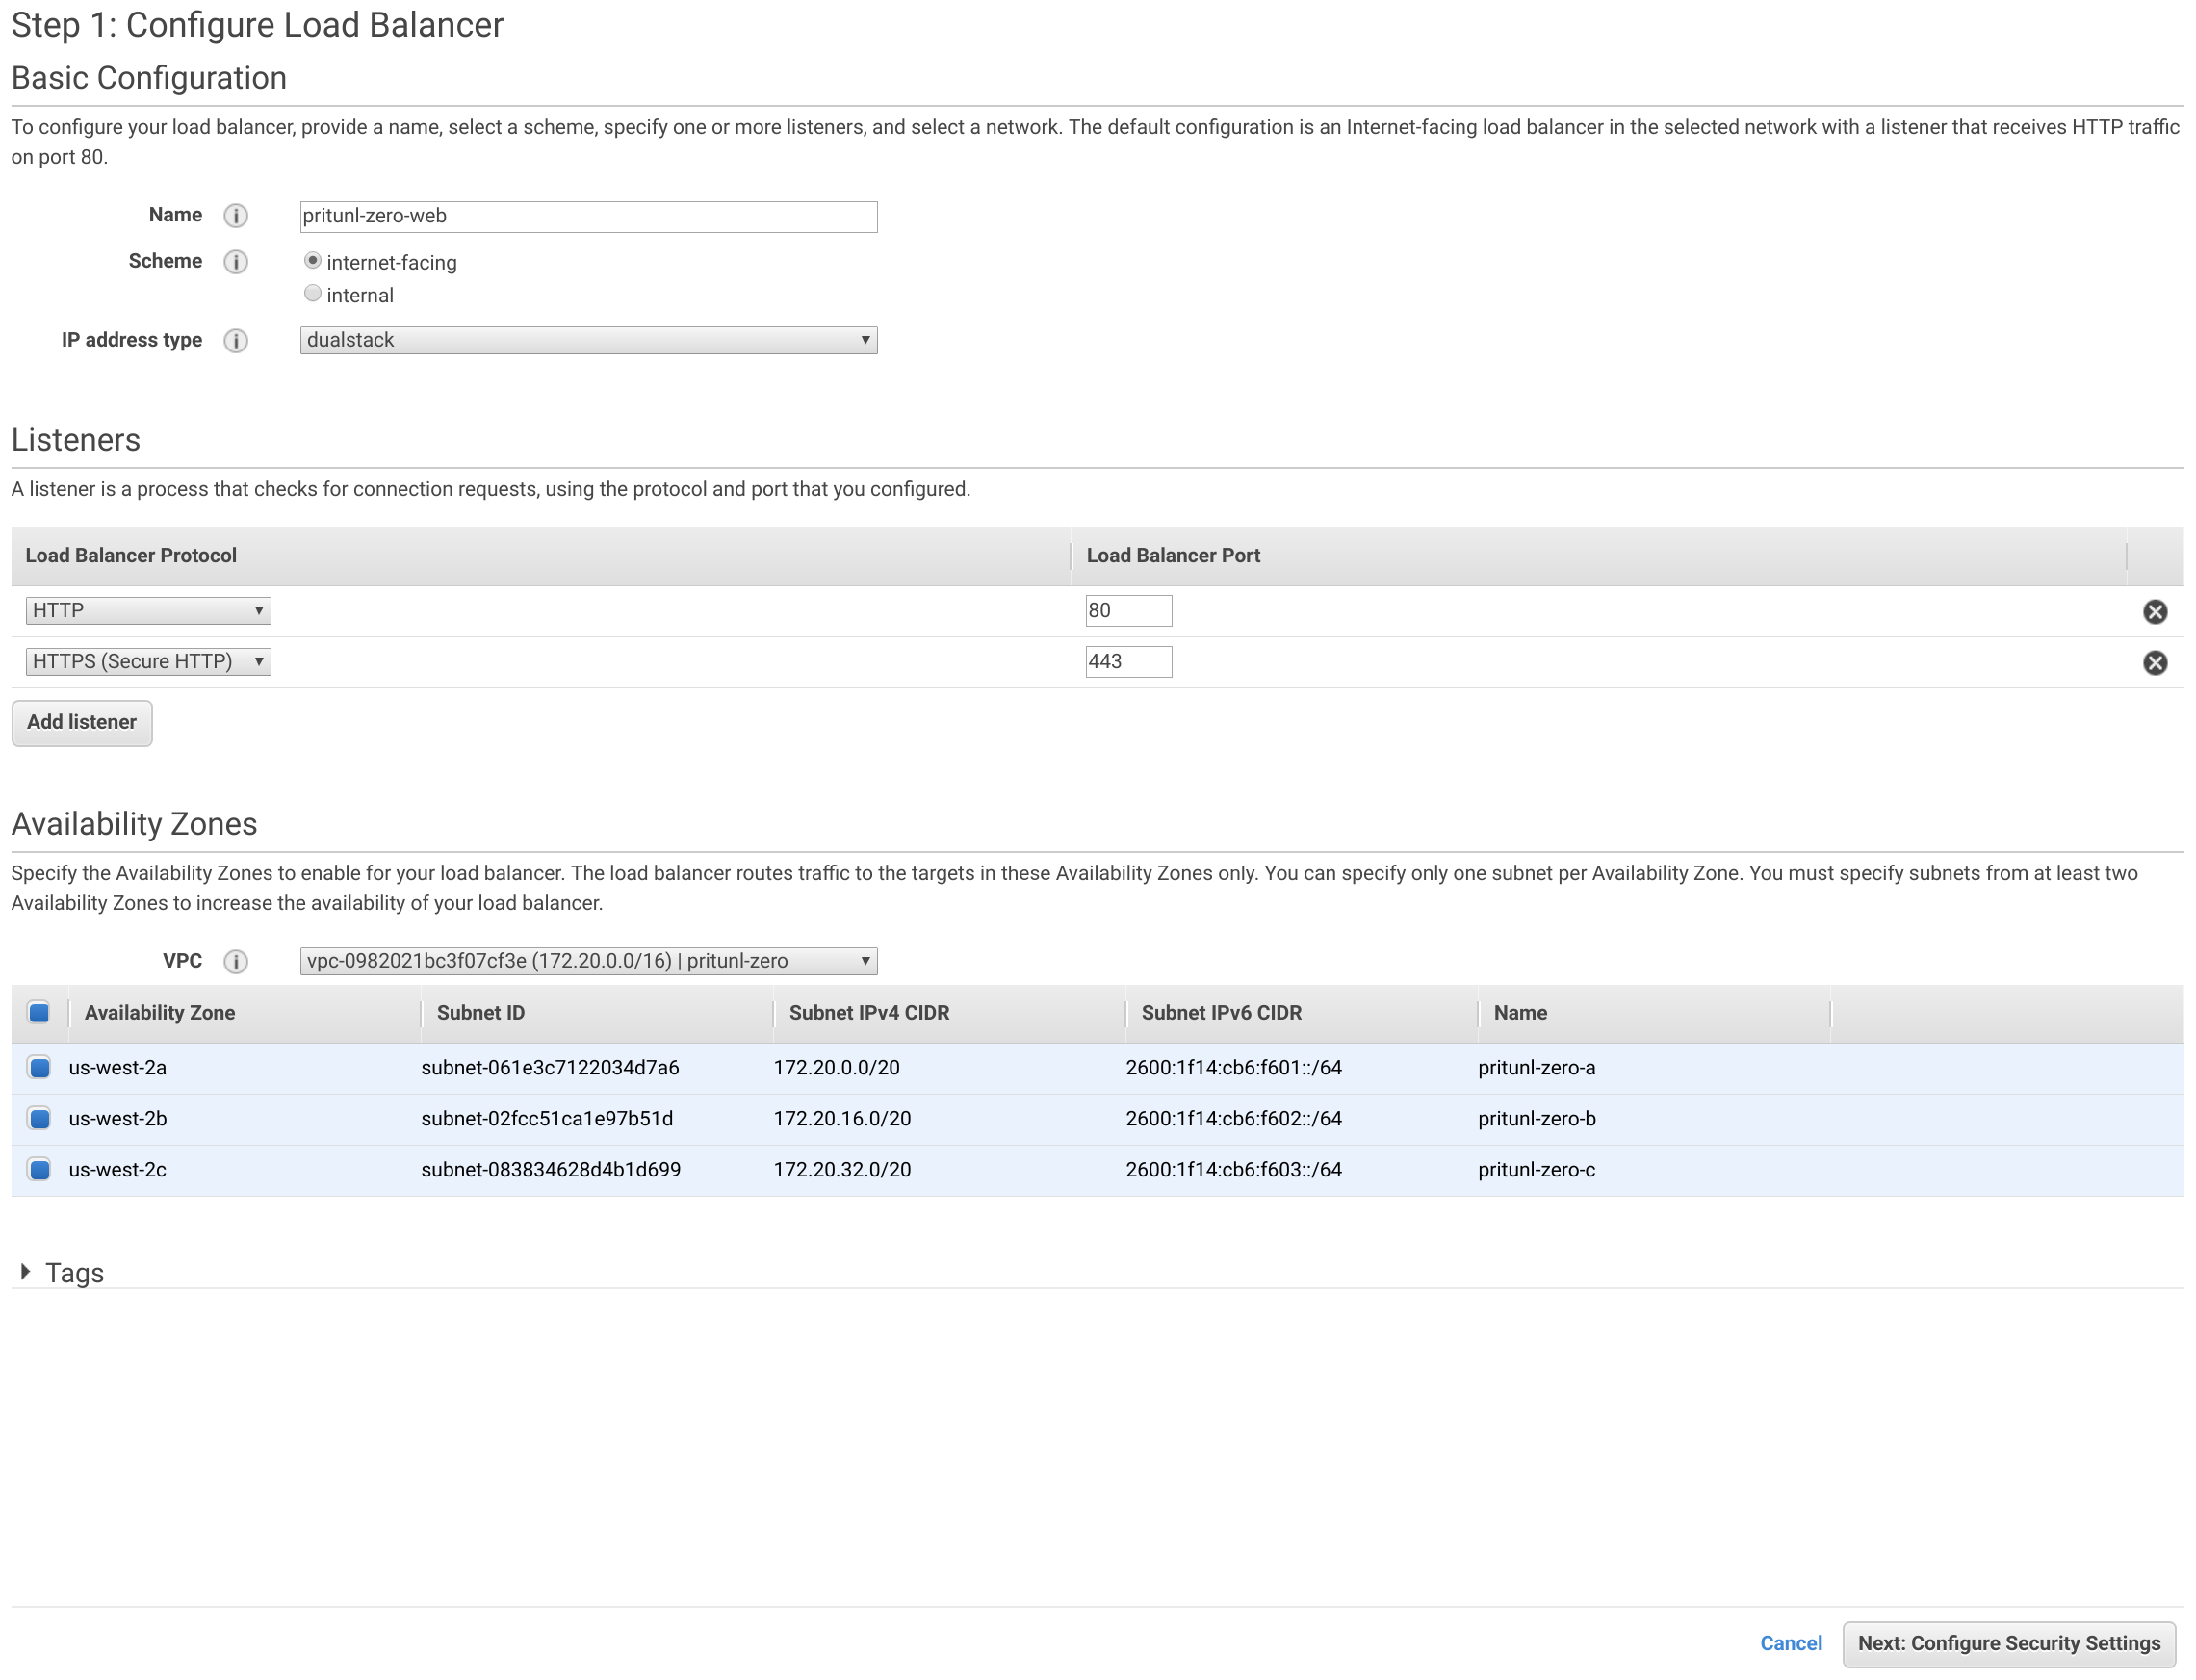
Set the Name to pritunl-zero-web, Scheme to internet-facing and IP address type to dualstack. Then click Add listener and set the Load Balancer Protocol to HTTPS. Select the pritunl-zero VPC and select all Availability Zones. Then click Next: Configure Security Settings.
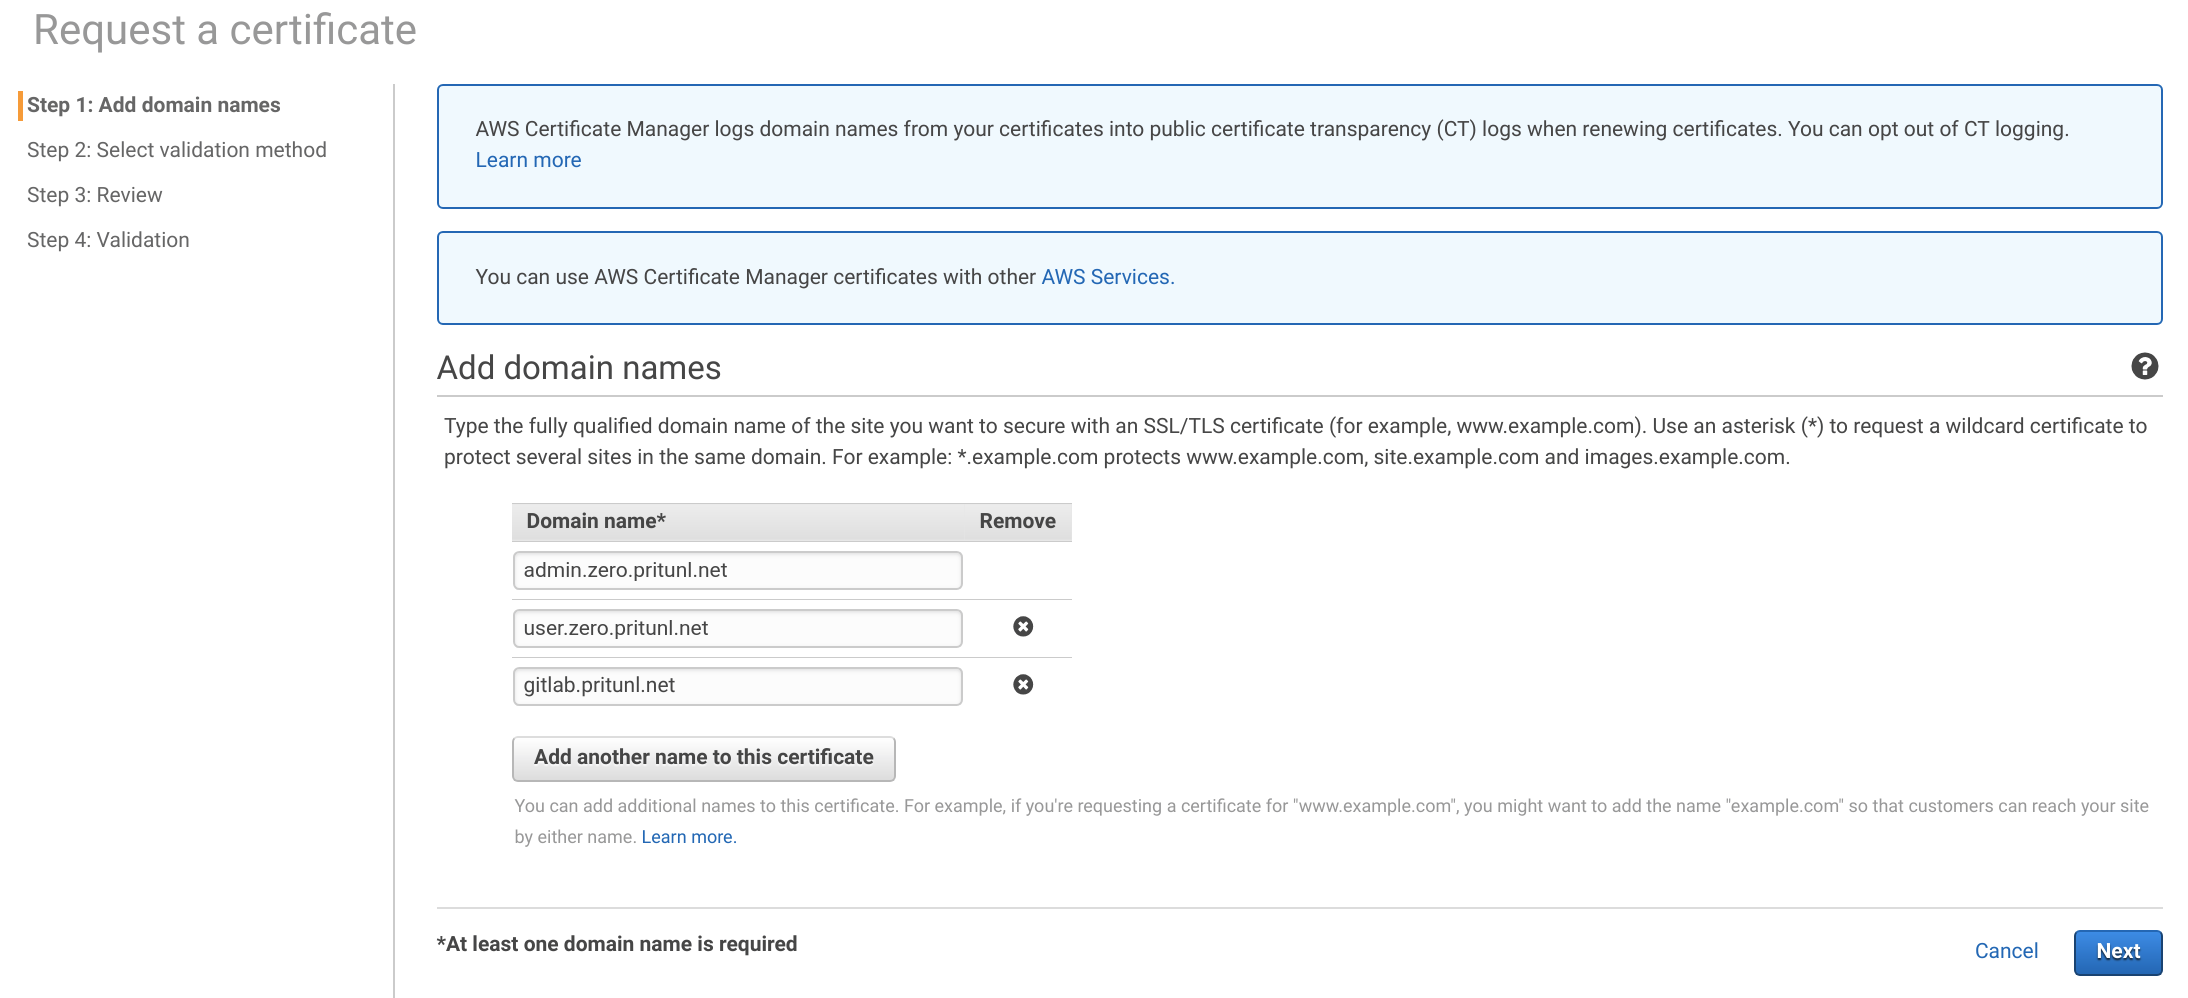
Click Request a new certificate from ACM then add the three domain names below. These will need to be changed to your top level domain. Then click Next.
admin.zero.pritunl.net
user.zero.pritunl.net
gitlab.pritunl.net
This lab will use DNS validation depending on the name server used it may be easier to use email validation. Select the method and click Review. Then click Confirm and request.

Expand the domains and add the required CNAME DNS records to your name server. If Route 53 is used you can click Create record in Route 53.
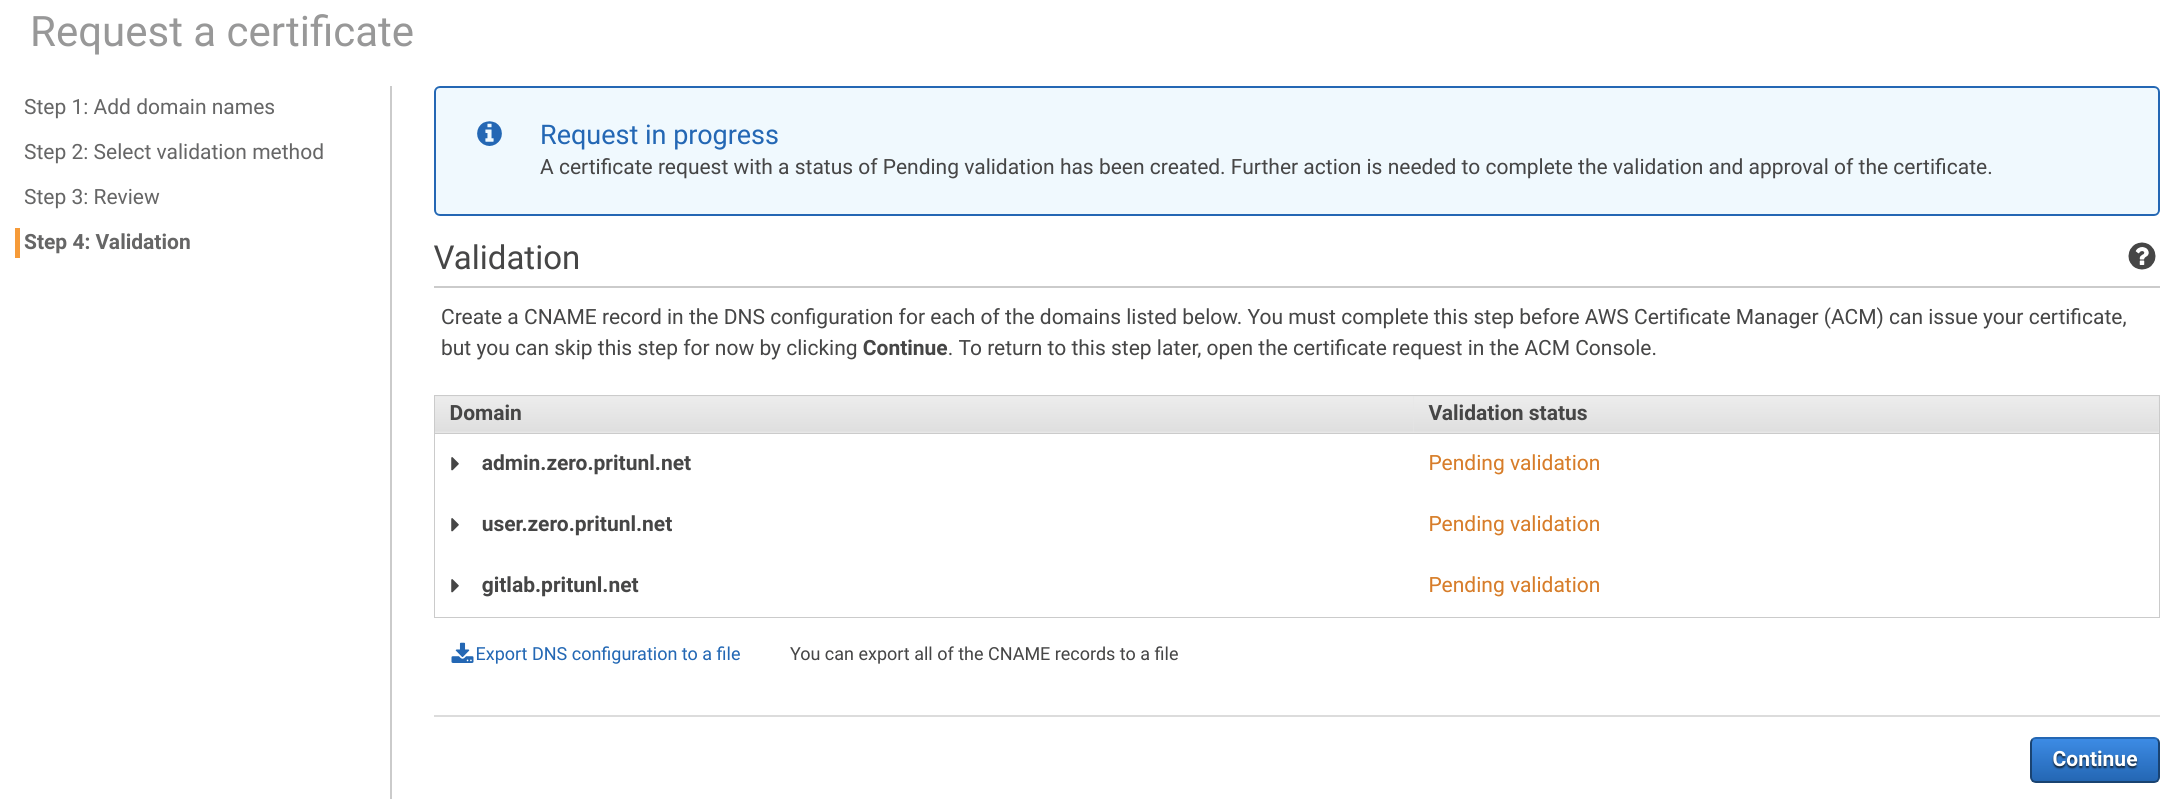
Back in the load balancer configuration page click the refresh button and set the Certificate name to the certificate created above. Then click Next: Configure Security Groups.

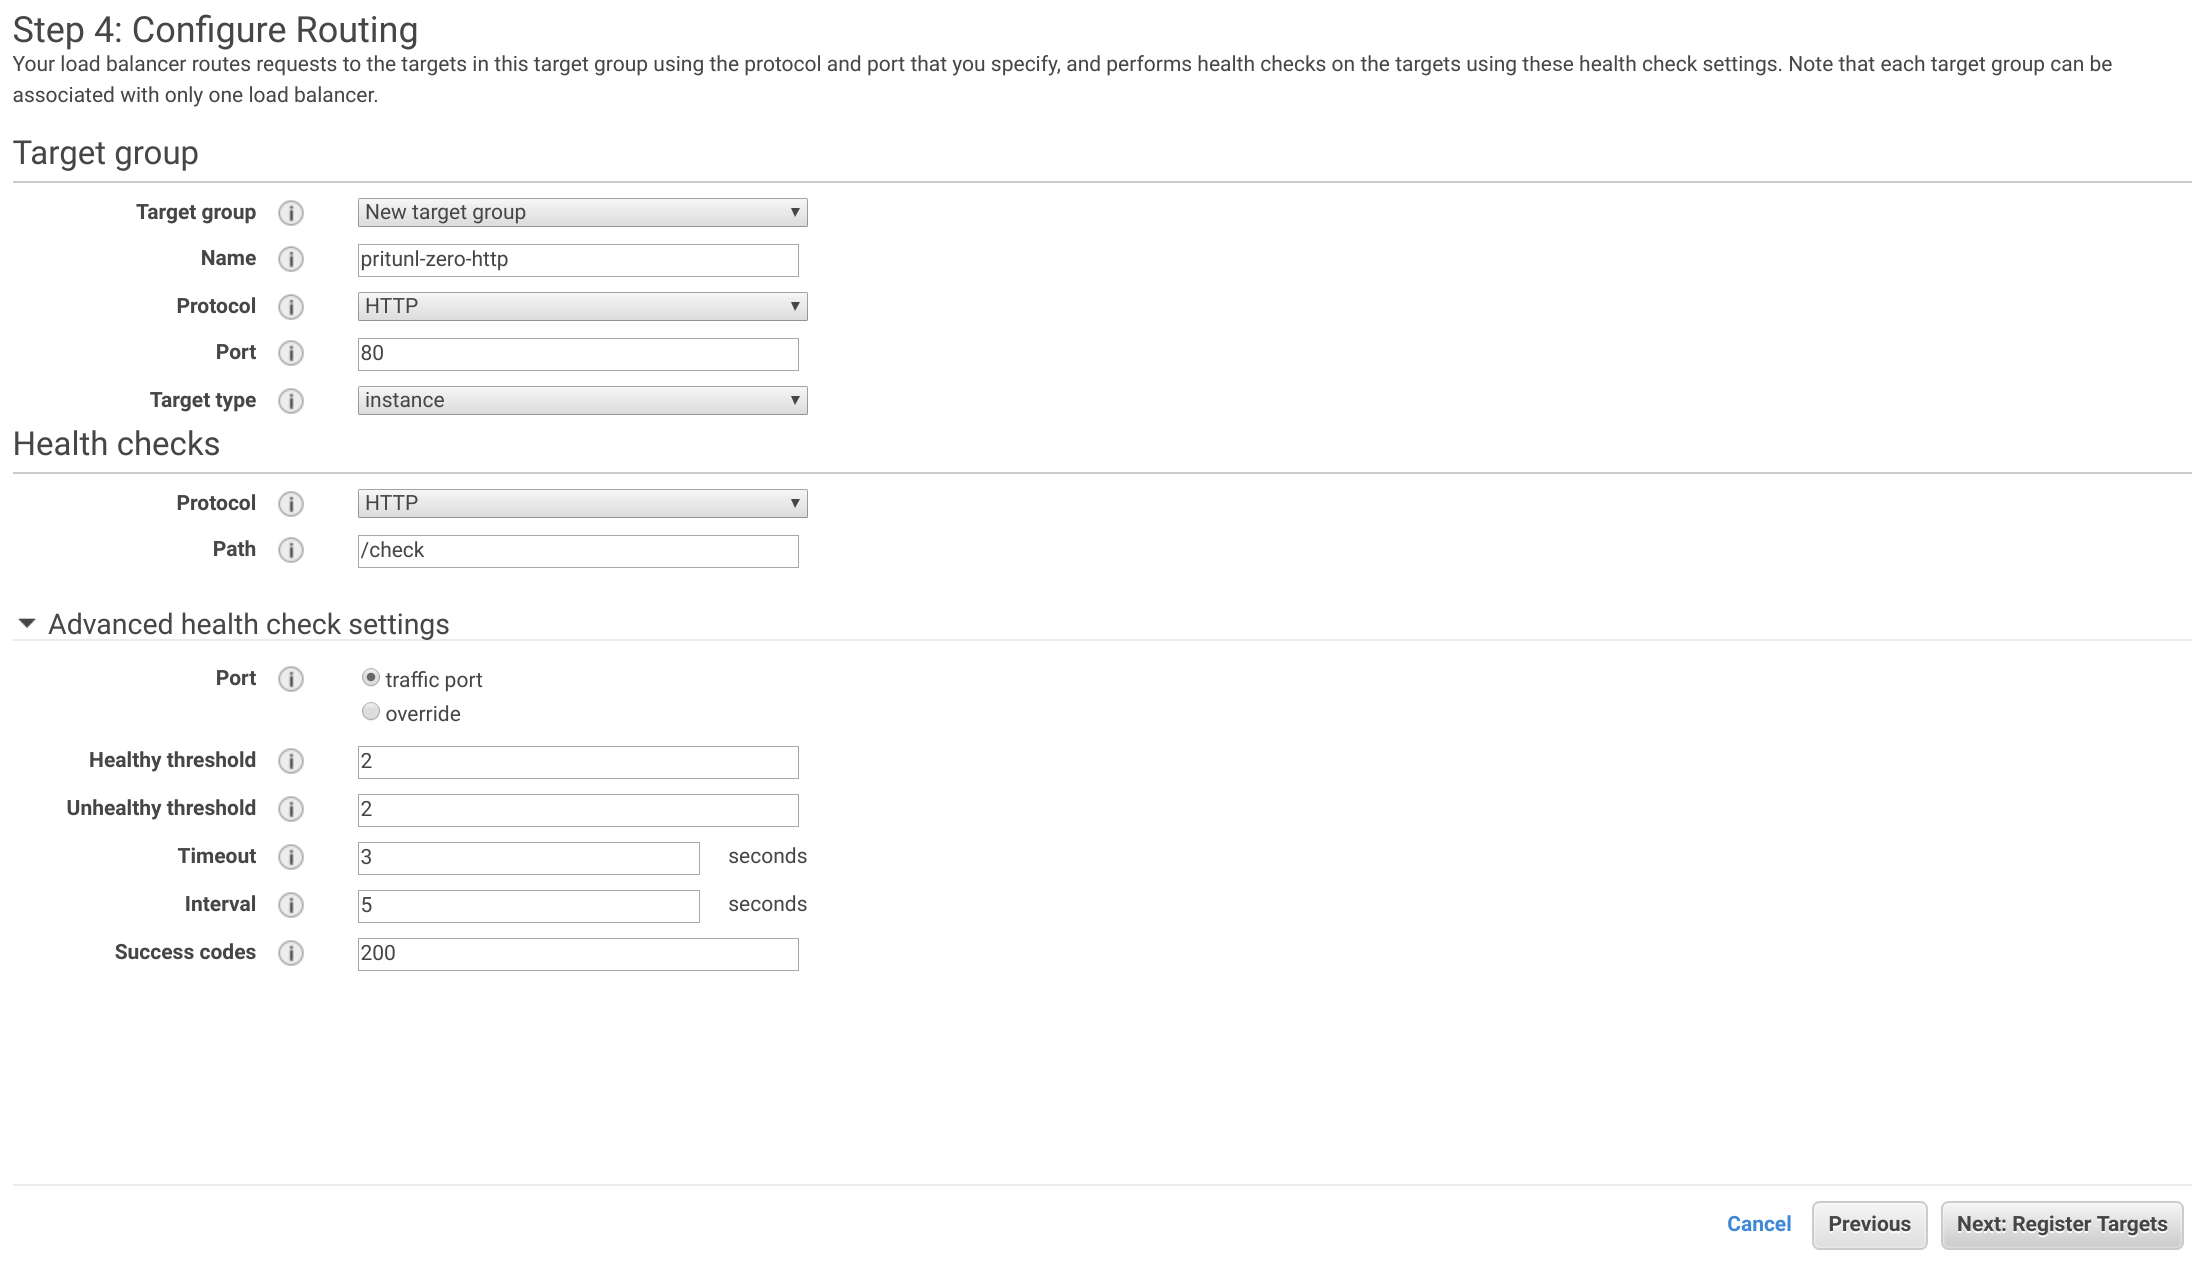
Select the pritunl-zero-lb-web security group and click Next: Configure Routing. Set the Name to pritunl-zero-http, Protocol to HTTP, Port to 80 and Target type to instance. Then set the health check Protocol to HTTP and the Path to /check. Open the Advanced health check settings and set the Healthy threshold to 2, Unhealthy threshold to 2, Timeout to 3 and Interval to 5. Then click Next: Register Targets.
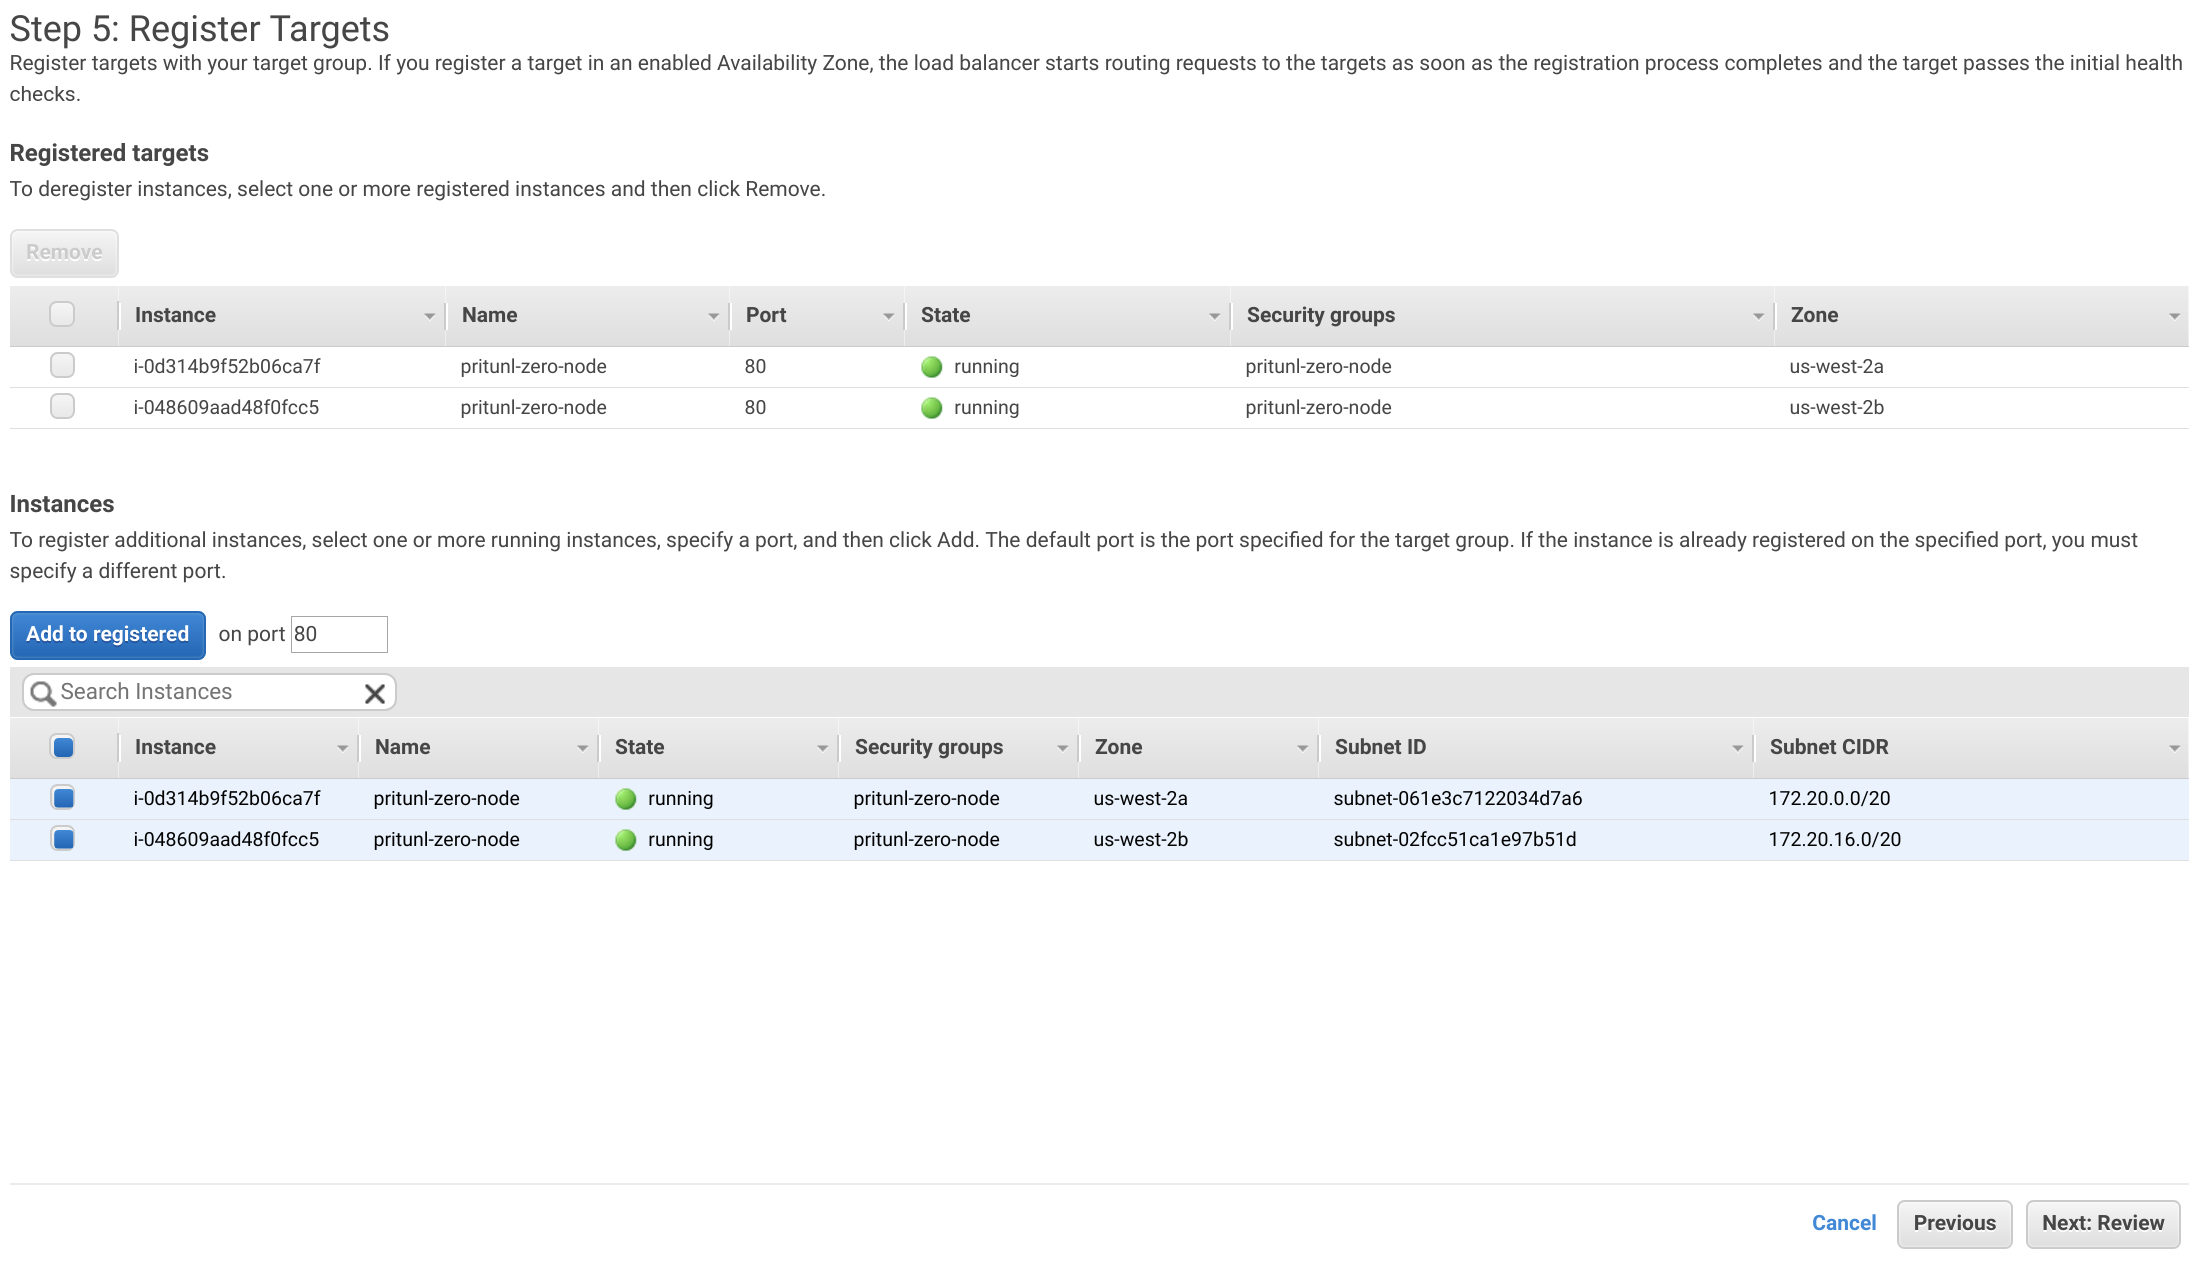
Select both the pritunl-zero-node instances then click Add to registered. Then click Next: Review and Create.
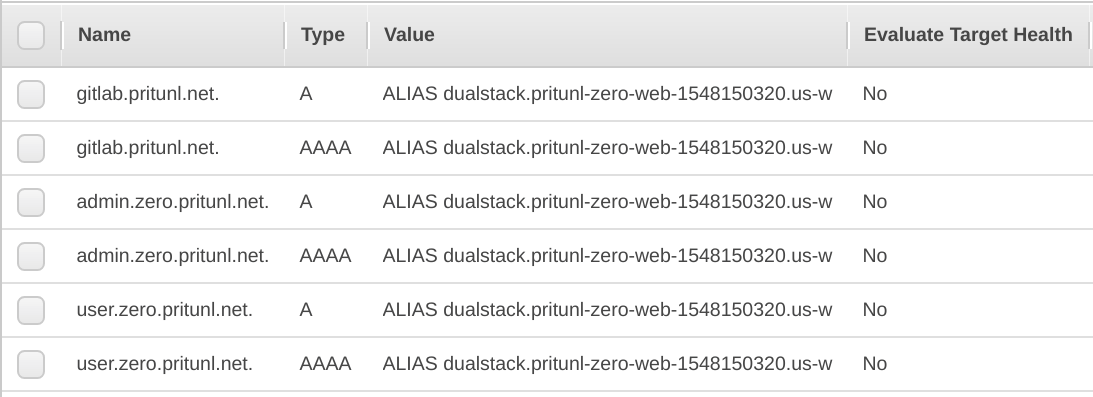
Copy the DNS name from the load balancer info page. Then create the three DNS records below pointing to the load balancer DNS name, replace the top level domain with your domain. If Route 53 is used add the A and AAAA alias records below for other registrars use the CNAME records.
Name: admin.zero.pritunl.net
Type: A
Alias: Yes
Target: dualstack.pritunl-zero-web
Name: admin.zero.pritunl.net
Type: AAAA
Alias: Yes
Target: dualstack.pritunl-zero-web
Name: user.zero.pritunl.net
Type: A
Alias: Yes
Target: dualstack.pritunl-zero-web
Name: user.zero.pritunl.net
Type: AAAA
Alias: Yes
Target: dualstack.pritunl-zero-web
Name: gitlab.pritunl.net
Type: A
Alias: Yes
Target: dualstack.pritunl-zero-web
Name: gitlab.pritunl.net
Type: AAAA
Alias: Yes
Target: dualstack.pritunl-zero-web
Name: admin.zero.pritunl.net
Type: CNAME
Target: pritunl-zero-web-1548150320.us-west-2.elb.amazonaws.com
Name: user.zero.pritunl.net
Type: CNAME
Target: pritunl-zero-web-1548150320.us-west-2.elb.amazonaws.com
Name: gitlab.pritunl.net
Type: CNAME
Target: pritunl-zero-web-1548150320.us-west-2.elb.amazonaws.com
Configure Pritunl Zero
Open https://<PRITUNL_ZERO_IP> in your browser. Get the IP address from one of the pritunl-zero-node instances. Then login with the username and password pritunl. Select the pritunl user and change the password then click Save.
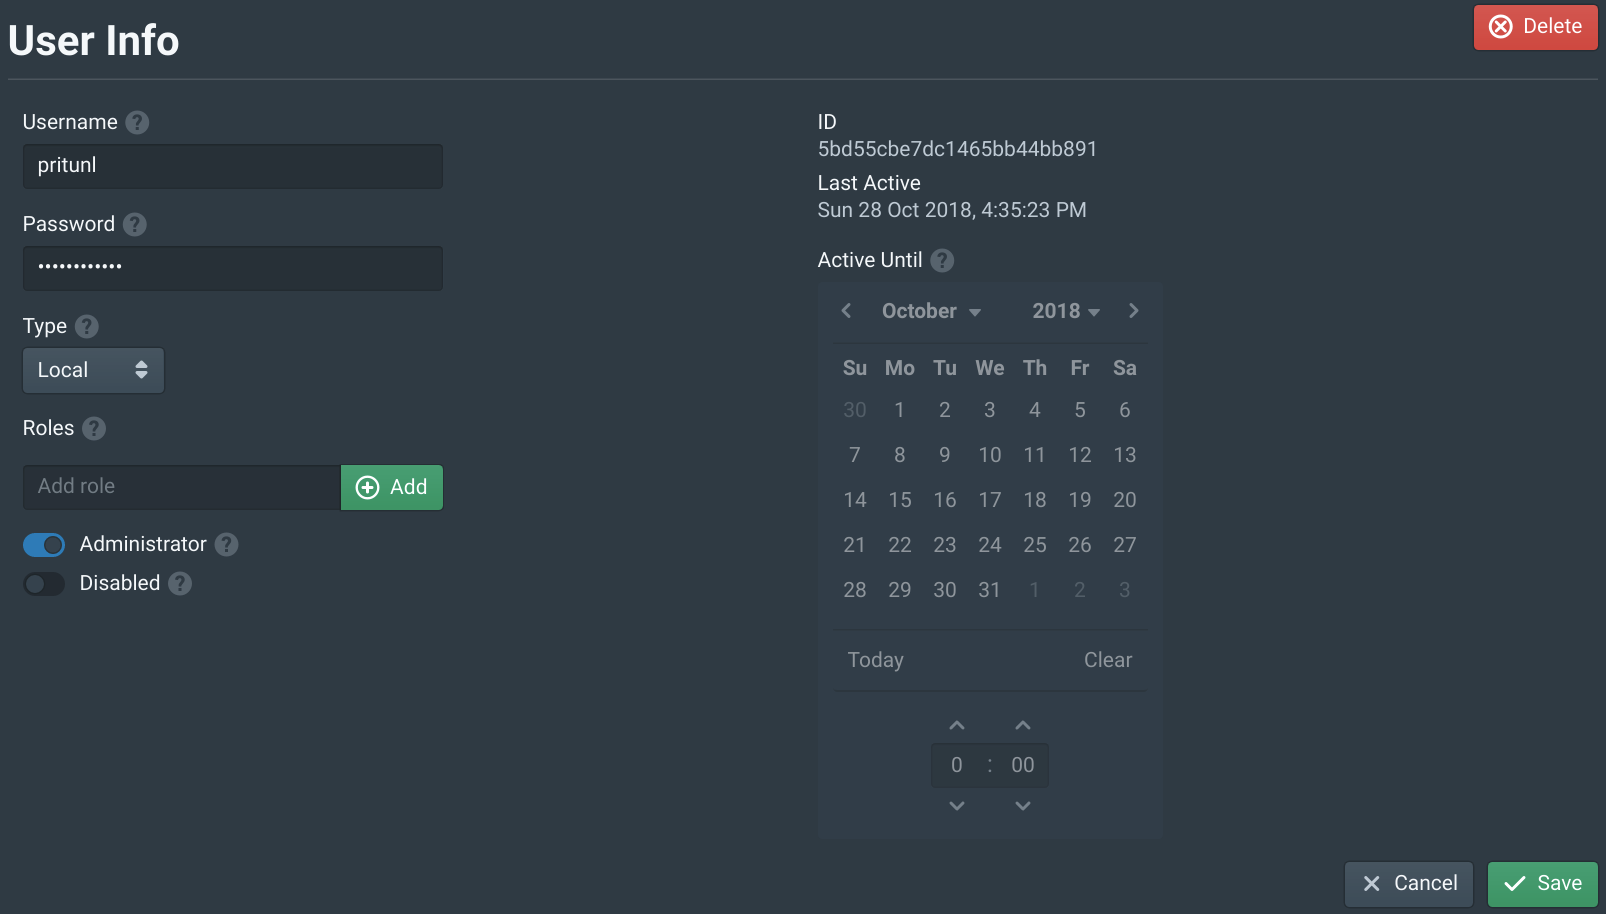
Open the Nodes tab and enable Management and User on one node. Then set the Management Domain to admin.zero.pritunl.net and the User Domain to user.zero.pritunl.net, replace the top level domain with your domain. Set the Protocol to HTTP and the Port to 80. Then enable Forwarded for header and Forwarded proto header. Modify these settings on only one node to prevent losing access if misconfigured. If the settings were incorrect try both public IP address of the pritunl-zero-node instances.
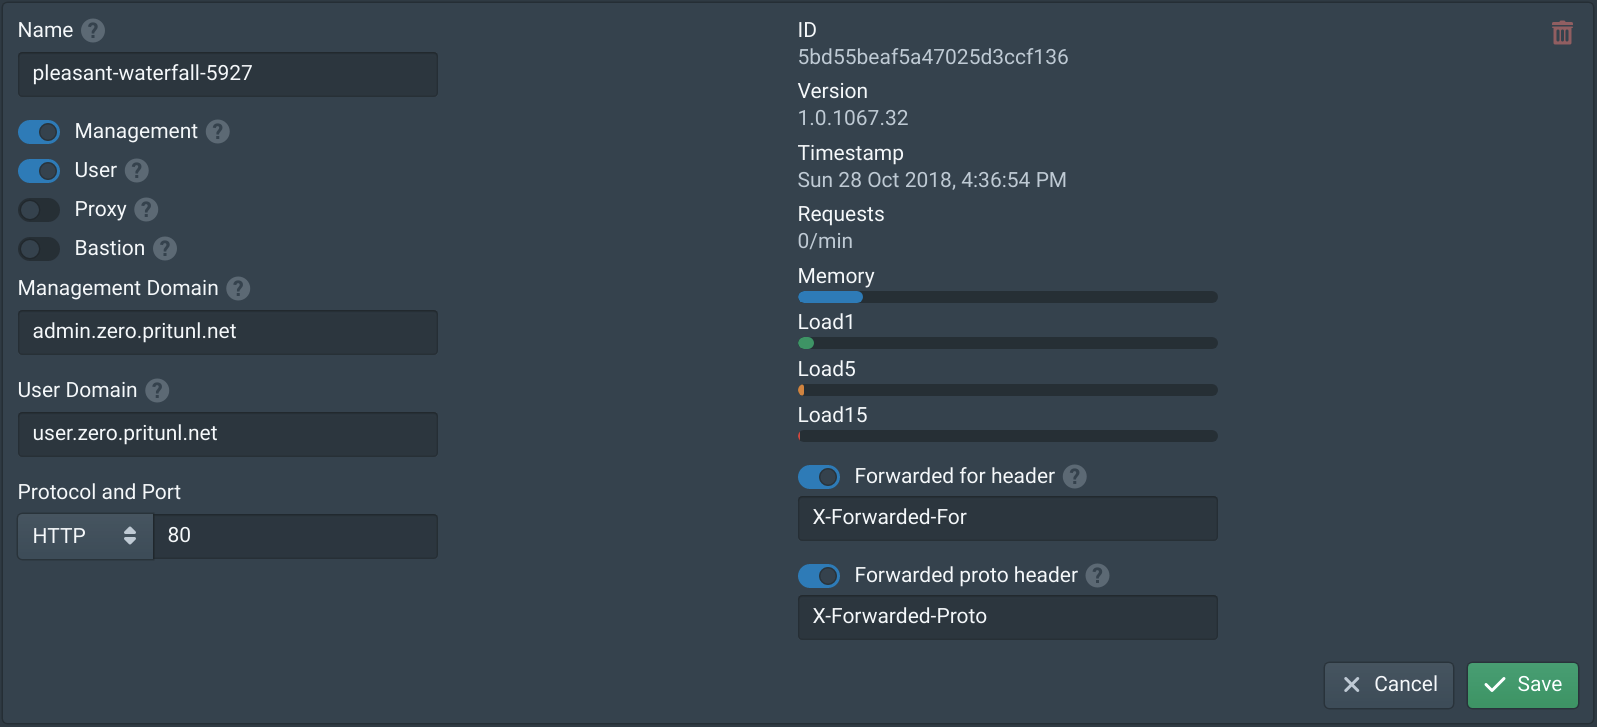
Next attempt to open https://admin.zero.pritunl.net in your browser with your top level domain. Both Pritunl Zero nodes will be in healthy status on the load balancer target group so half the requests will get a redirect error. If the blue login page partially loads the configuration is working. Once verified configure the second node with the same settings as above.
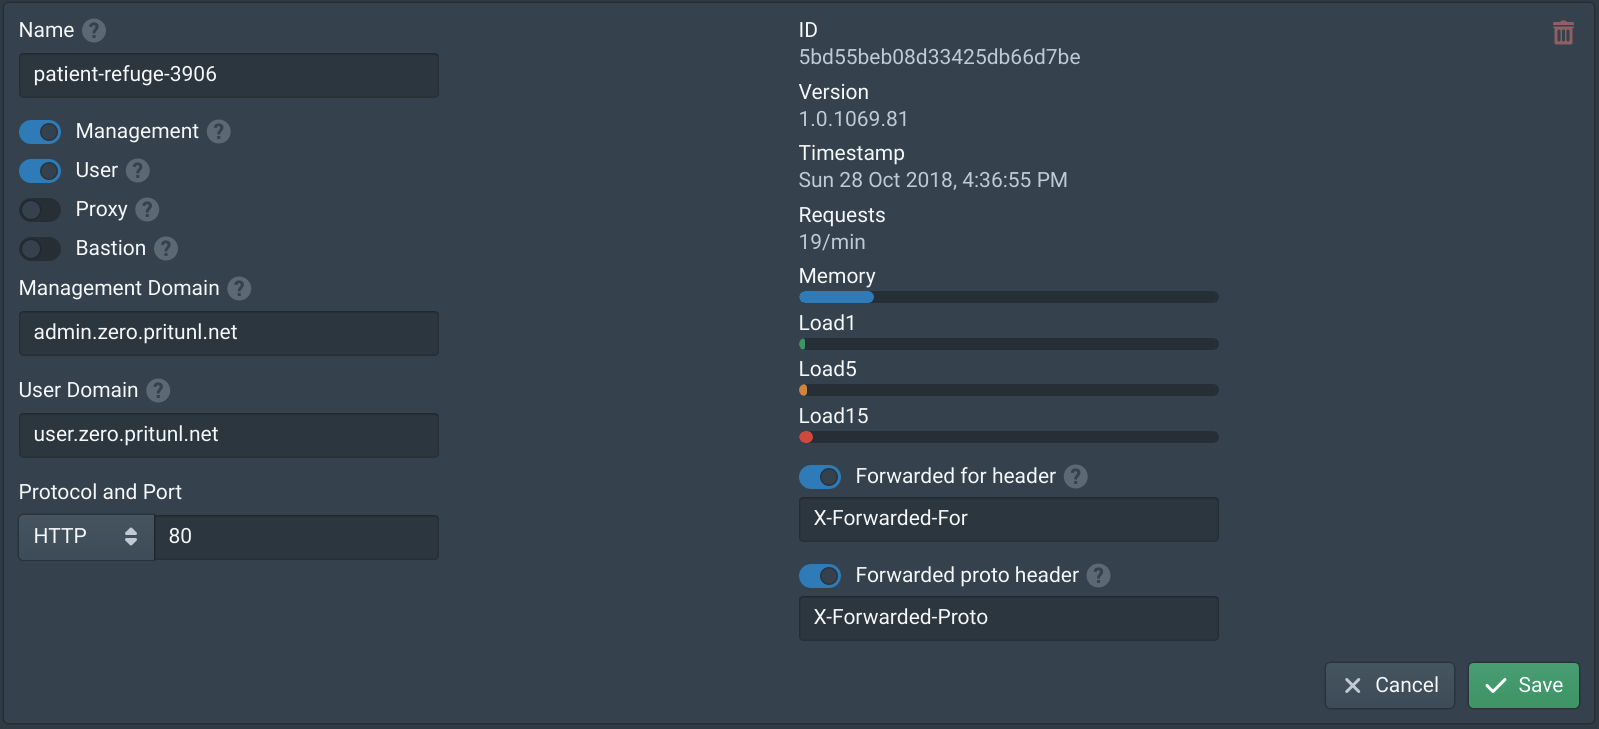
After saving the https://admin.zero.pritunl.net domain should now be working. You may need to clear the cache or open a new window.
Once done open the VPC Dashboard then select the pritunl-zero-node security group from the Security Groups tab. Then remove the the SSH and HTTPS rules with your IP address and click Save.
Configure SSH Authority
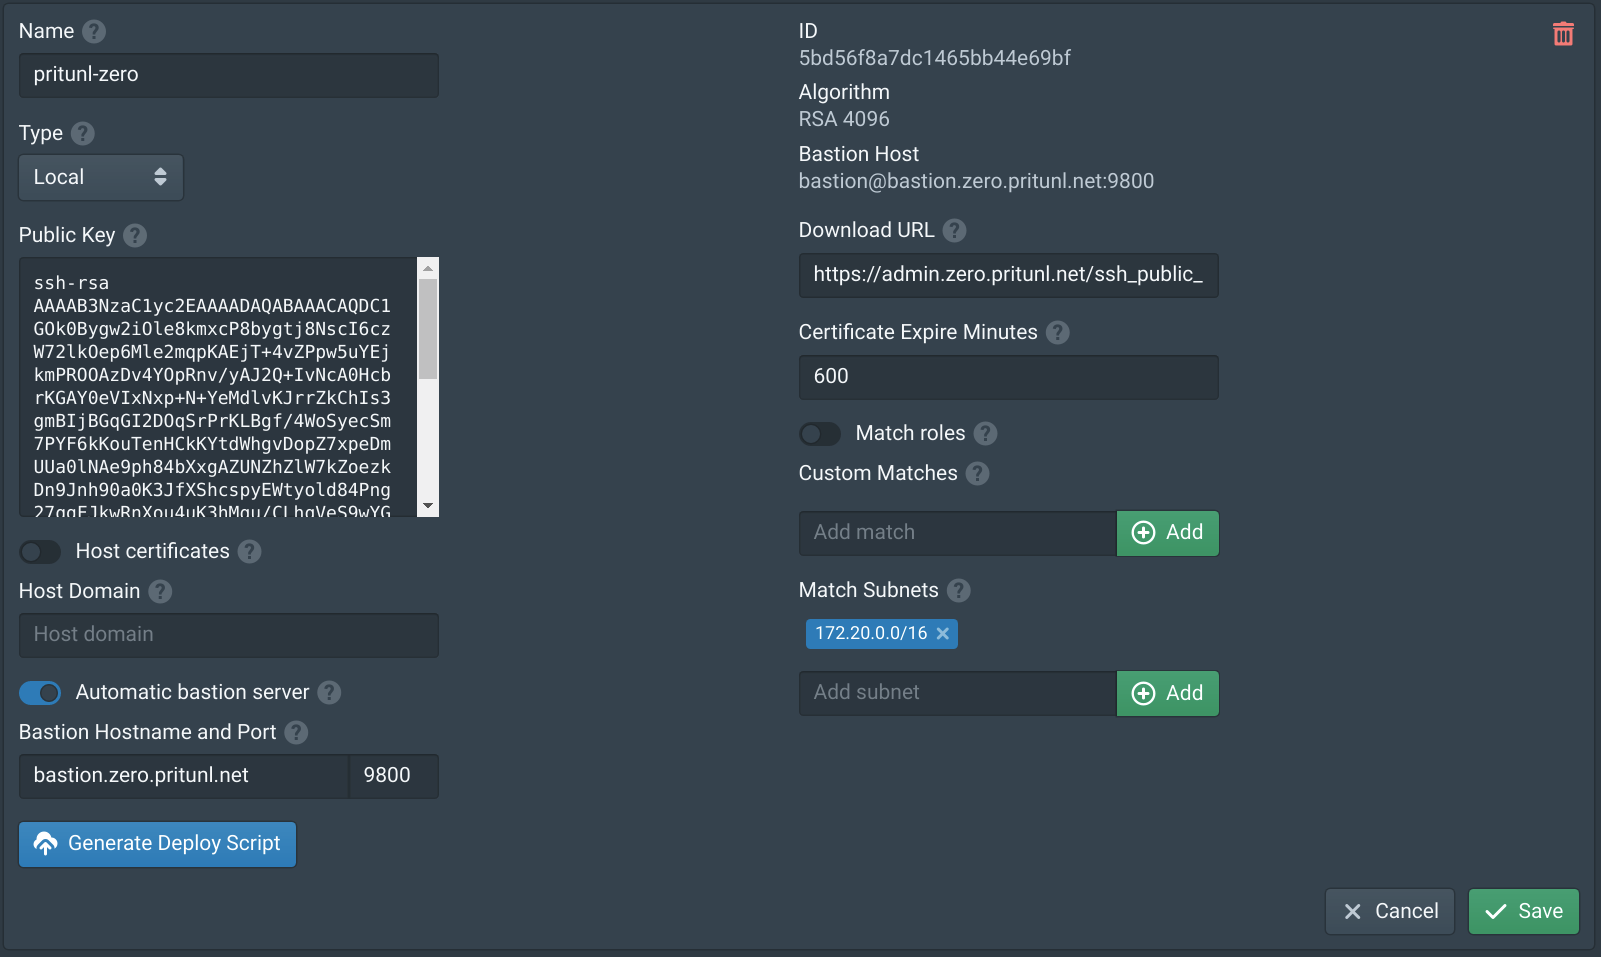
In the Authorities tab click New. Set the Name to pritunl-zero, enable Automatic bastion server then set the Hostname to bastion.zero.pritunl.net using your top level domain and the Port to 9800. Then add the VPC subnet 172.20.0.0/16 to Match Subnets. Then click Save.
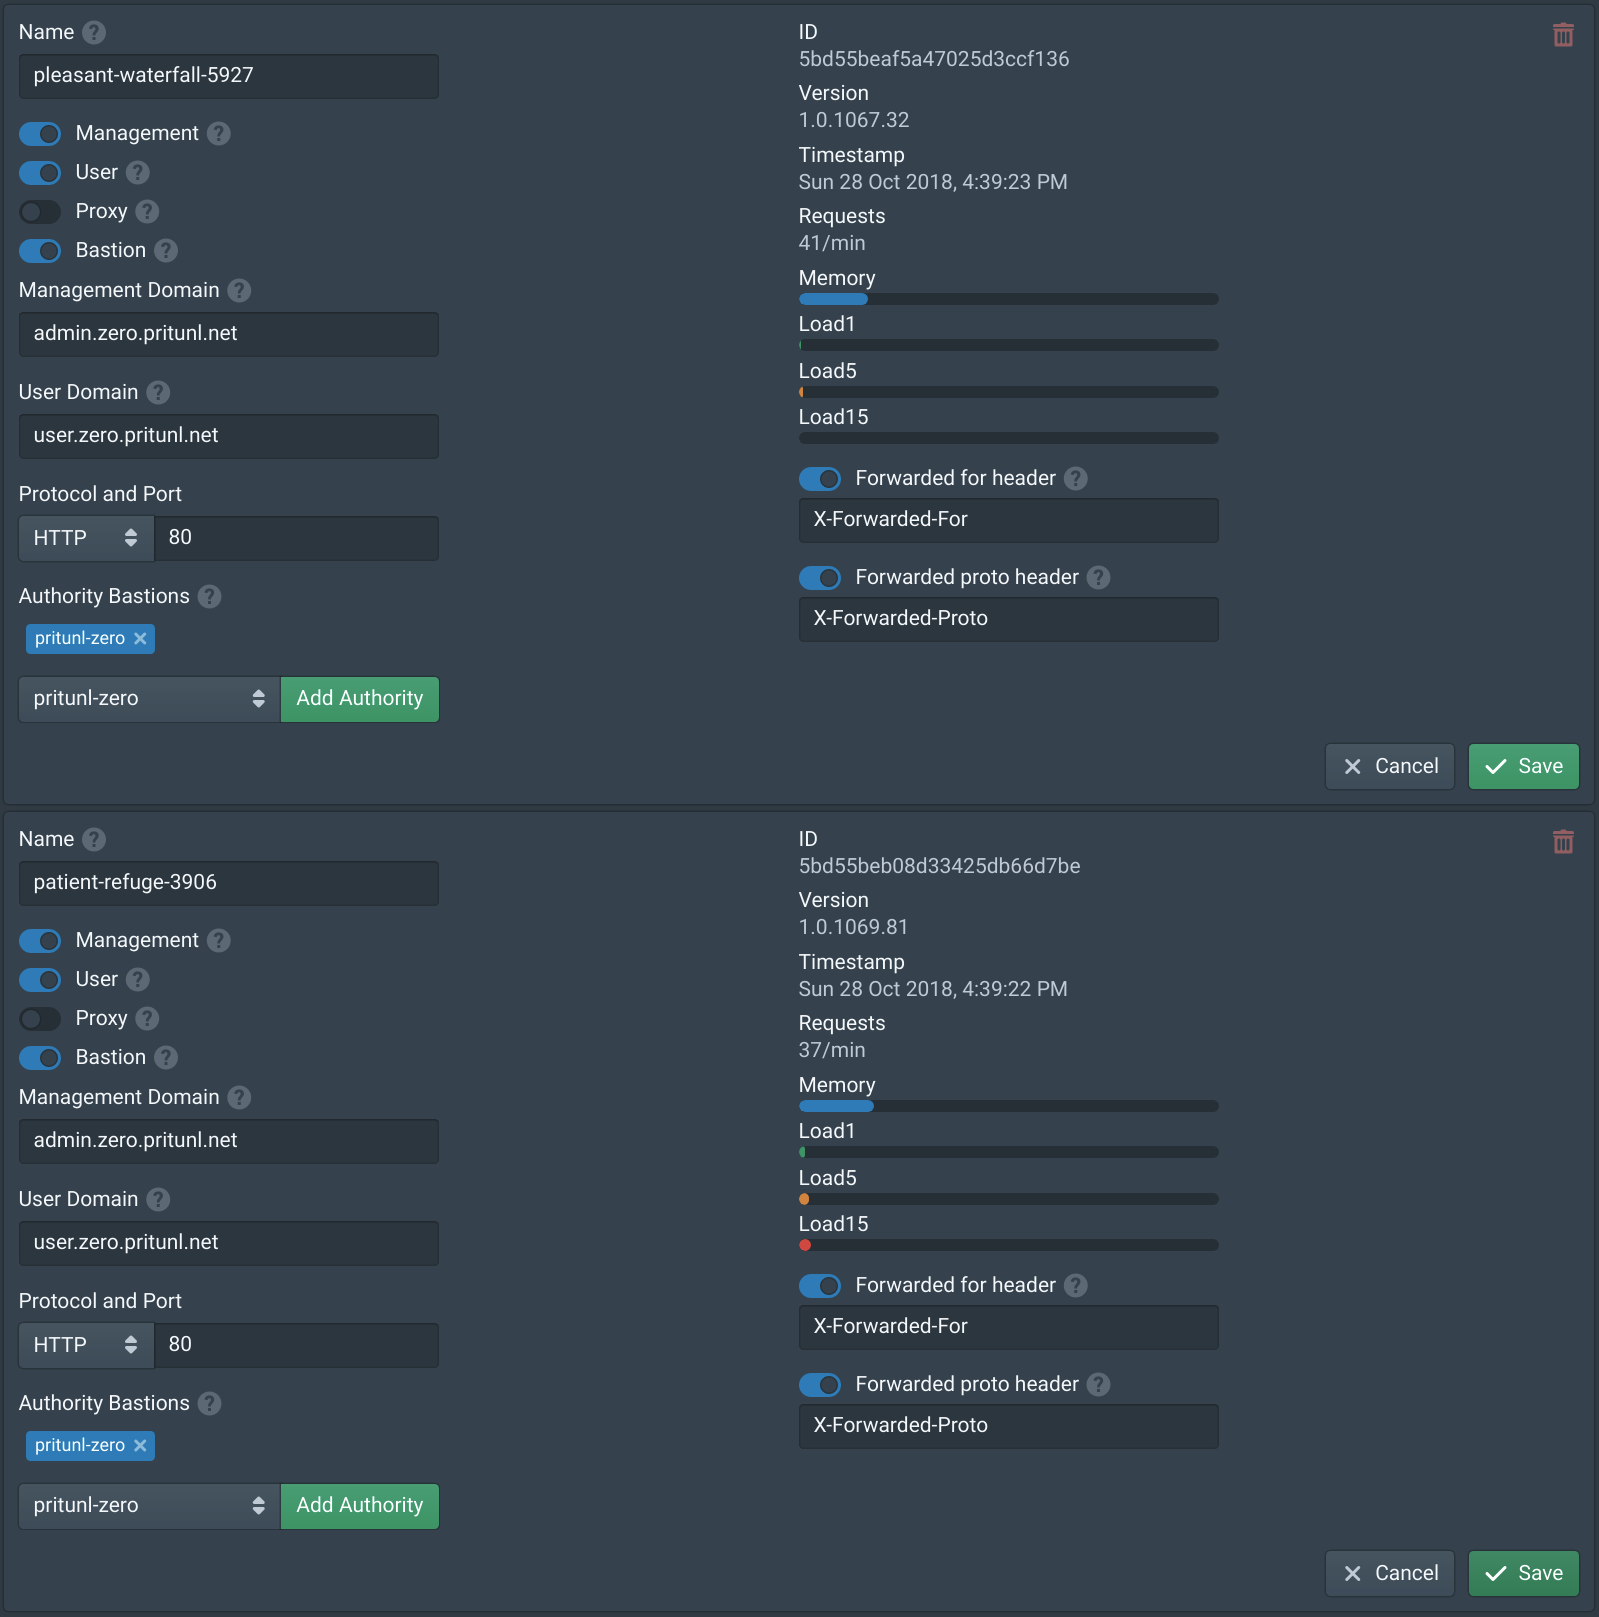
In the Nodes tab enable Bastion on both nodes and add pritunl-zero to the Authority Bastions. Then click Save.
Create SSH Load Balancer
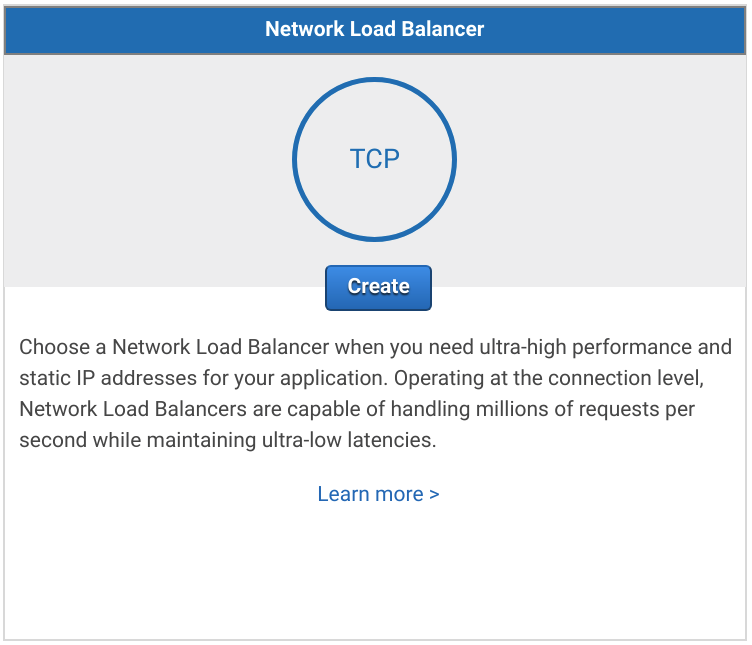
In the EC2 Management Console open the Load Balancers tab and click Create Load Balancer. Then select Network Load Balancer.
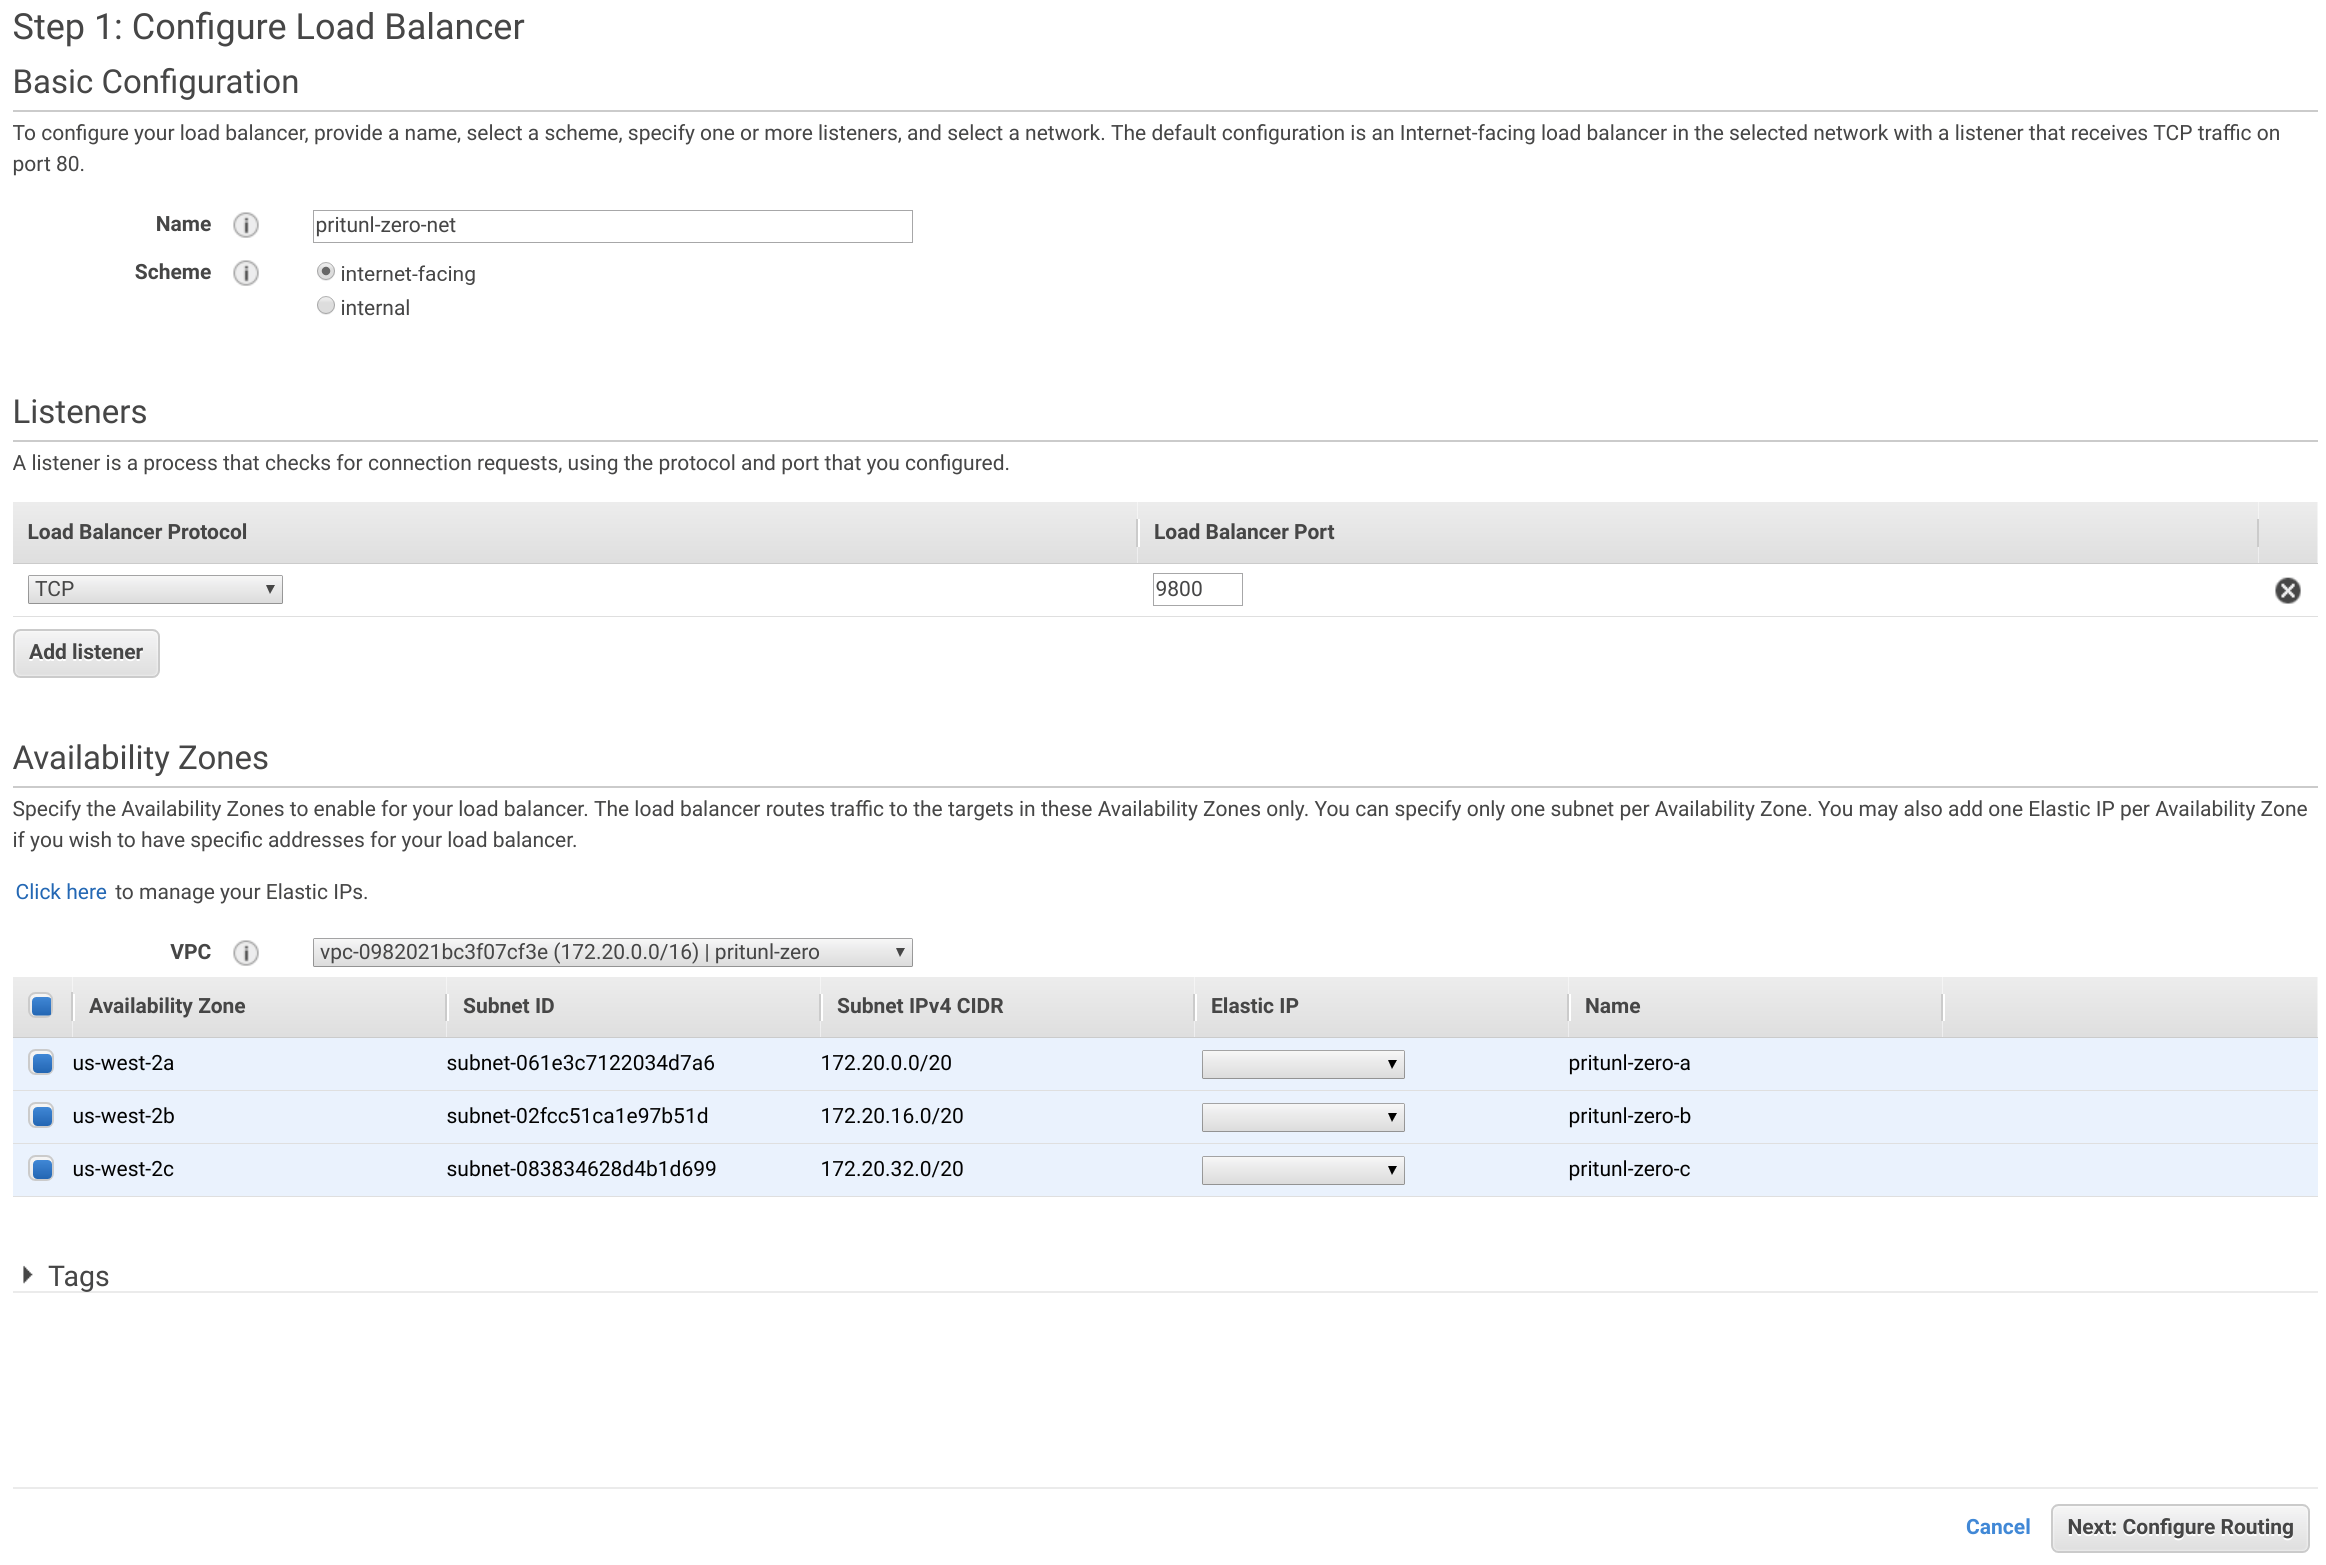
Set the Name to pritunl-zero-net and Load Balancer Port to 9800. Then select the pritunl-zero VPC and select all availability zones. Then click Next: Configure Routing.
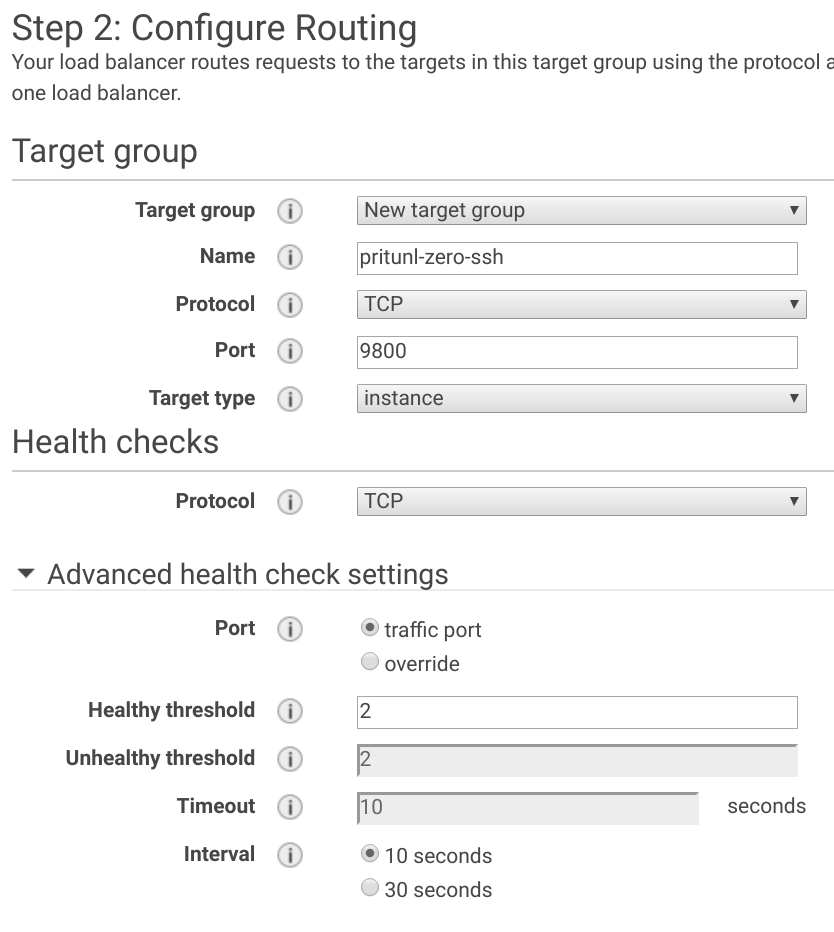
Set the Name to pritunl-zero-ssh and the Port to 9800. Then open the Advanced health check settings and set the Healthy threshold to 2 and the Interval to 10 seconds.
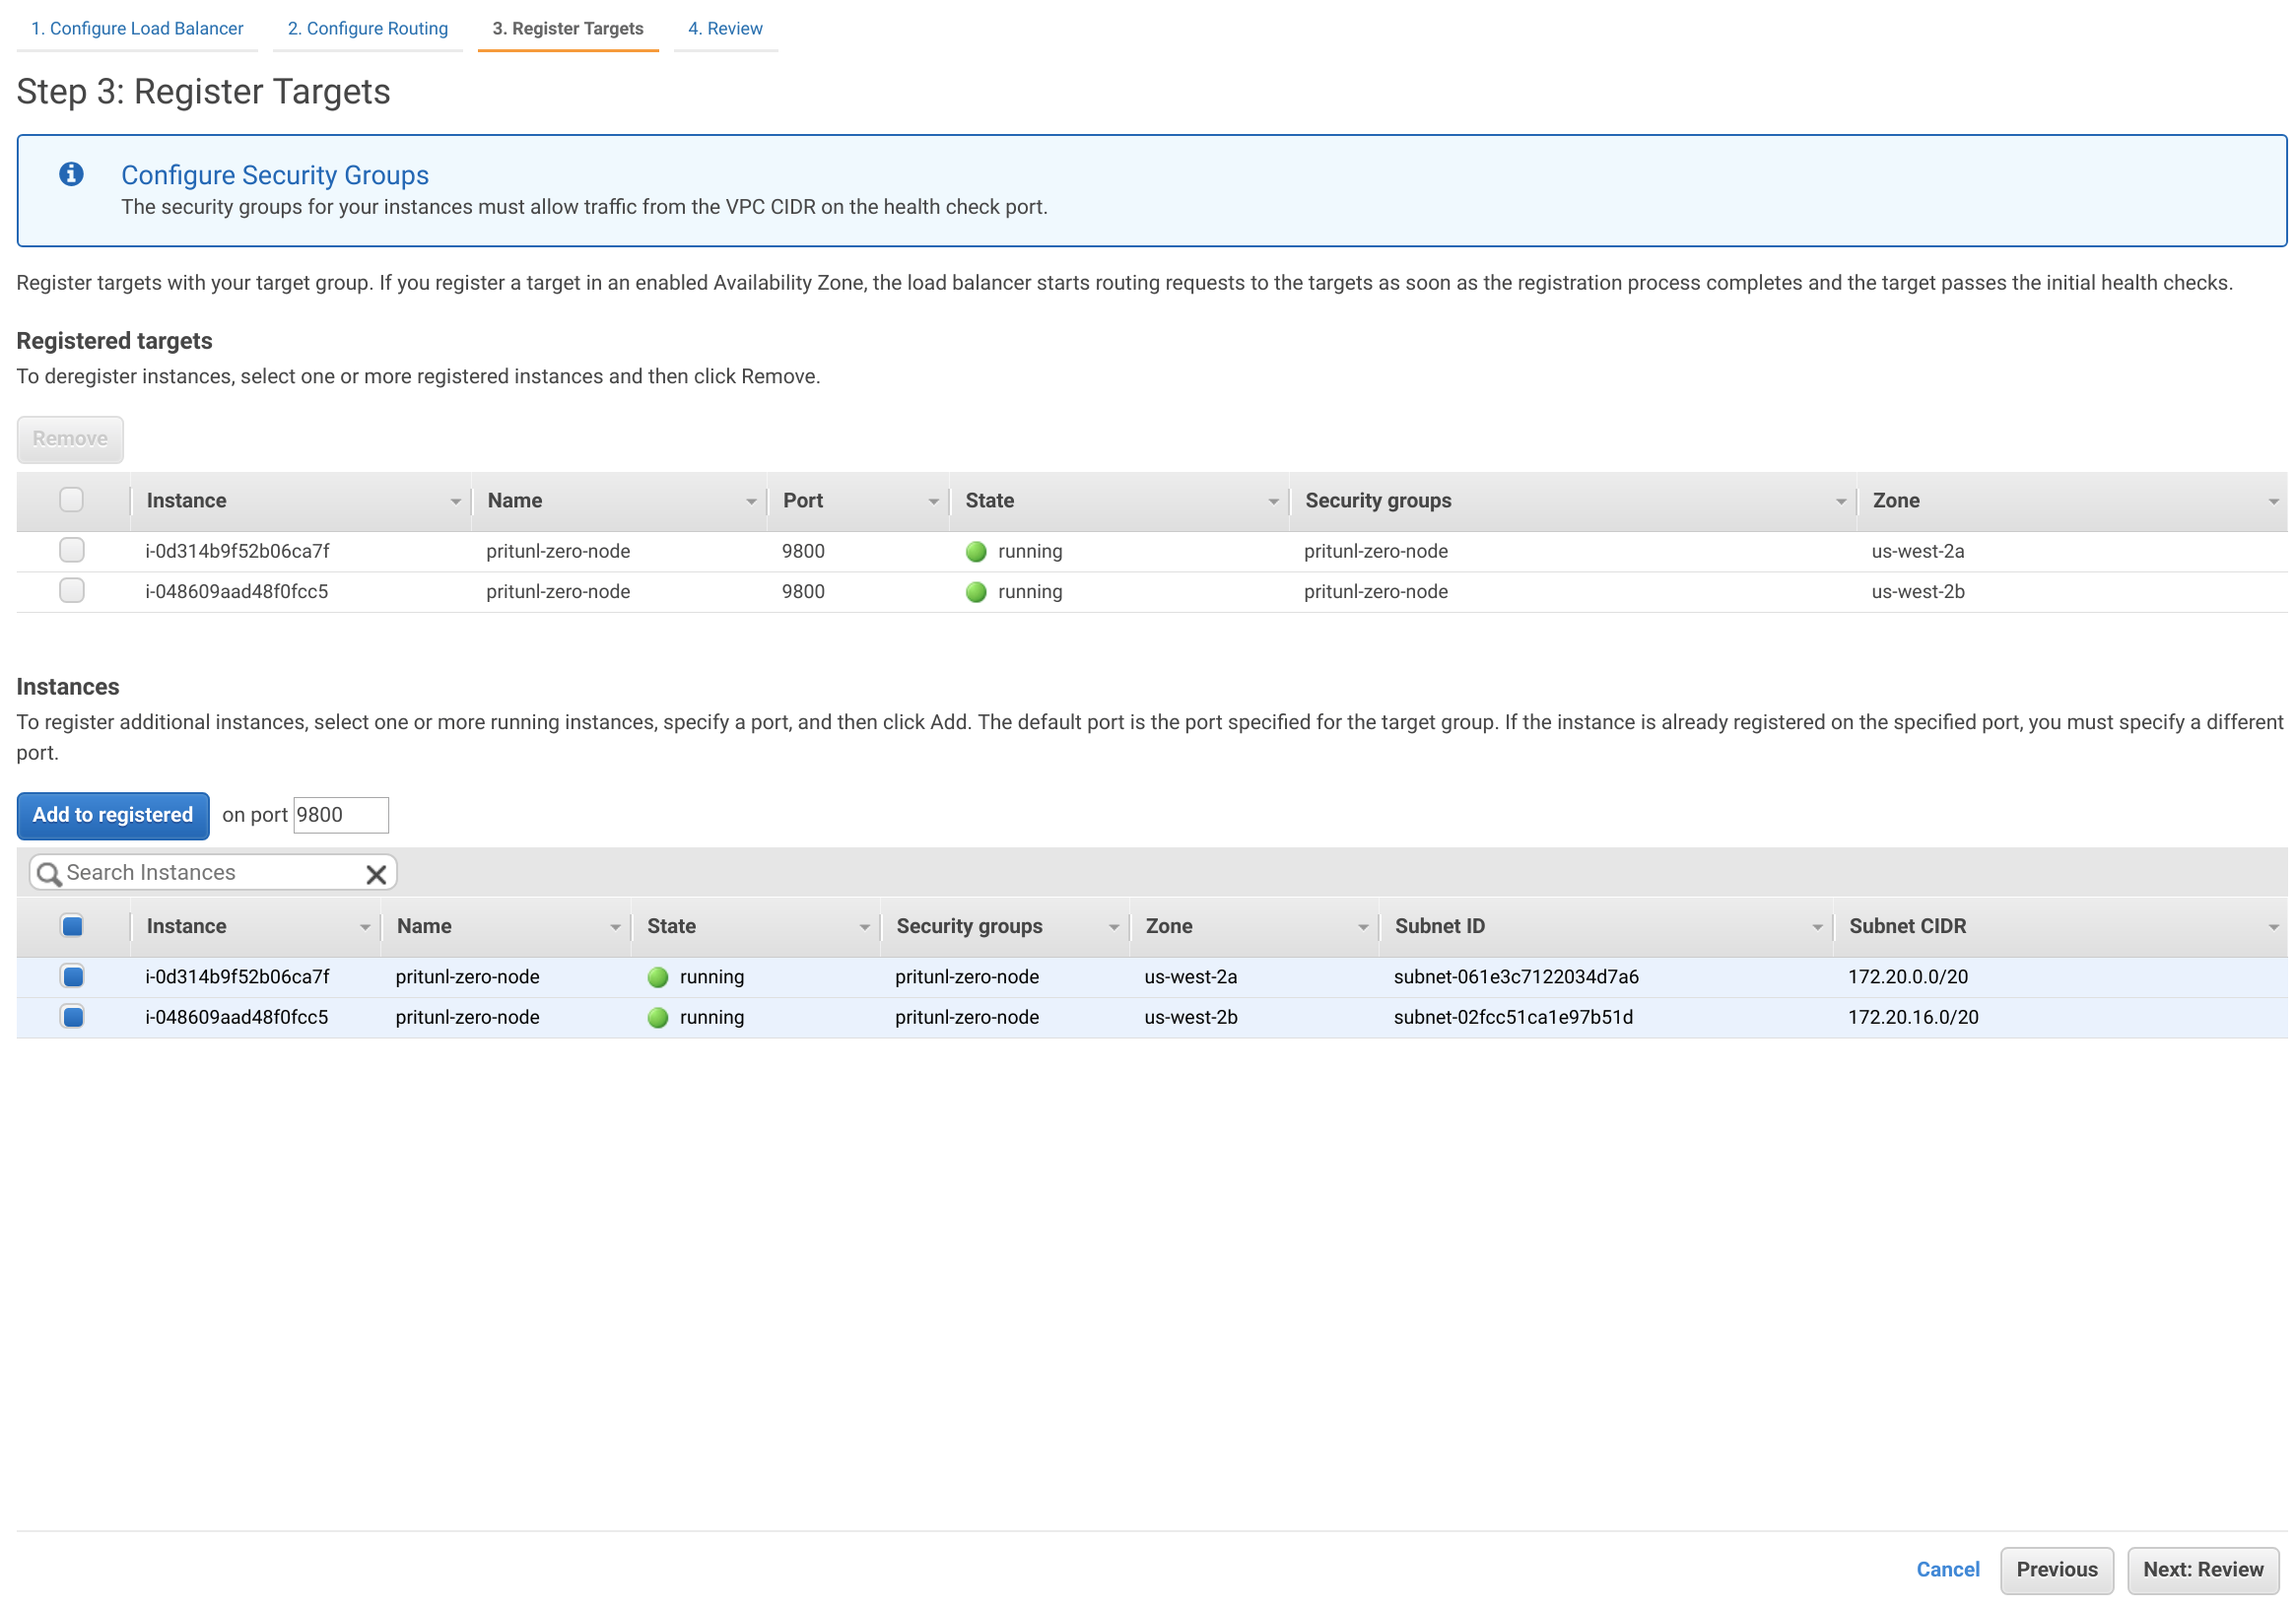
Select both the pritunl-zero-node instances and click Add to registered. Then click Next: Review and Create.
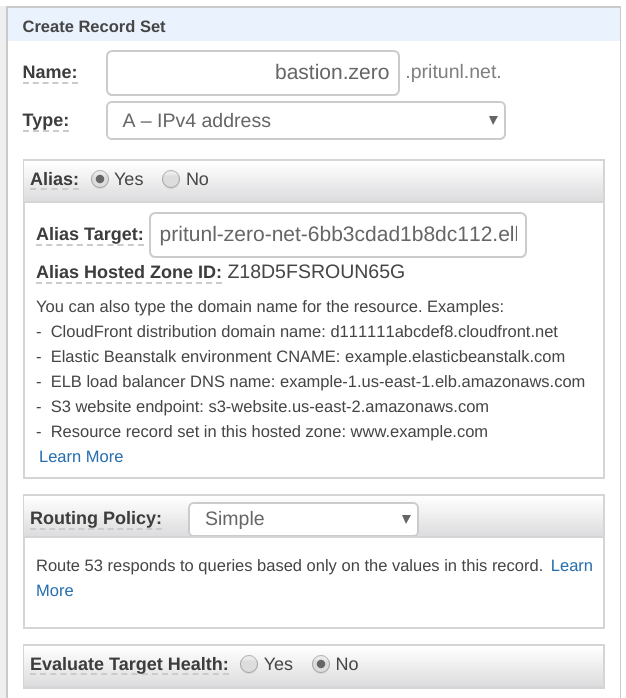
Select the pritunl-zero-net load balancer and copy the DNS name from the load balancer info. Then create a DNS record for bastion.zero.pritunl.net using your top level domain. If Route 53 is used create an A record with an alias pointing to the pritunl-zero-net load balancer. For other registrars use a CNAME pointing to the DNS name.
Create Linux Instance
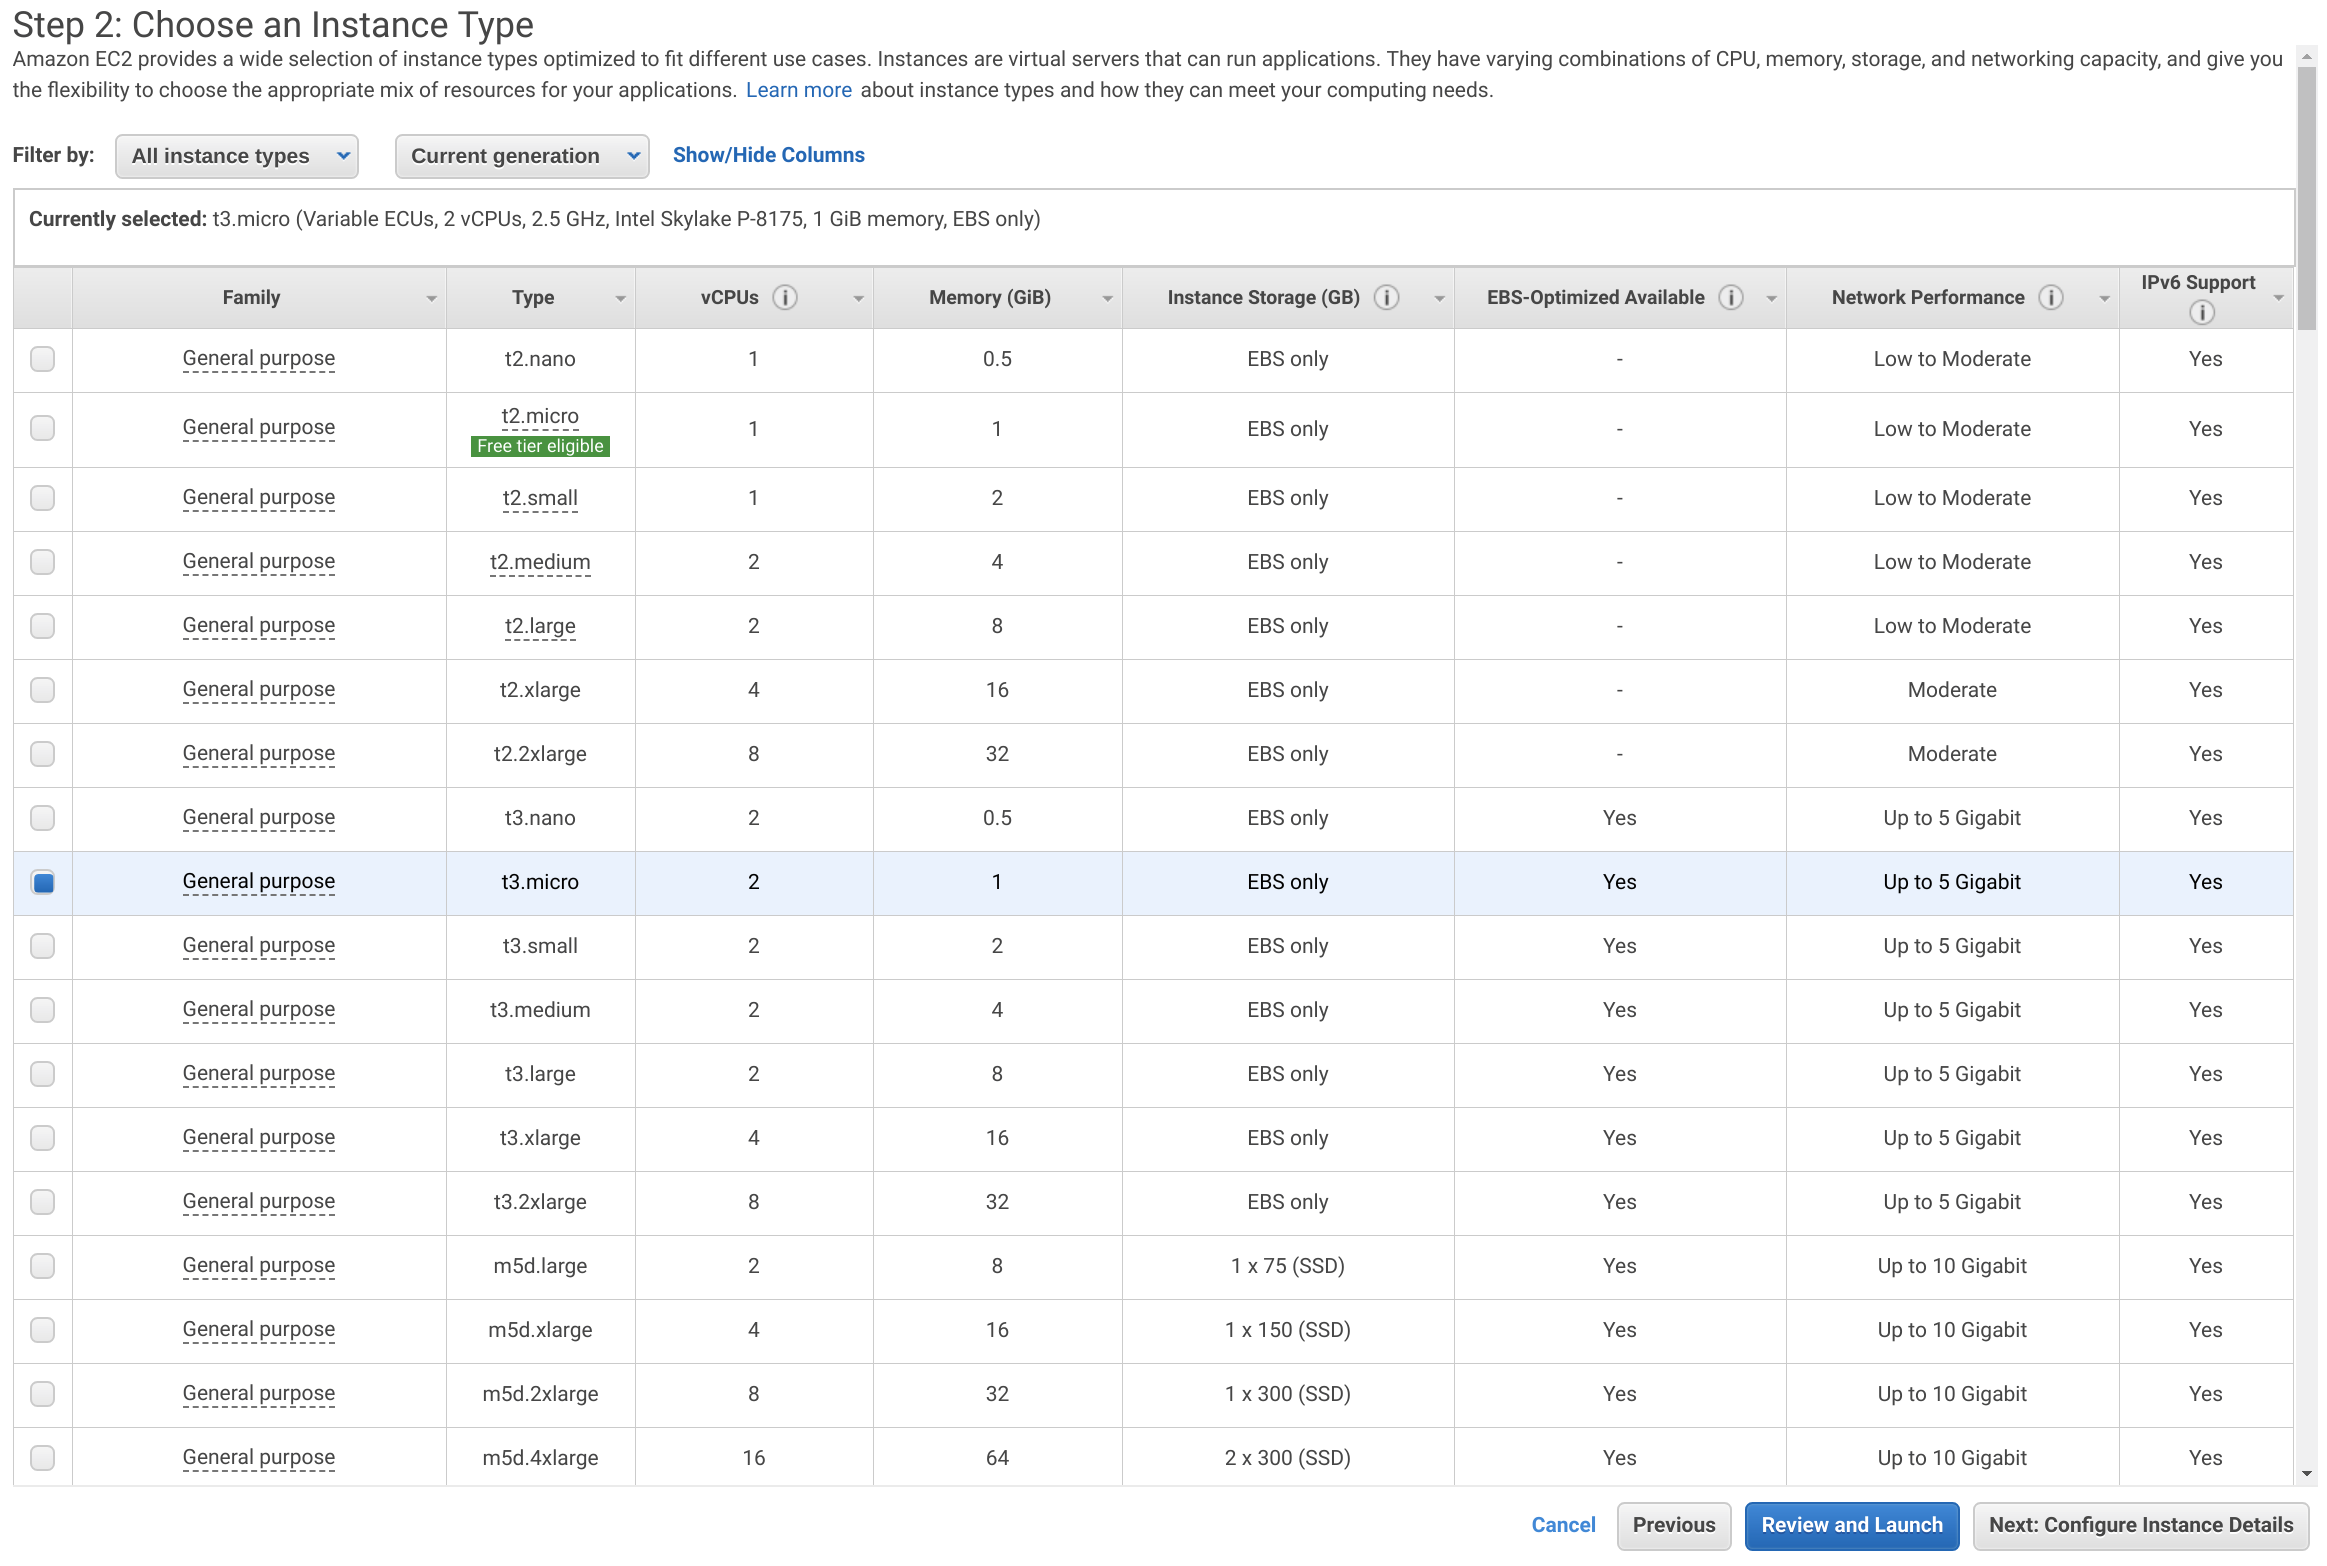
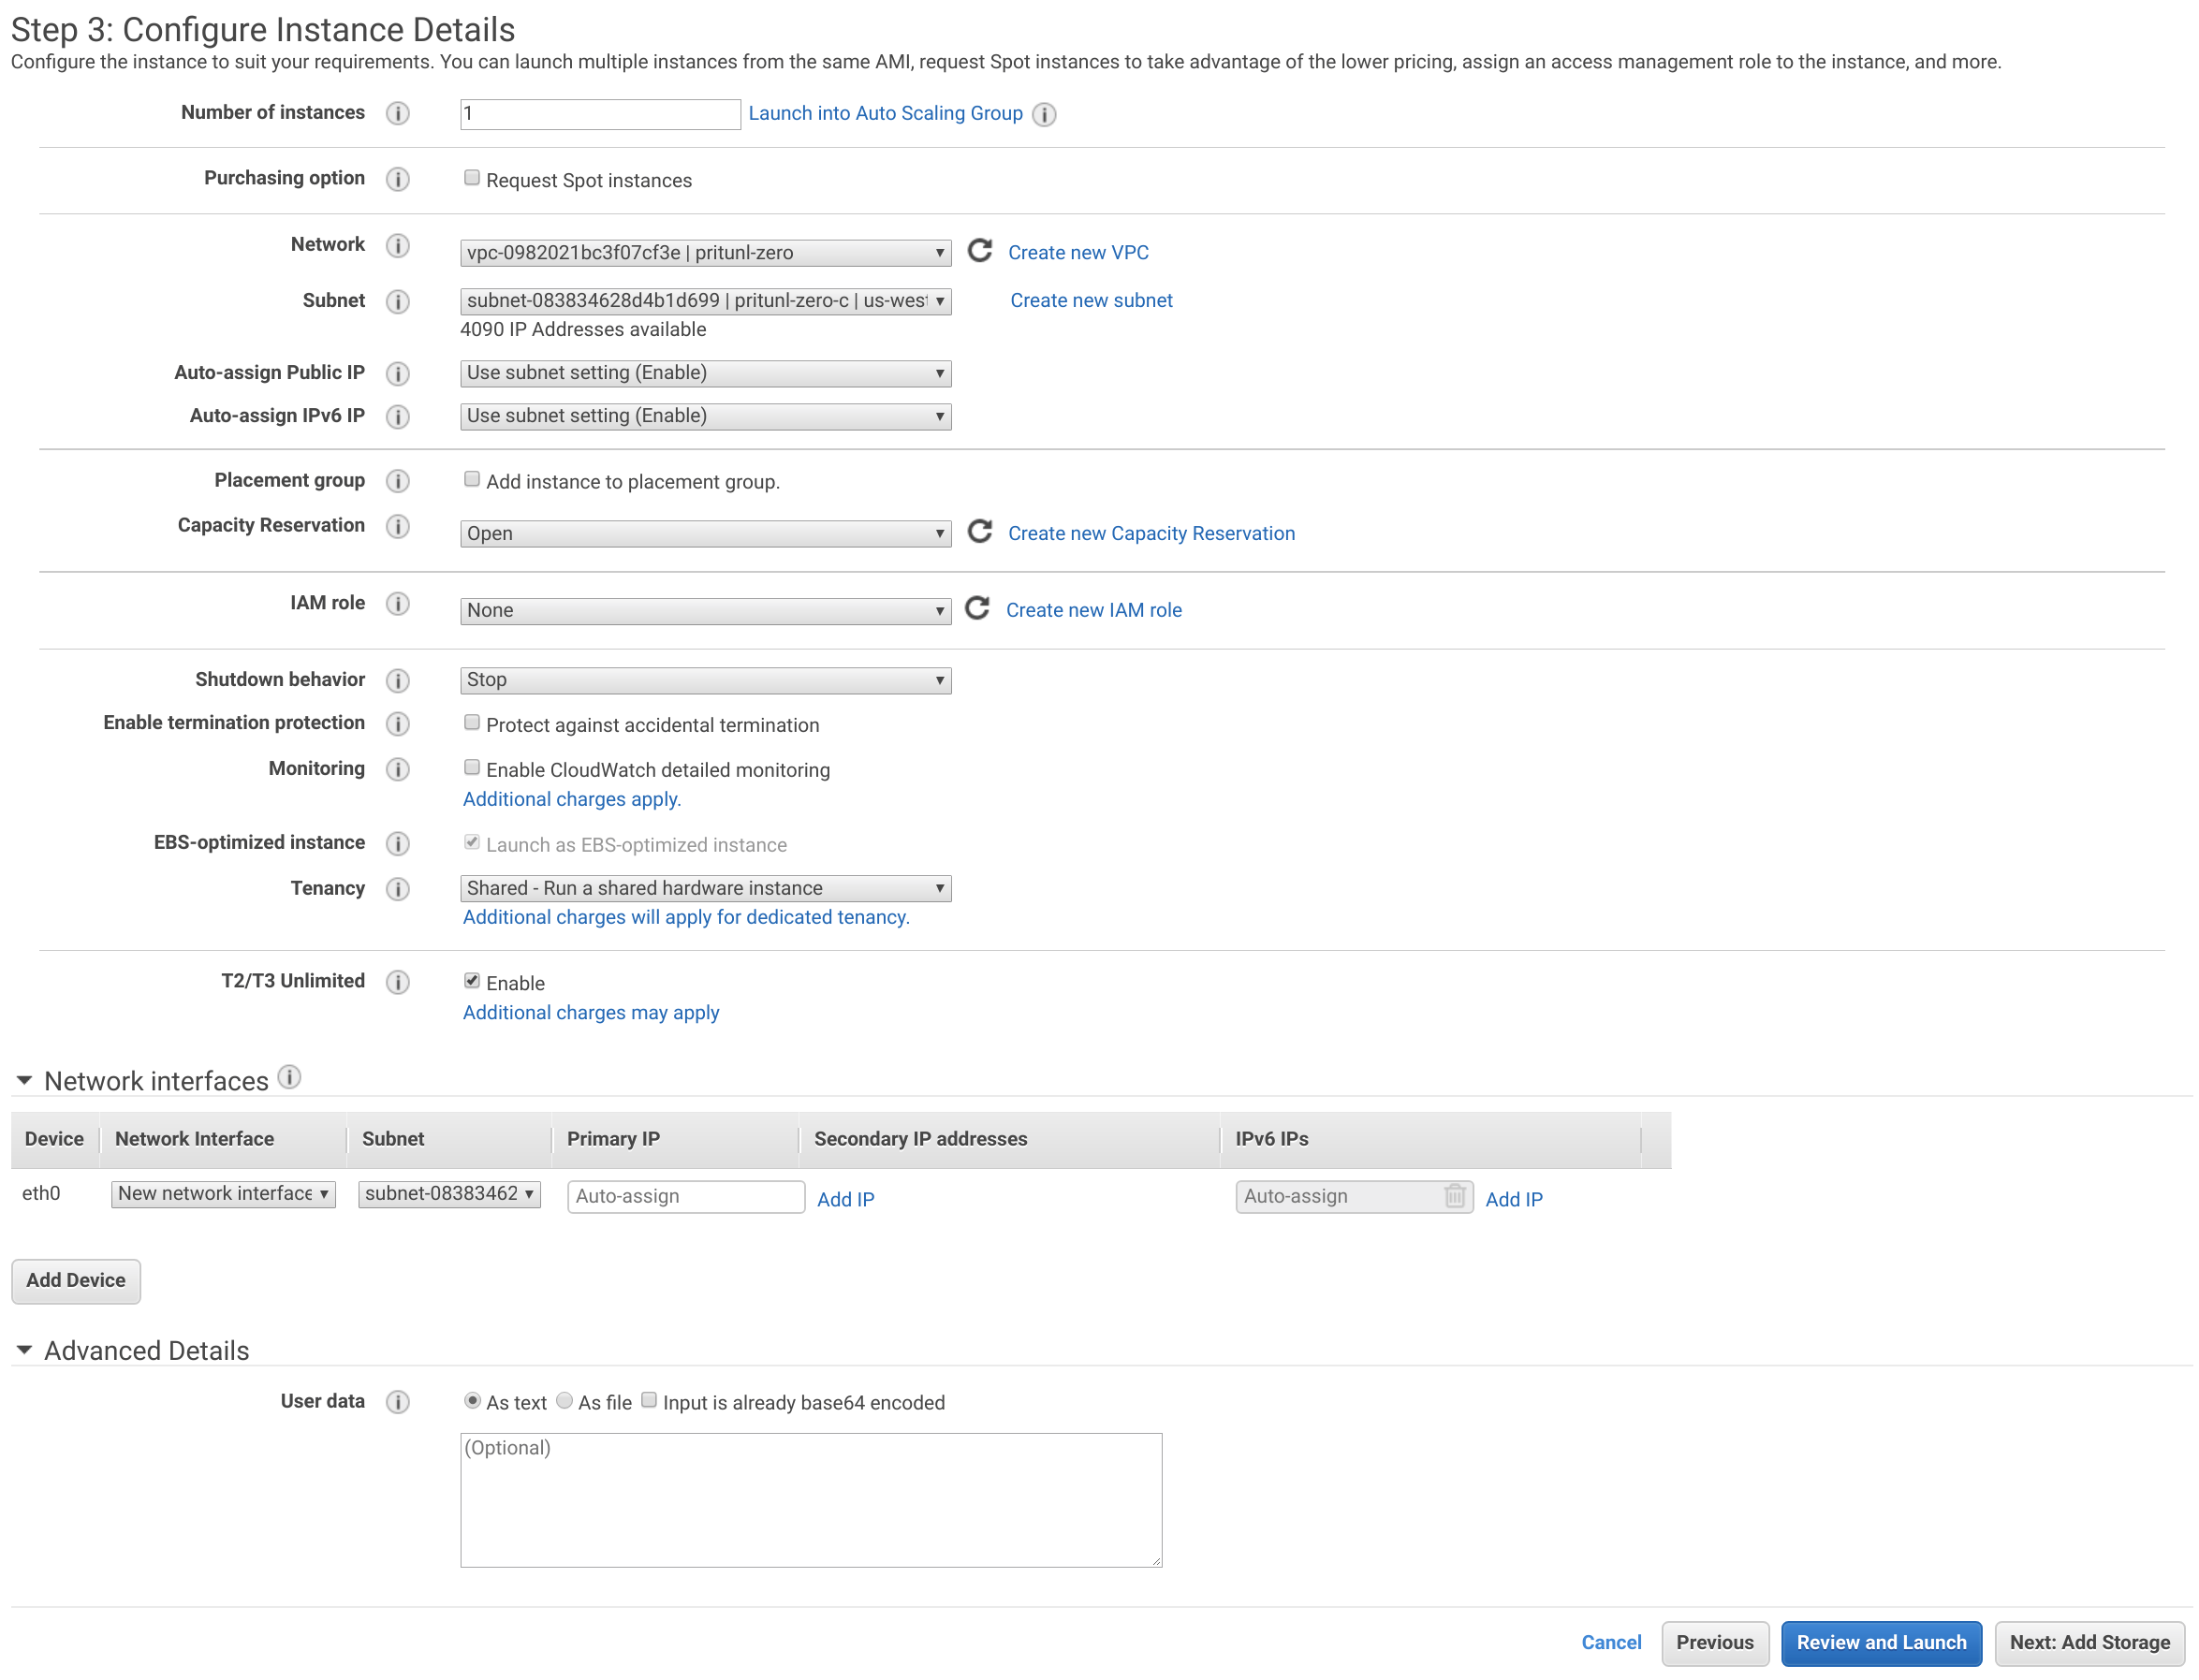
This instance will demonstrate an example Linux instance that a remote user would need access to through the Pritunl Zero bastion server. This will also demonstrate how to provision a Pritunl Zero SSH authority to a server. In the EC2 Dashboard click Launch Instance. Select Amazon Linux 2 AMI and set the Instance Type to t3-micro. Then click Next: Configure Instance Details.
Set the Network to the VPC created above and the Subnet to pritunl-zero-c.
From the Authorities tab in the Pritunl Zero web console click Generate Deploy Script. Then add developers to the Roles. This will create a deploy script that will only allow Pritunl Zero users with the developers role to access the server.
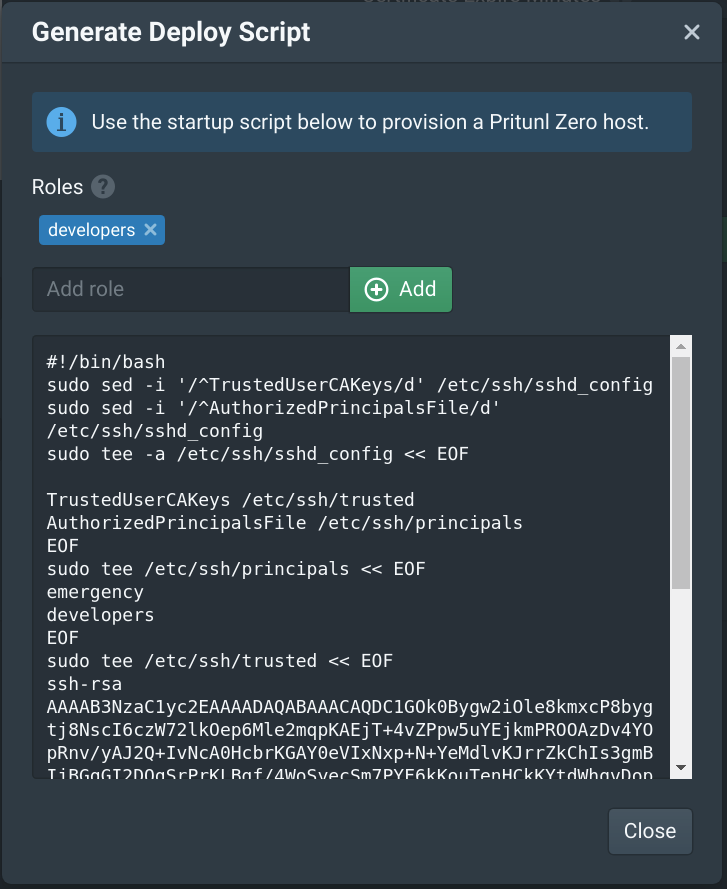
Copy the deploy script to the User data field under Advanced Details then click Next: Add Storage then Next: Add Tags.

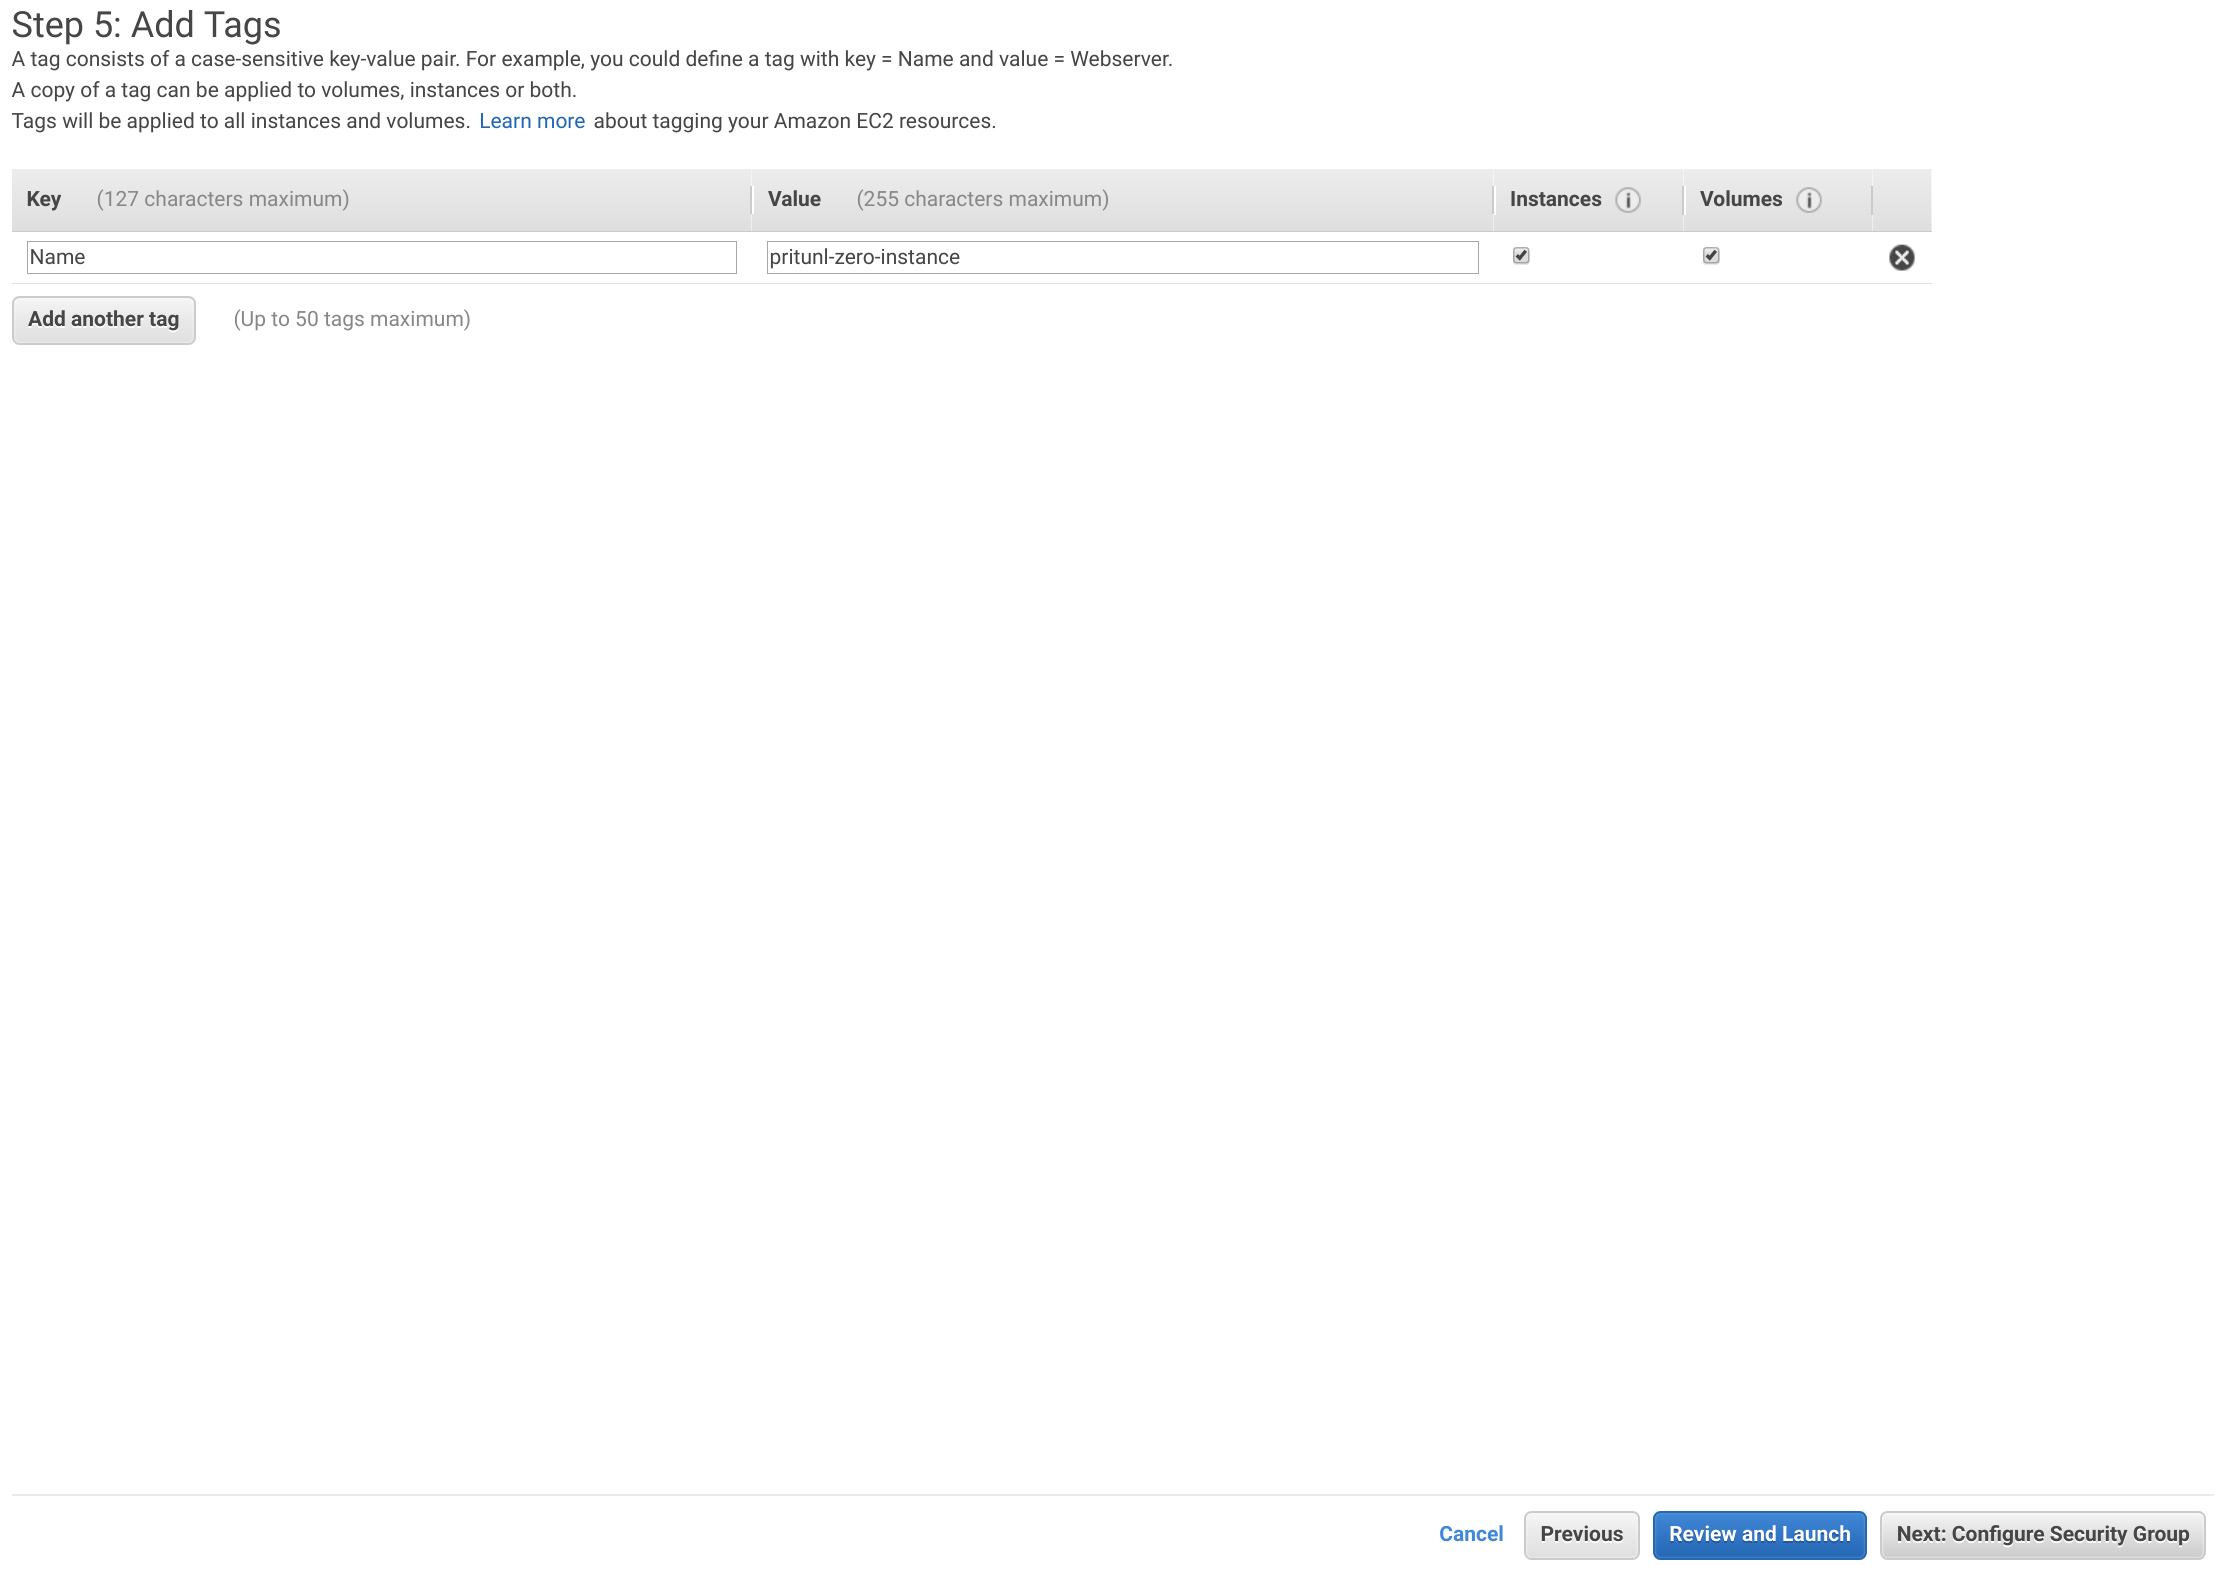
Add a tag with the Key set to Name and the Value set to pritunl-zero-instance. Then click Next: Configure Security Groups.
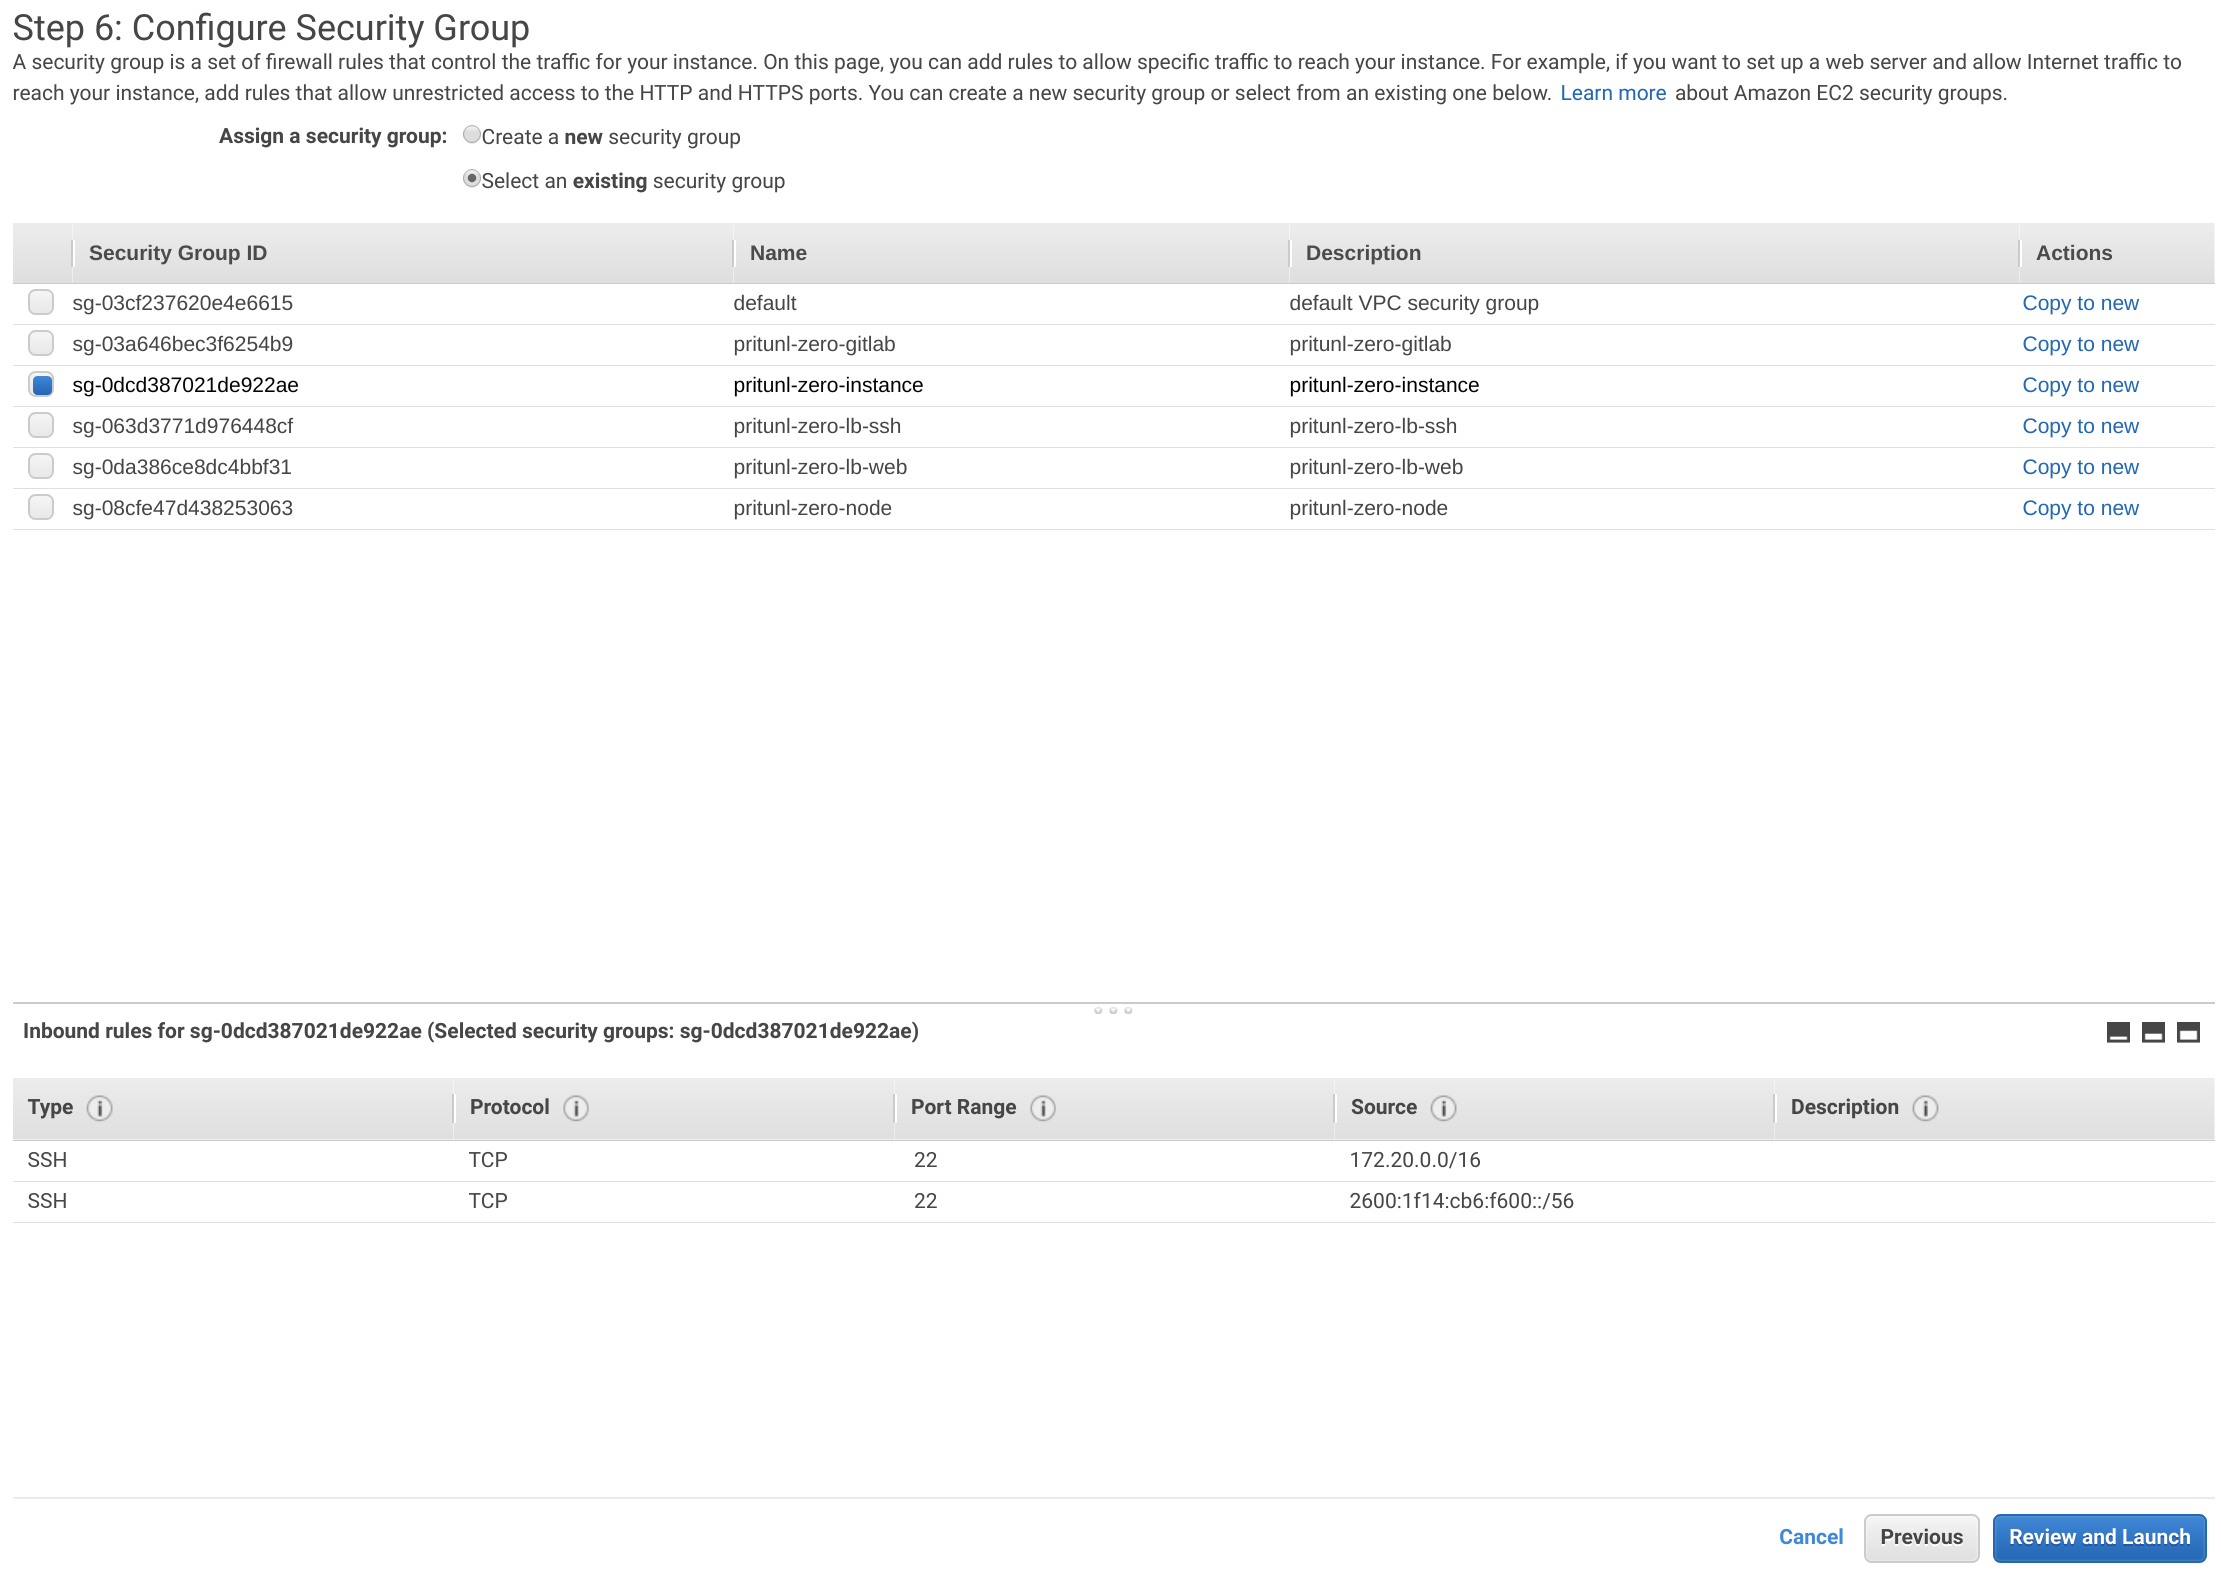
Select the pritunl-zero-instance security group then click Review and Launch.
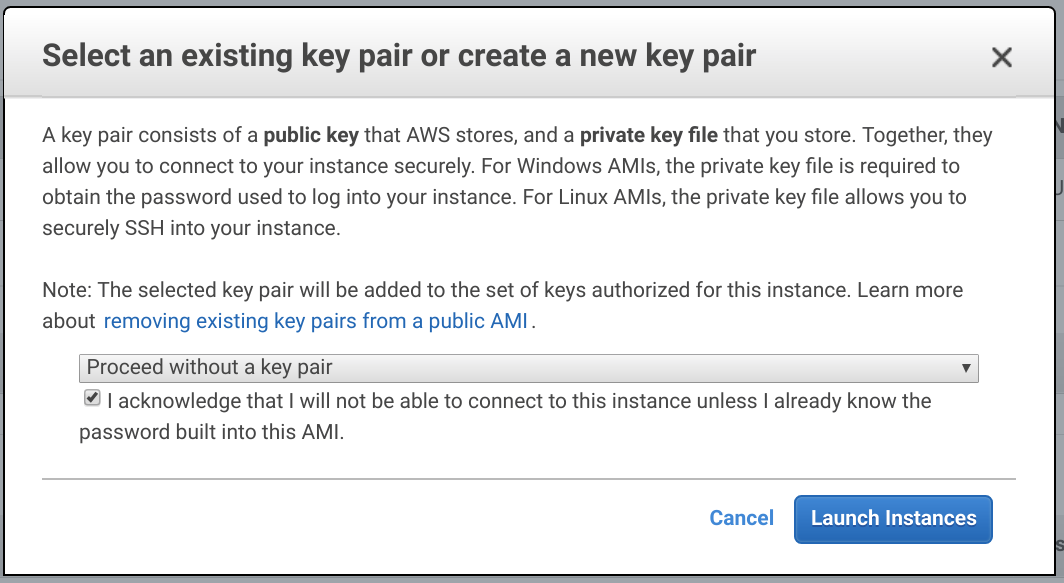
Click Launch then select Proceed without a key pair and click Launch Instance.
Create Test User
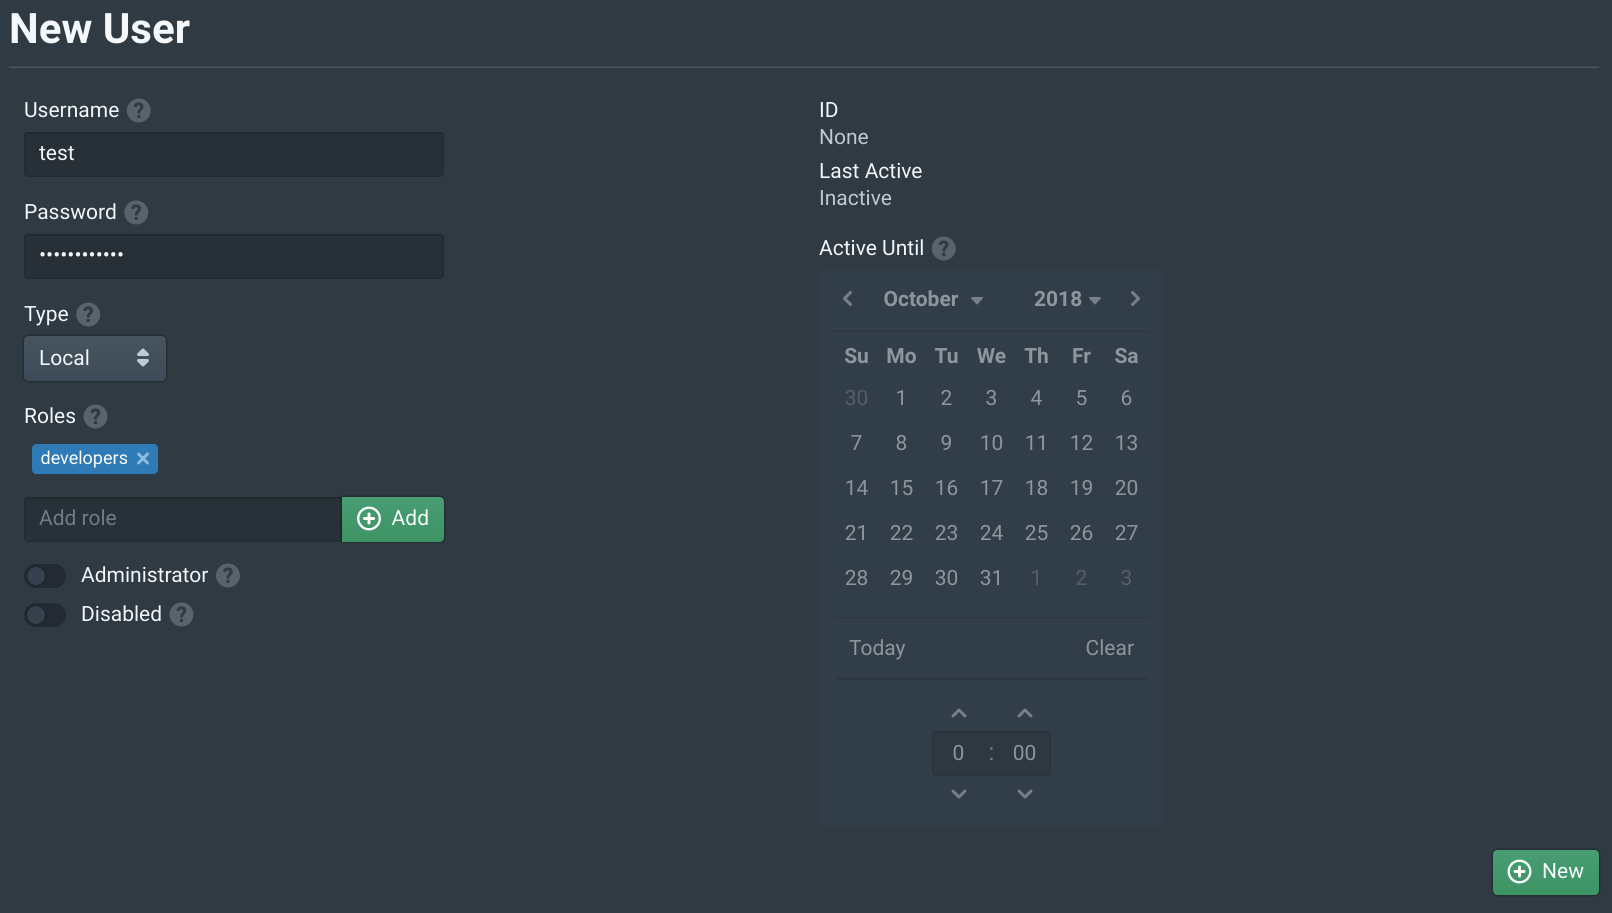
Open the Users tab in the Pritunl Zero web console and click New. Then set the Username to test and add the developers to Roles. This will allow this user to access the server above. Then click New.
Configure Pritunl Zero SSH Client
For this lab the Pritunl Zero SSH Client will be run inside a Docker container to prevent needing to install the client or modify the SSH configuration on your computer. If you don't have Docker configured on your local computer or intend on installing the client refer to Install SSH Client
# Pull oracle linux 7
docker pull oraclelinux:7

# Start oracle linux container
docker run --rm -ti --entrypoint /bin/bash oraclelinux:7

# Add pritunl repository (copy all lines together)
tee /etc/yum.repos.d/pritunl.repo << EOF
[pritunl]
name=Pritunl Repository
baseurl=https://repo.pritunl.com/stable/yum/oraclelinux/7/
gpgcheck=1
enabled=1
EOF
gpg --keyserver hkp://keyserver.ubuntu.com --recv-keys 7568D9BB55FF9E5287D586017AE645C0CF8E292A
gpg --armor --export 7568D9BB55FF9E5287D586017AE645C0CF8E292A > key.tmp
rpm --import key.tmp; rm -f key.tmp

# Install openssh and pritunl-ssh
yum -y install pritunl-ssh

# Generate ssh key leave all prompts empty
ssh-keygen -t ed25519
# Enter file in which to save the key (/root/.ssh/id_ed25519):
# Enter passphrase (empty for no passphrase):
# Enter same passphrase again:
After install the SSH client run pritunl-ssh enter the hostname user.zero.pritunl.net using your top level domain and select the key created above. Then hold ctrl/cmd and click the link, outside of a Docker container the link will open automatically.
pritunl-ssh
# Enter Pritunl Zero user hostname: user.zero.pritunl.net
# Enter key number or full path to key: 1
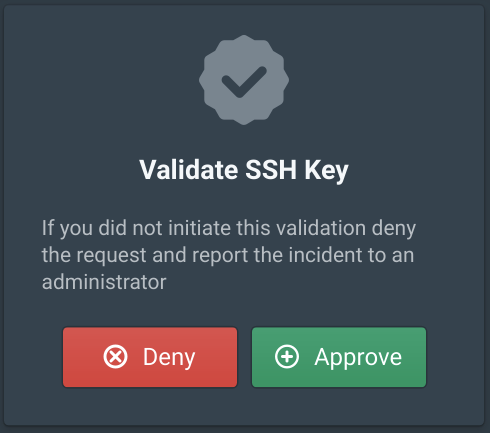
Login with the test user created above and click Approve.
Running cat ~/.ssh/config will show how the SSH client is configured. All SSH connections to 172.20.0.0/16 will be proxied through the bastion port. Then the @cert-authority will be used to strict host check the bastion.zero.pritunl.net server. This prevents man-in-the-middle attacks for all connections that go through the bastion server. Even if strict host checking is not used on the other EC2 servers the first bastion connection going over the internet will be checked. All other applications based on SSH such as Git or Rsync will work with this configuration.
cat ~/.ssh/config
# pritunl-zero
Host 172.20.*.*
	ProxyJump bastion@bastion.zero.pritunl.net:9800
# pritunl-zero
Host bastion.zero.pritunl.net
	StrictHostKeyChecking yes

cat ~/.ssh/known_hosts
@cert-authority bastion.zero.pritunl.net ssh-rsa AAAAB3NzaC1yc2EAAAADAQABAAACAQDC1GOk0Bygw2iOle8kmxcP8bygtj8NscI6czW72lkOep6Mle2mqpKAEjT+4vZPpw5uYEjkmPROOAzDv4YOpRnv/yAJ2Q+IvNcA0HcbrKGAY0eVIxNxp+N+YeMdlvKJrrZkChIs3gmBIjBGqGI2DOqSrPrKLBgf/4WoSyecSm7PYF6kKouTenHCkKYtdWhgvDopZ7xpeDmUUa0lNAe9ph84bXxgAZUNZhZlW7kZoezkDn9Jnh90a0K3JfXShcspyEWtyold84Png27qgFJkwRnXou4uK3hMqu/CLhqVeS9wYGEdnajXv2Z7cEamBjkxvHbJuH+hC1tulKonTCWNMIno8pO/fiQ7rT2pEDd8haJbMMkaAiJi/JiSk2xoDDMY3VPfV6csujdNSnOyZk9b27OvthXK307AO0/Qvt4G5dvRMGiJP3stxpLApft2zg810TrgE6SQ5xyZLYvx+/KZU0k0ZbXyz/4ySpQBQebLIs96clhFQNn1MfBIjbZD1sA9Kcbts4ET7jd2eeM5Gm0FW4Exrfba0t5QUphrgVVNtVYNPeKMnApEPFC/rNiEFJpDz1xoYc1DaBqjCxkMhqyi6bE2Zog5Bv/wbX+BkY15BwSrAf2X6V9h7oQBcmJdRCCmfc866KKpgZ1ogCjUdNVqi97FCRekSMRCW7QJ0lkW1uM3JQ== # pritunl-zero
Next connect to the test instance using the instances VPC IP address for in this example the instance address is 172.20.45.178. This should prompt to verify the host certificate of the 172.20.45.178 but no prompt should be shown for the bastion host which will be using strict host checking. This will demonstrate how a user will securely access instances in the VPC using VPC IP addresses with connections going through the bastion server.
ssh ec2-user@172.20.45.178The SSH client will be able to connect to any servers with the developers role until the certificate expires. By default the certificate will expire in 10 hours this can be changed in the authority settings. For a more secure configuration very short expiration times such as 1-2 minutes can be used. Any open SSH connections will remain connected even after the certificate has expired.
Create GitLab Server
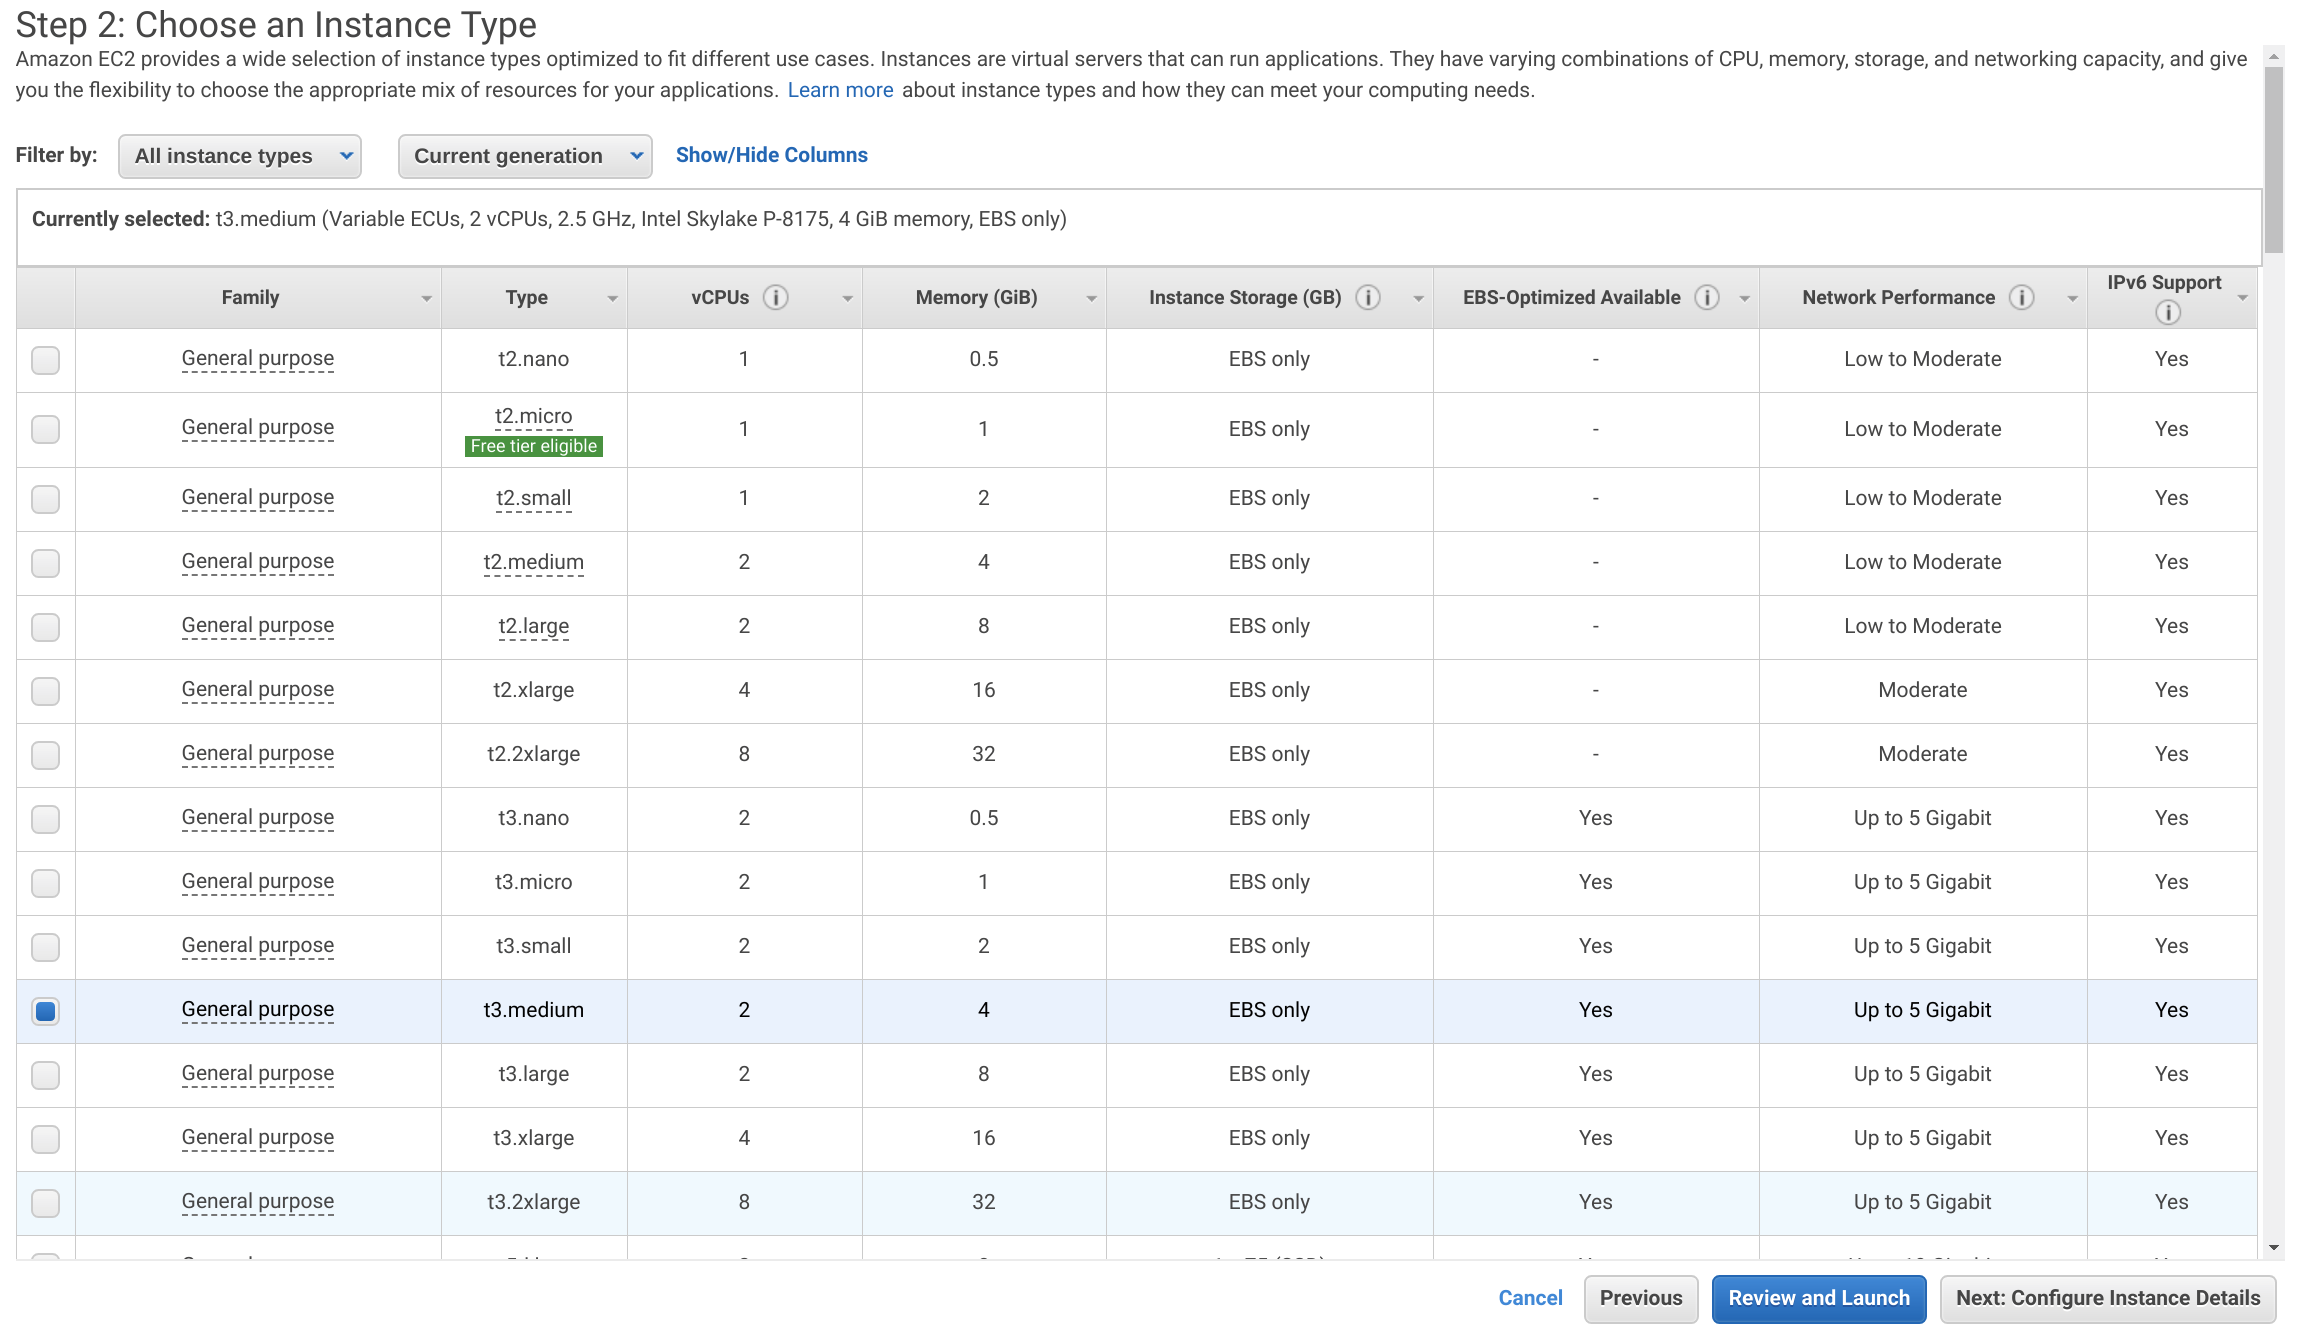
In the EC2 Dashboard click Launch Instance then select Amazon Linux 2 AMI and set the Instance Type to t3-medium. Then click Next: Configure Instance Details.
From the Authorities tab in the Pritunl Zero web console click Generate Deploy Script. Then add gitlab-admin to the Roles. Only give this role to users that need administrator SSH access to the GitLab server. GitLab users will not need this role to use Git over SSH.
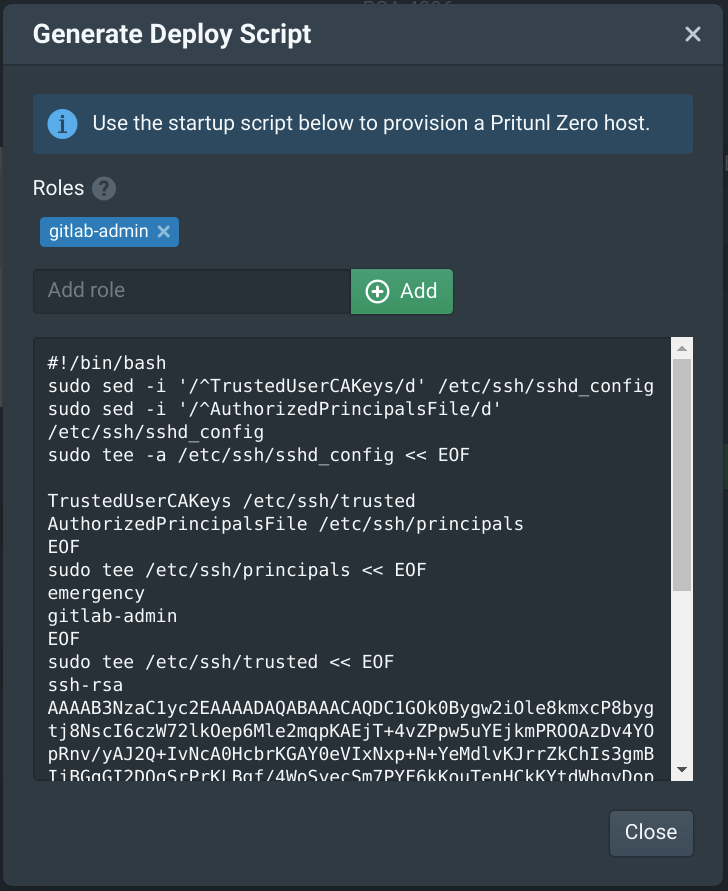
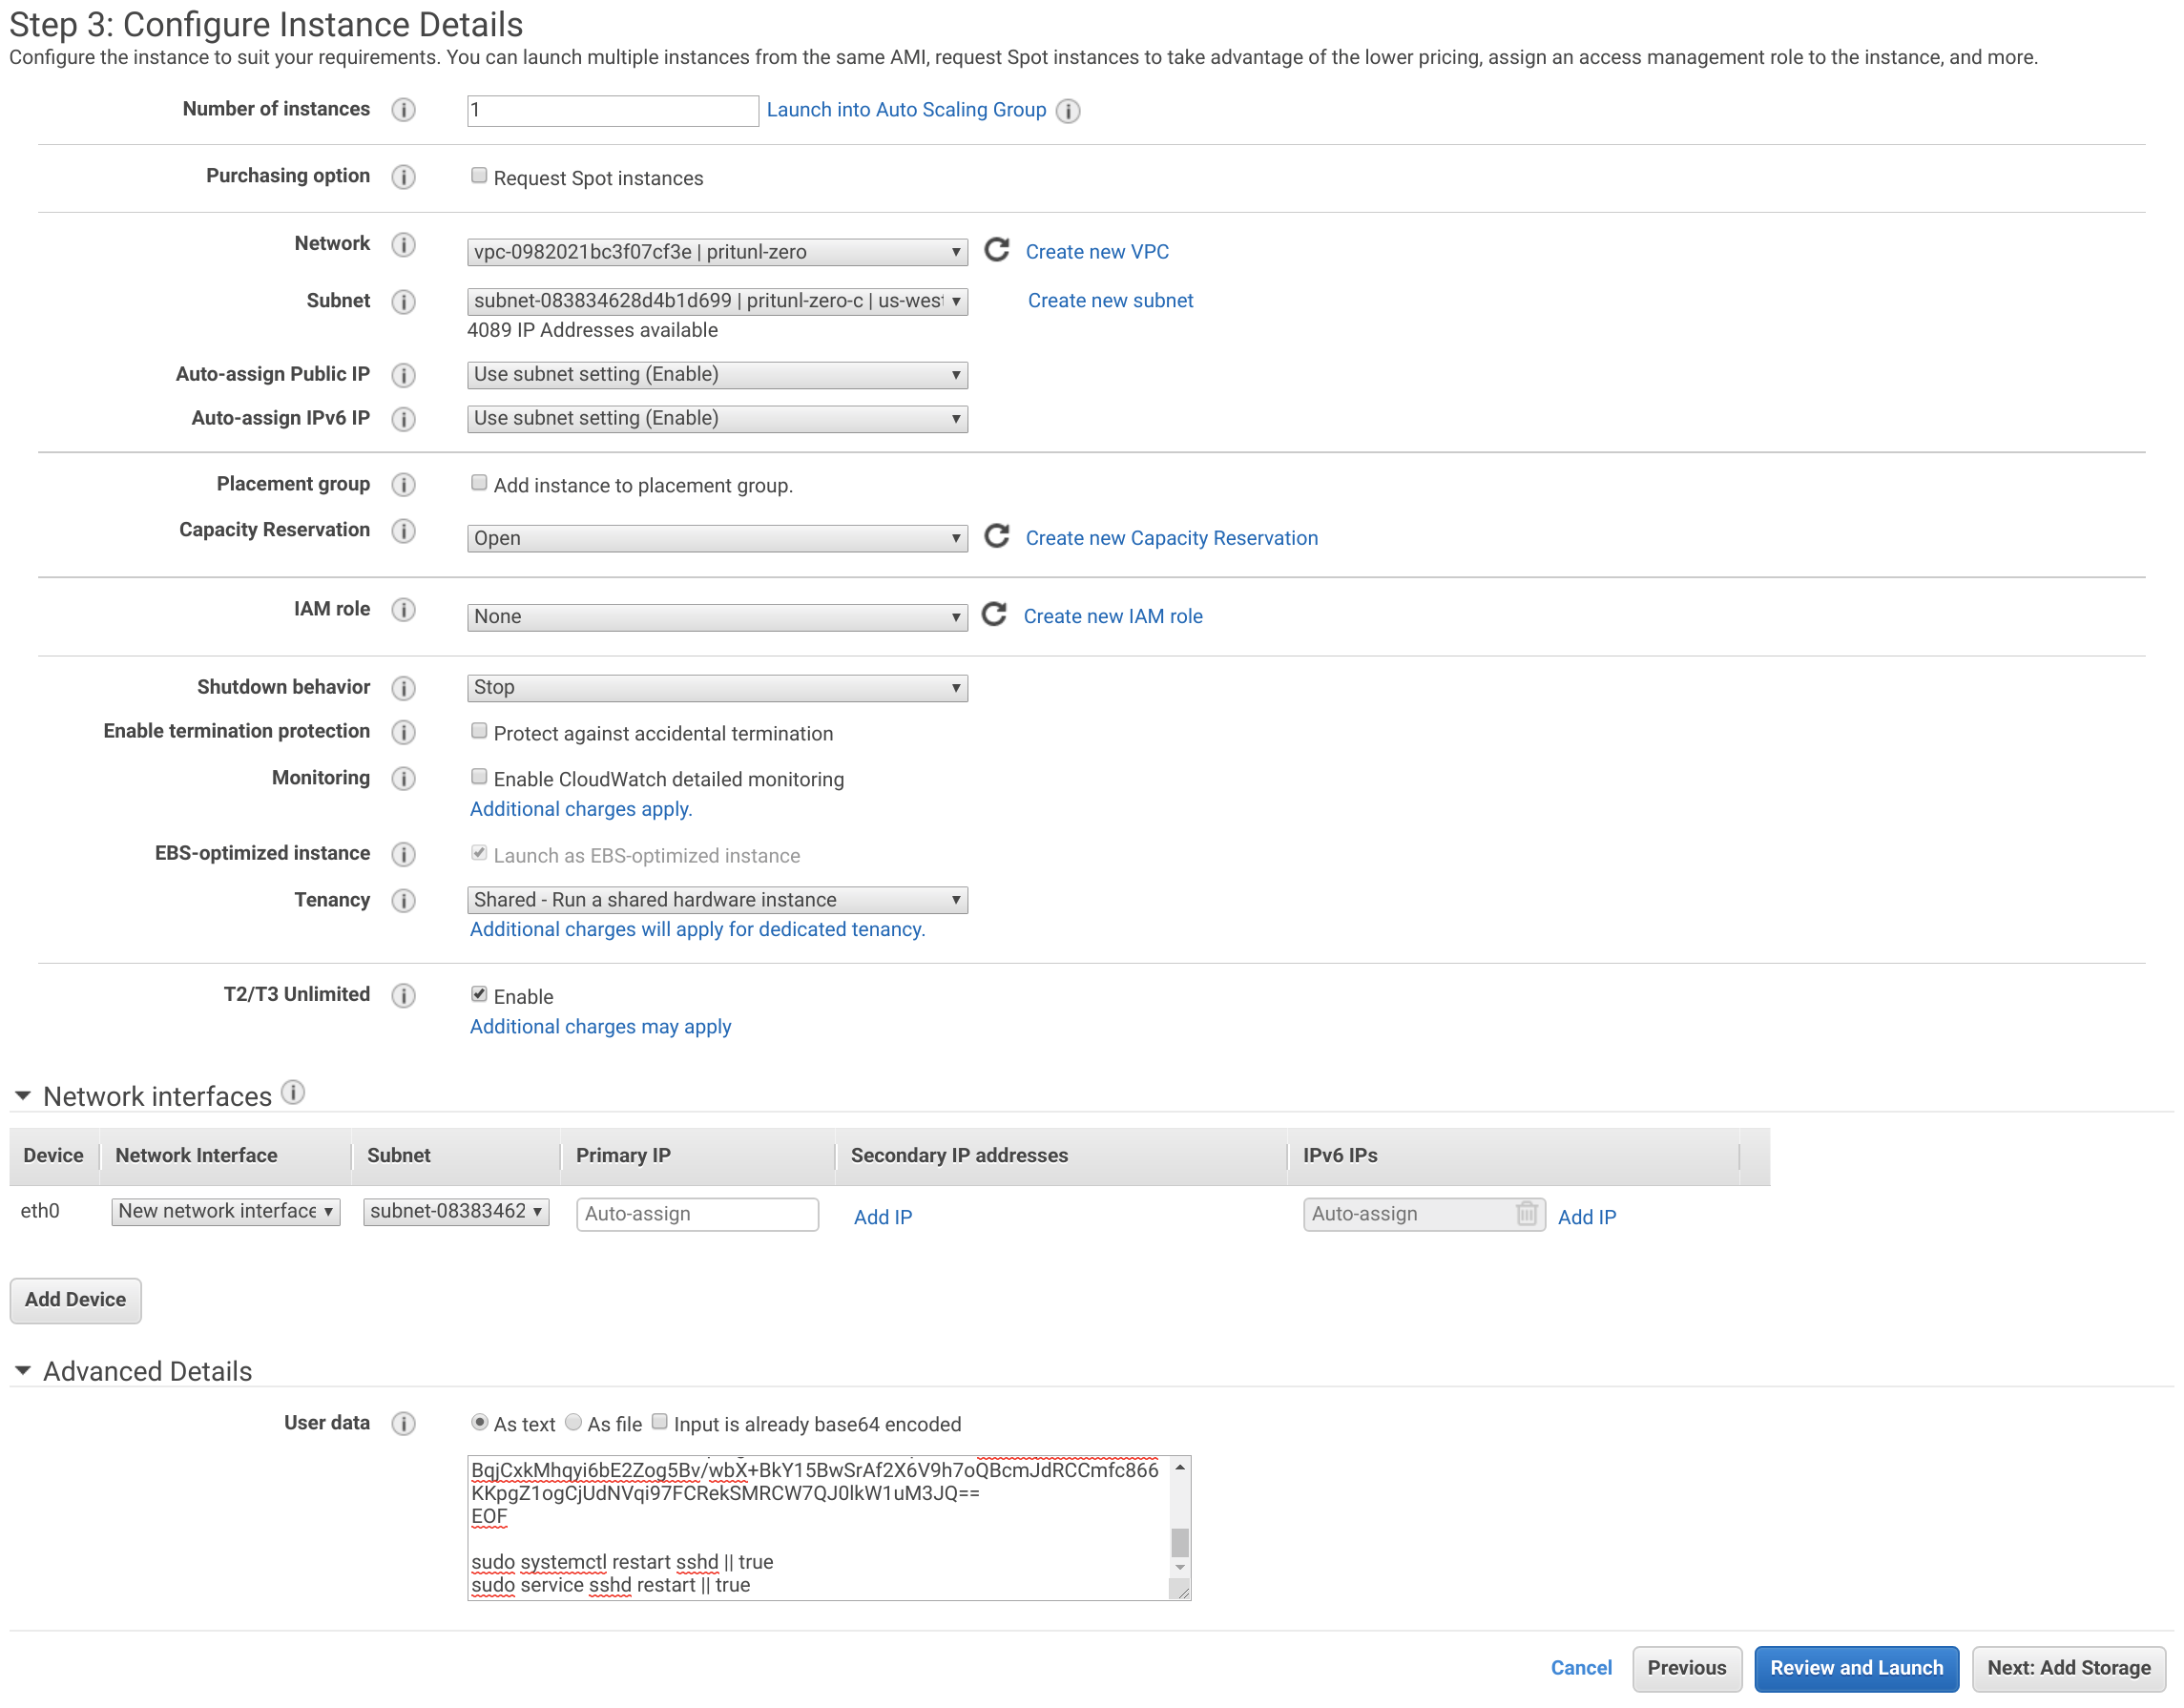
Copy this deploy script to the User data field in the instance Advanced Details section. Then set the instance Network to pritunl-zero and Subnet to pritunl-zero-c. Then click Next: Add Storage.
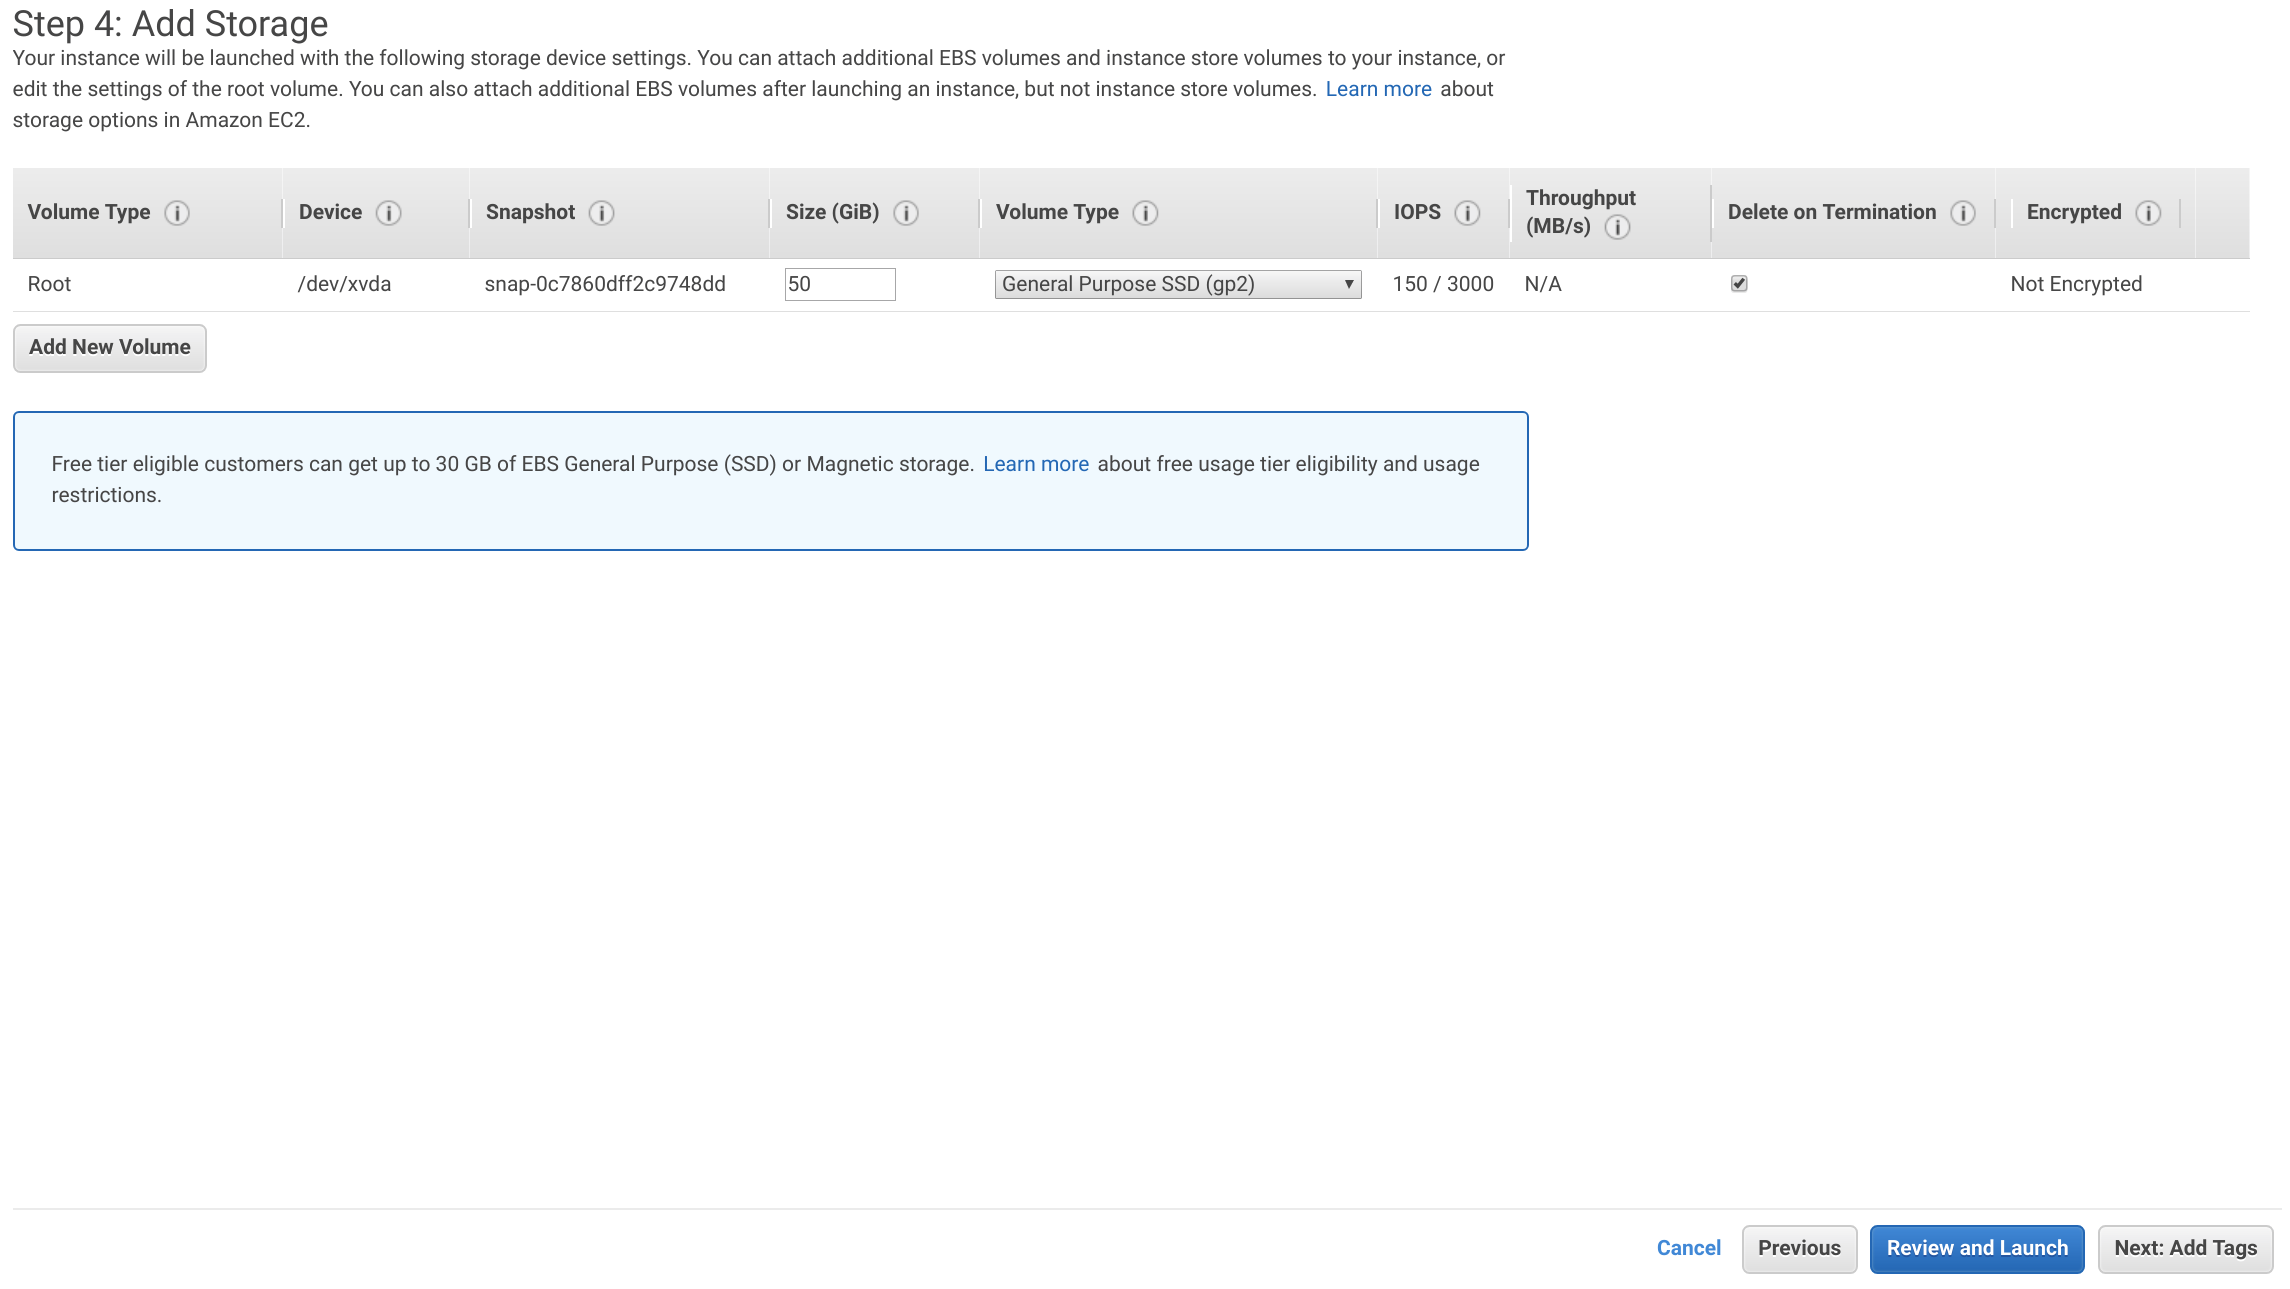
The storage size will be relative to the size of your organization and number of Git repositories. The GitLab data and database will be stored on this instance. A disk size of 50 GiB will be used for this lab. Then click Next: Add Tags.
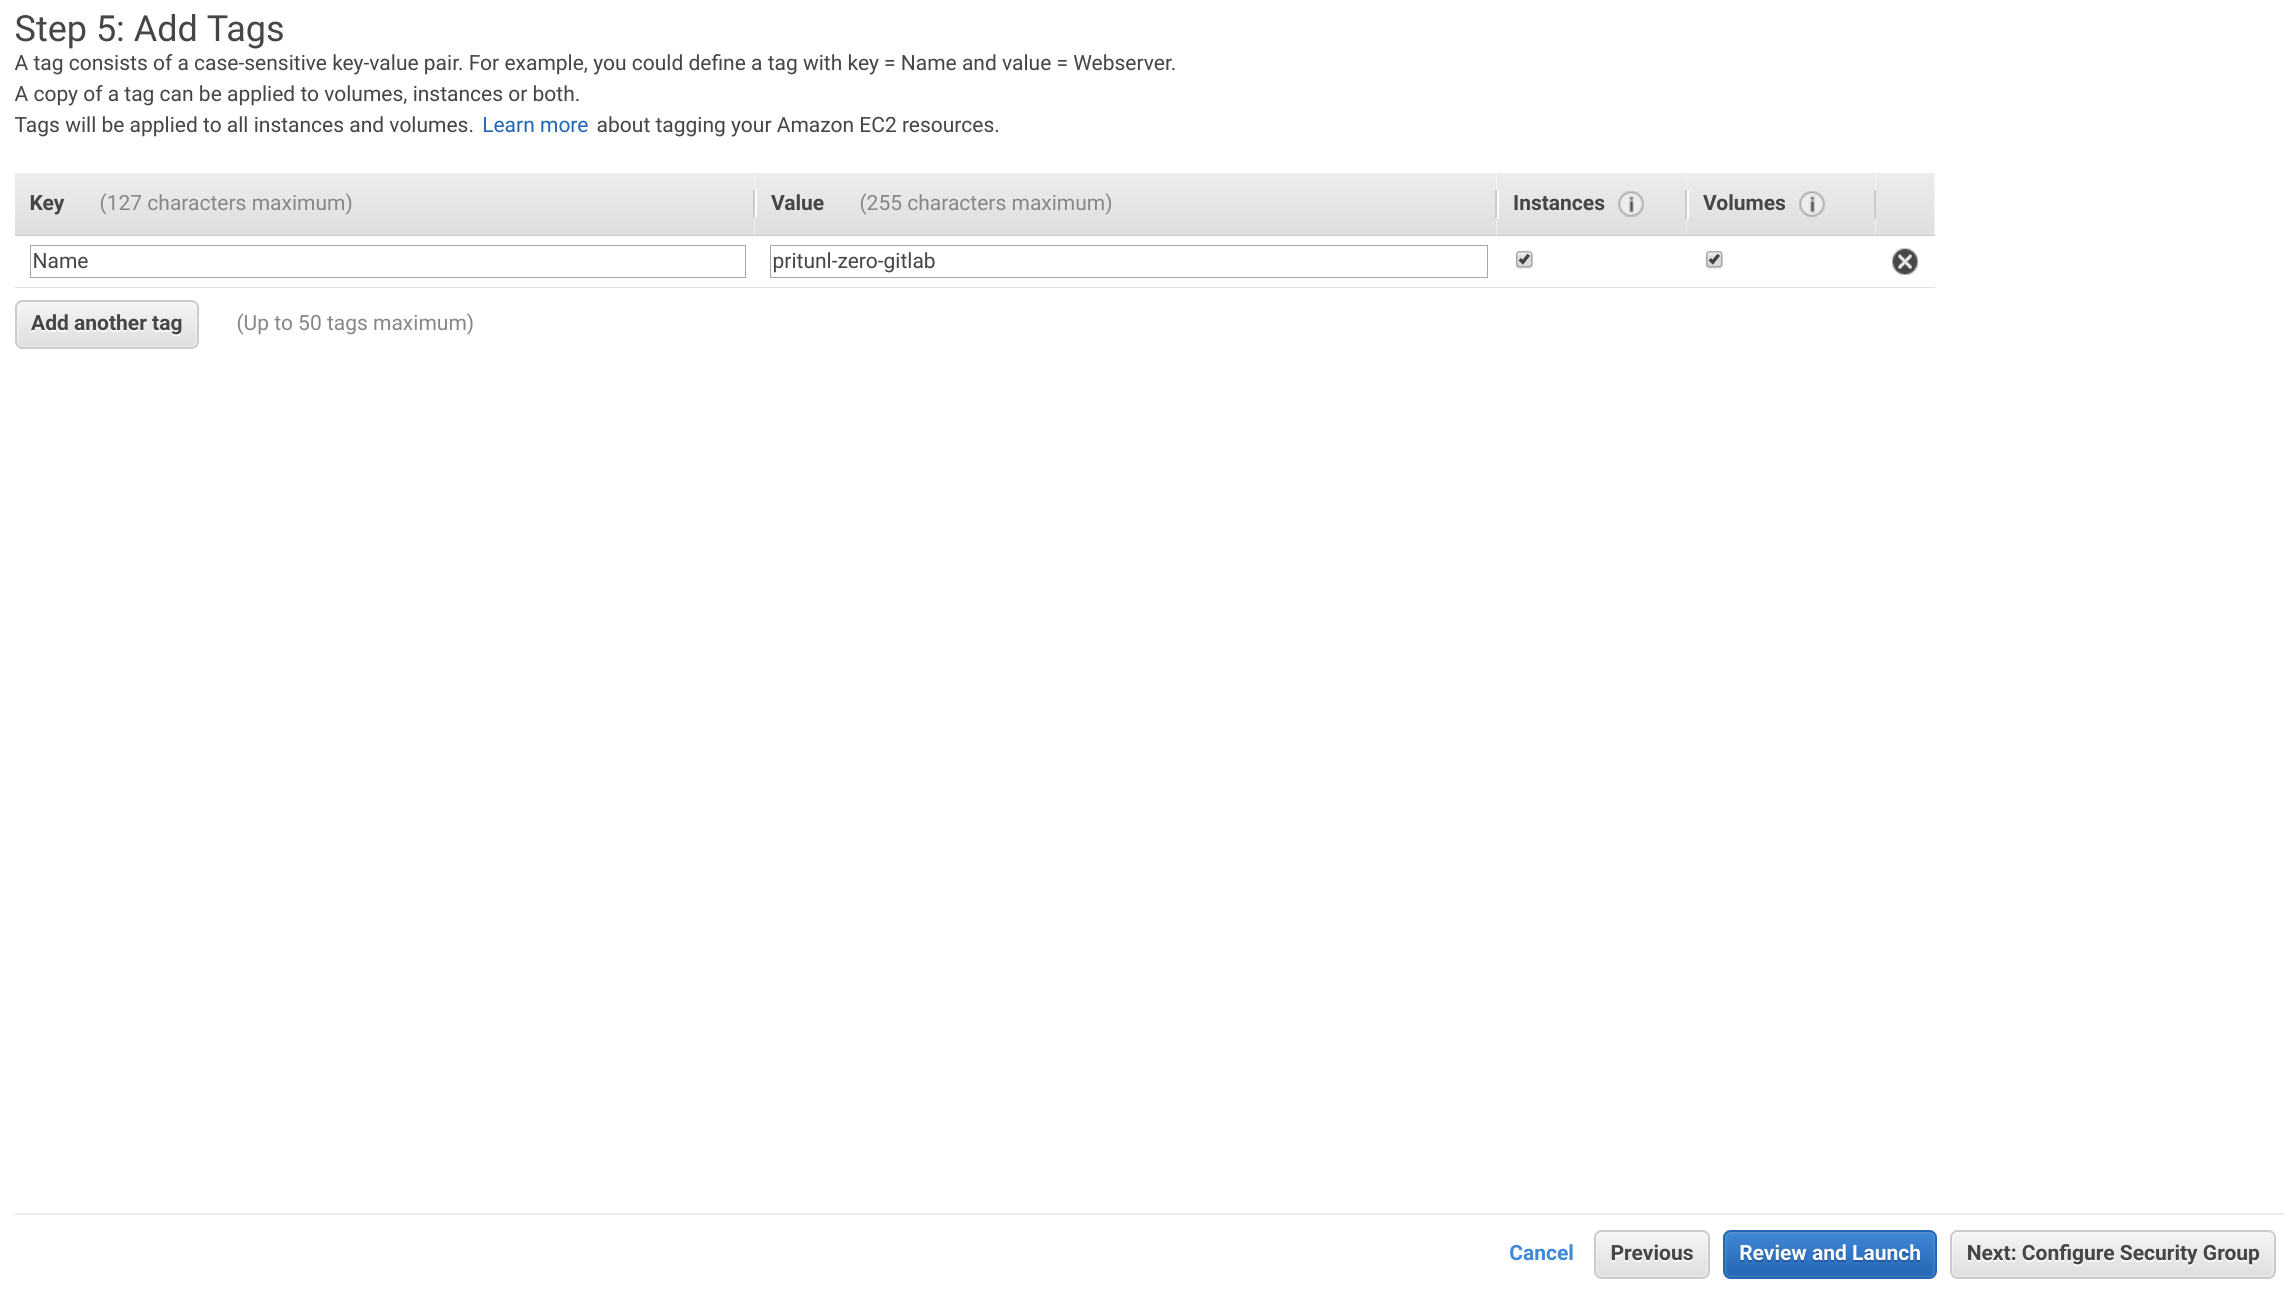
Add a tag with the Key set to Name and the Value set to pritunl-zero-gitlab. Then click Next: Configure Security Groups.
Select the pritunl-zero-gitlab security group then click Review and Launch.
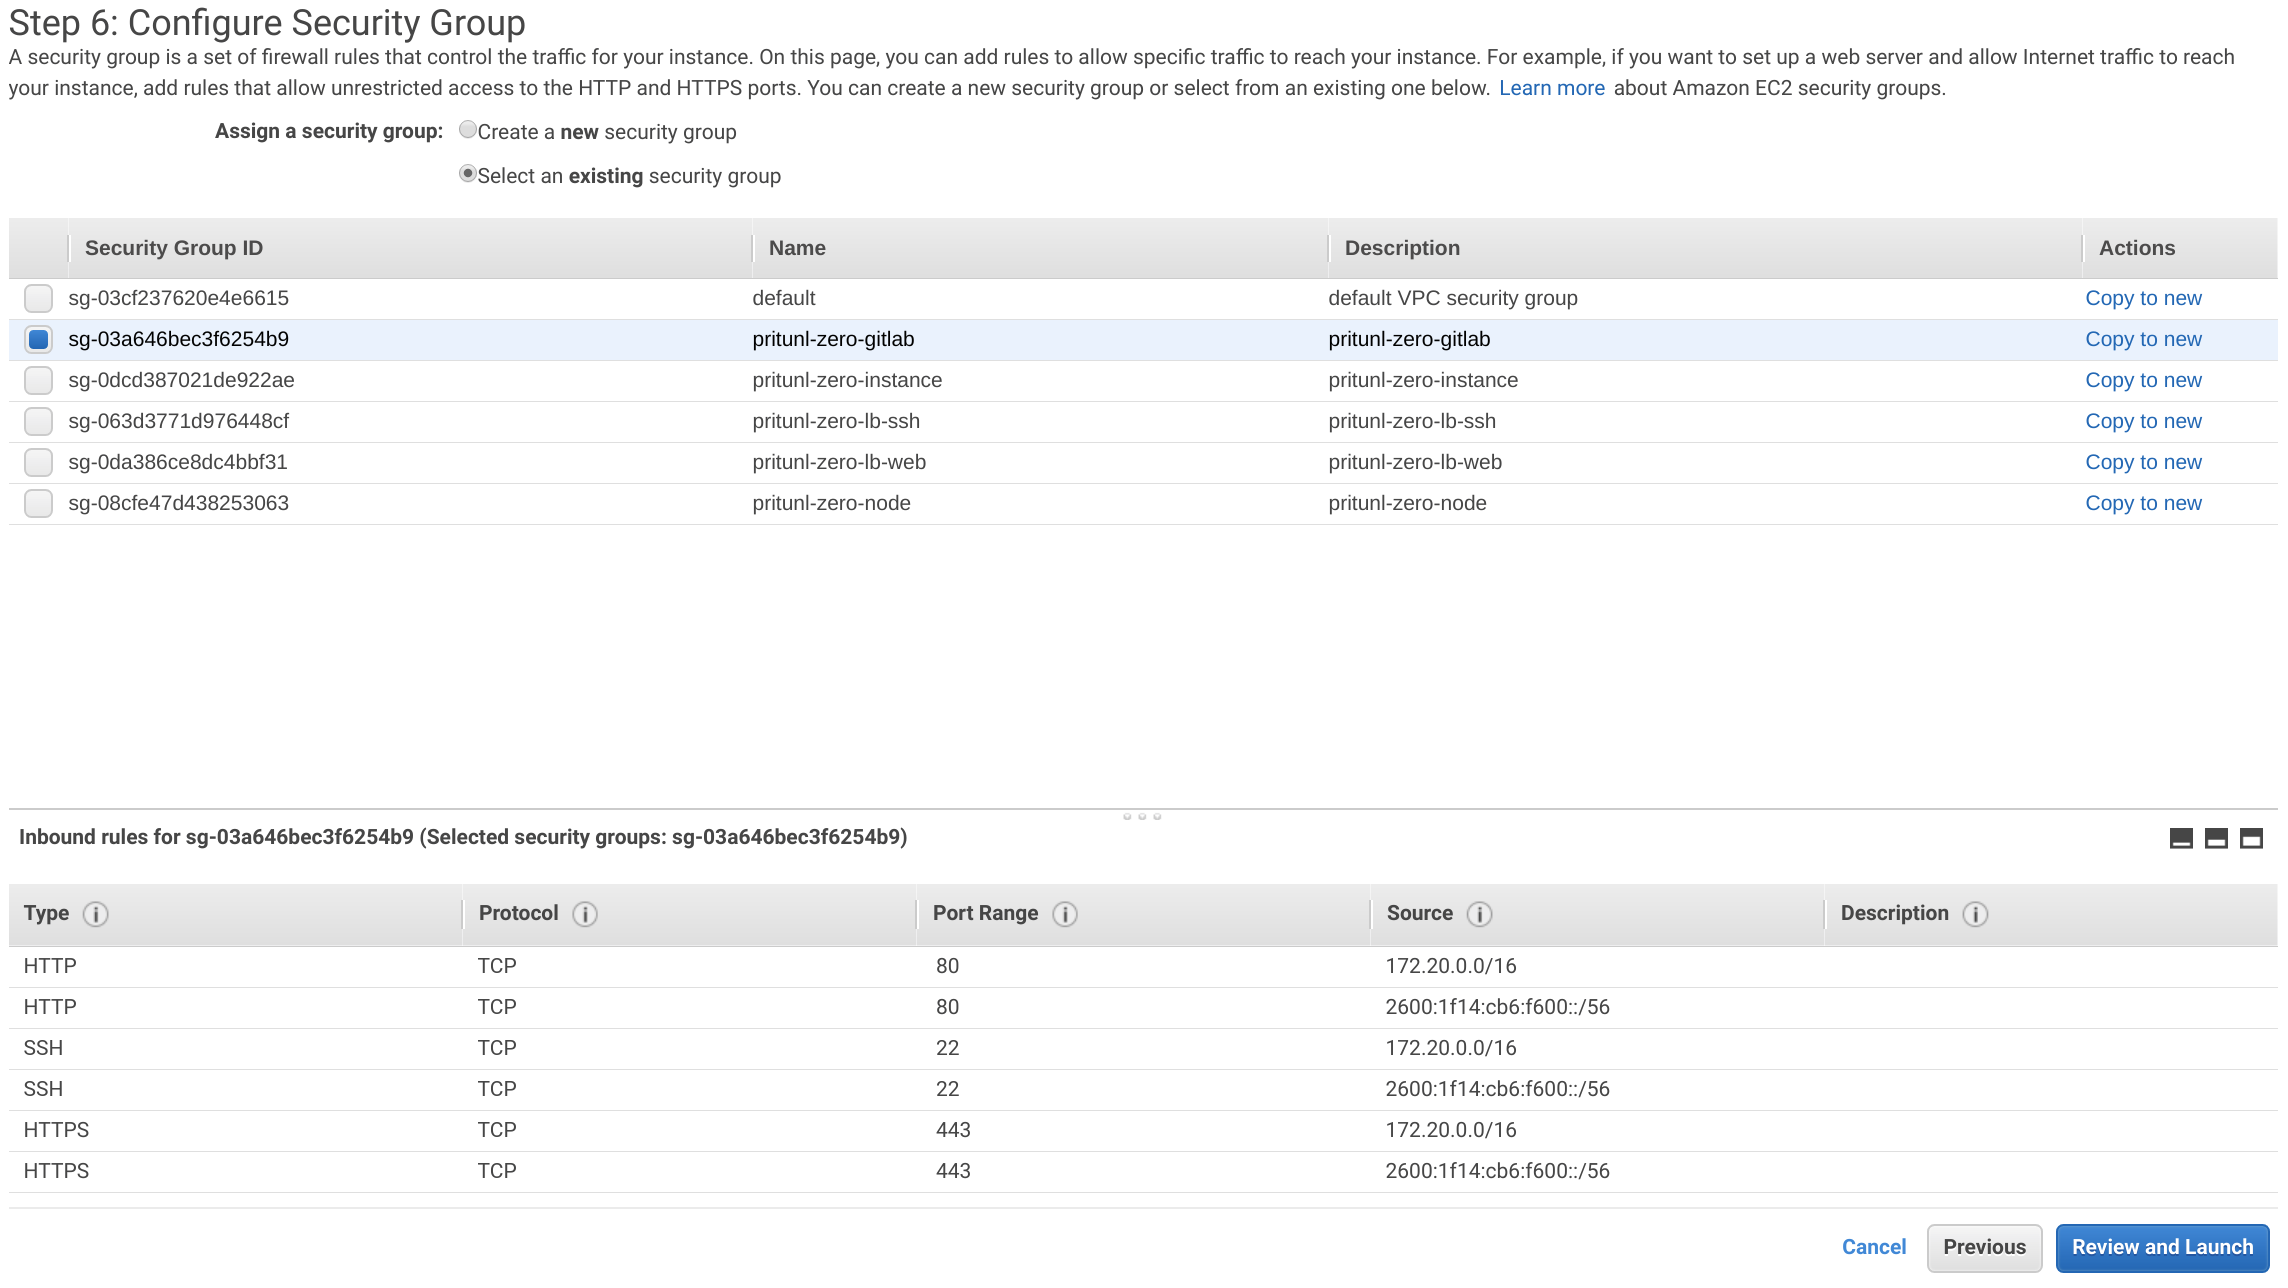
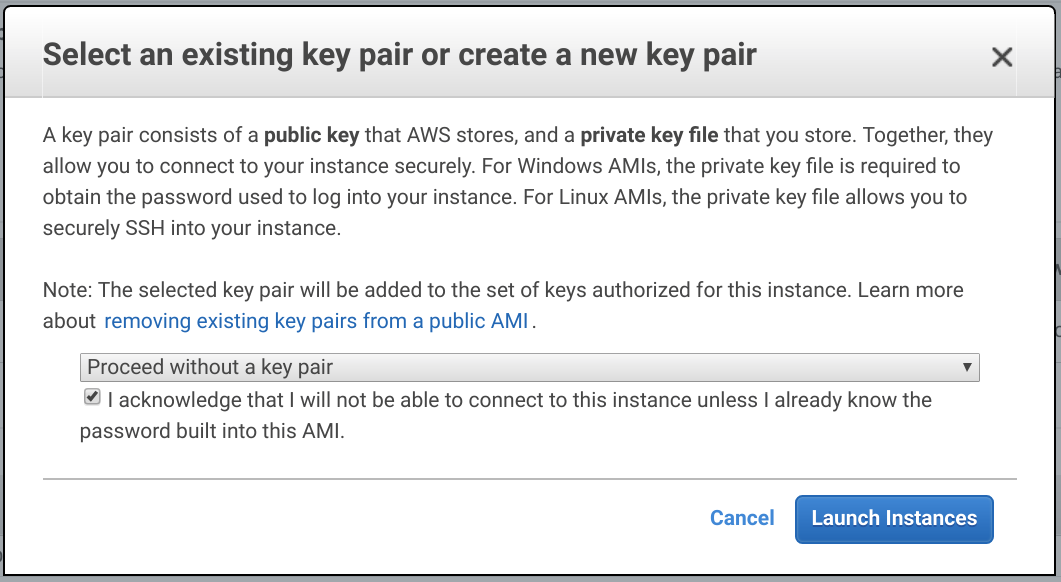
Click Launch then select Proceed without a key pair and click Launch Instance.
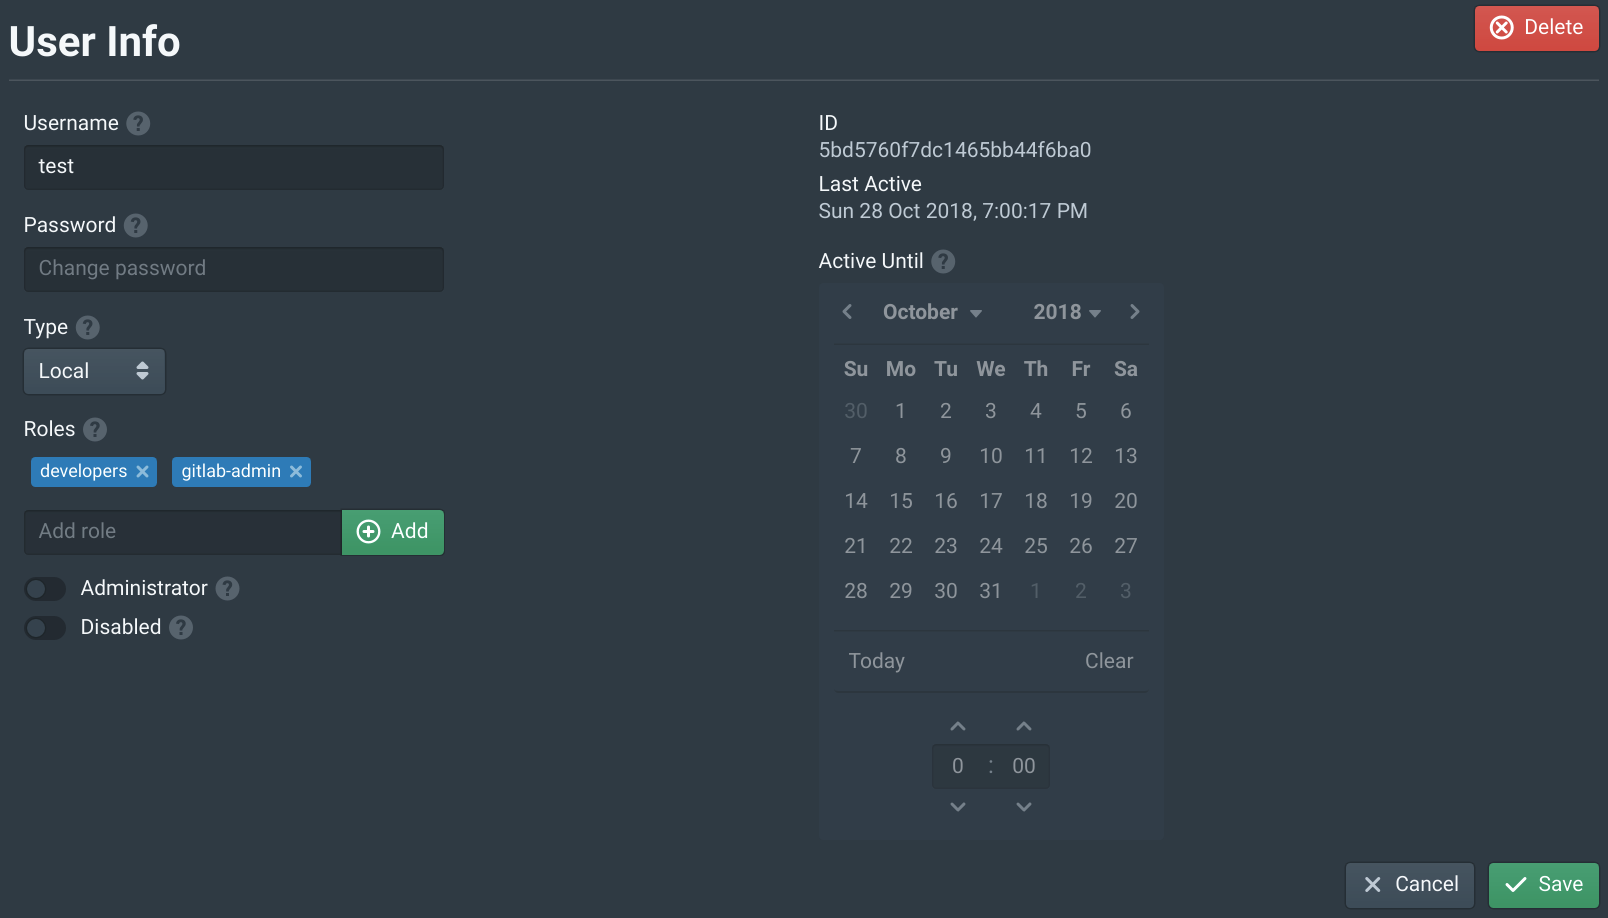
Open the Users tab in the Pritunl Zero web console and select the test user. Then add the gitlab-admin to Roles. This will allow this user to access the GitLab server. Once done click Save.
Run pritunl-ssh renew to force the SSH certificate to renew, this will add the new gitlab-admin role to the certificate. Then SSH to the instance using the VPC IP address with the pritunl-ssh client.
pritunl-ssh renew
ssh ec2-user@172.20.38.103
Once on the server upgrade the packages then install and start postfix. Then update the gitlab.pritunl.net url to your top level domain and install GitLab. The gitlab-ee package does not require a GitLab subscription and will allow adding one later.
sudo yum -y upgrade

sudo yum -y install postfix
sudo systemctl enable postfix
sudo systemctl start postfix

curl https://packages.gitlab.com/install/repositories/gitlab/gitlab-ee/script.rpm.sh | sudo bash

sudo EXTERNAL_URL="https://gitlab.pritunl.net" yum install -y gitlab-ee
Edit the GitLab configuration and modify the options below to configure GitLab for running behind Pritunl Zero. Update the gitlab.pritunl.net and ssh.gitlab.pritunl.net urls with your top level domain. Use Ctrl+W to search for the options in the configuration, some of the options will be commented.
sudo nano /etc/gitlab/gitlab.rb
external_url 'https://gitlab.pritunl.net'
gitlab_rails['gitlab_ssh_host'] = 'ssh.gitlab.pritunl.net'
nginx['listen_port'] = 80
nginx['listen_https'] = false
nginx['proxy_set_headers'] = {
  "X-Forwarded-For" => "$proxy_add_x_forwarded_for",
  "X-Forwarded-Proto" => "https",
  "X-Forwarded-Ssl" => "on"
}
Once done use the commands below to restart GitLab.
sudo gitlab-ctl reconfigure
sudo gitlab-ctl restart
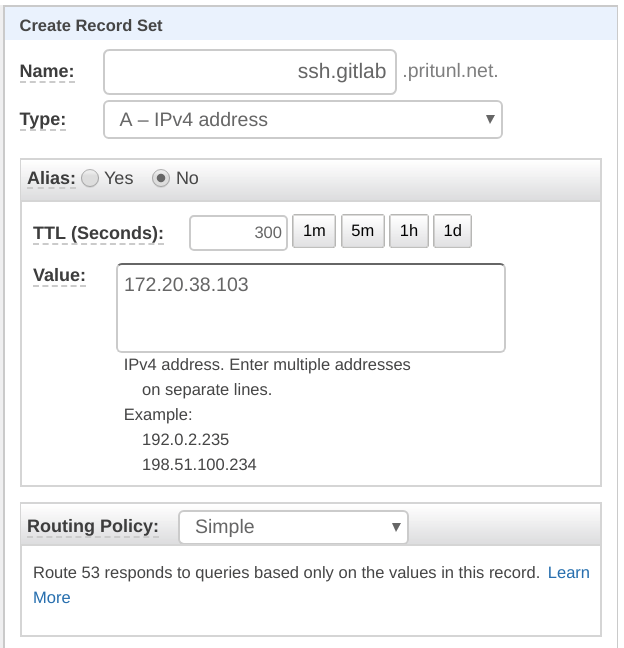
Copy the private VPC IP address of the GitLab instance and create the DNS record below for the GitLab SSH connection.
Name: ssh.gitlab.pritunl.net
Type: A
Target: <GITLAB_VPC_IP>
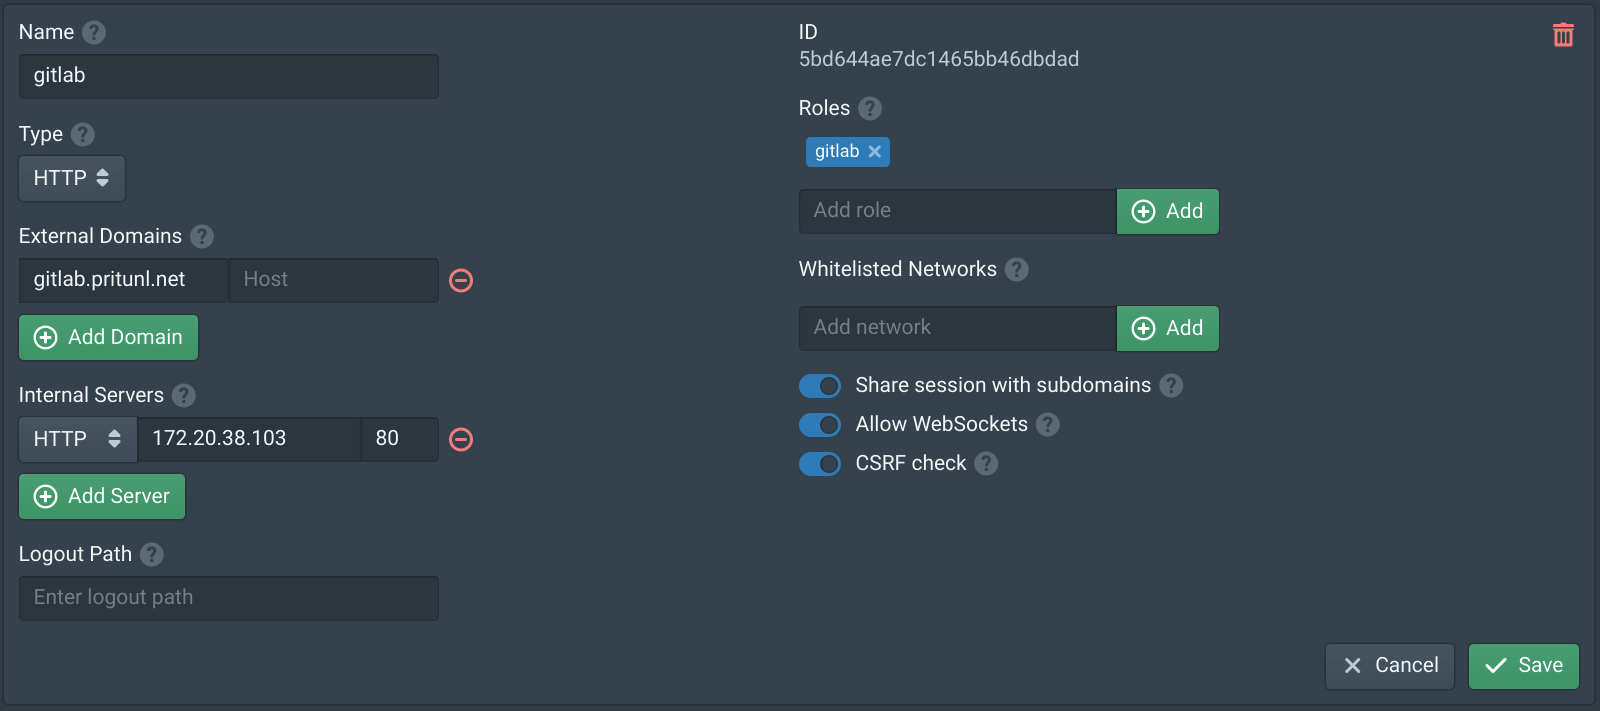
Open the Services tab in the Pritunl Zero web console and click New. Set the Name to gitlab then click Add Domain. Set the Domain to gitlab.pritunl.net using your top level domain then click Add Server. Select HTTP and set the Hostname to the GitLab VPC IP address, in this example it is 172.20.38.103. Then set the Internal Server port to 80. Then click Save.
Open the Authorities tab and add ssh.gitlab.pritunl.net using your top level domain. This will proxy the GitLab SSH connection through the bastion host. Then click Save.
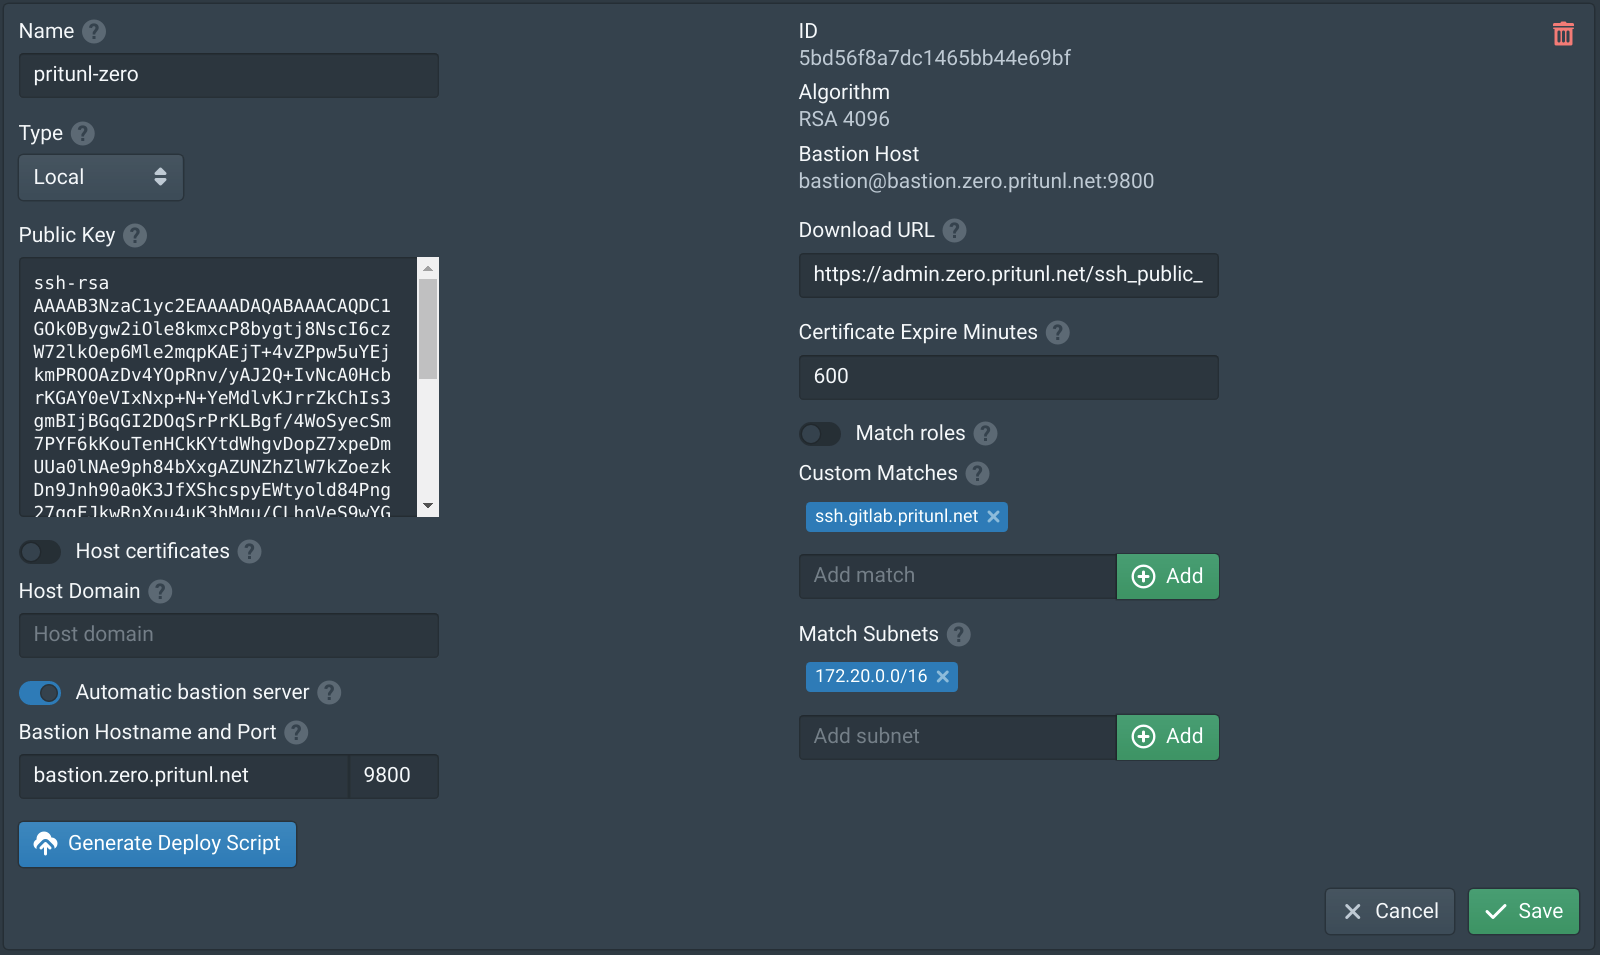
Run exit in the GitLab SSH terminal to exit from the GitLab server then run pritunl-ssh renew to force the SSH certificate to renew. This will update the SSH configuration with the GitLab SSH domain match.
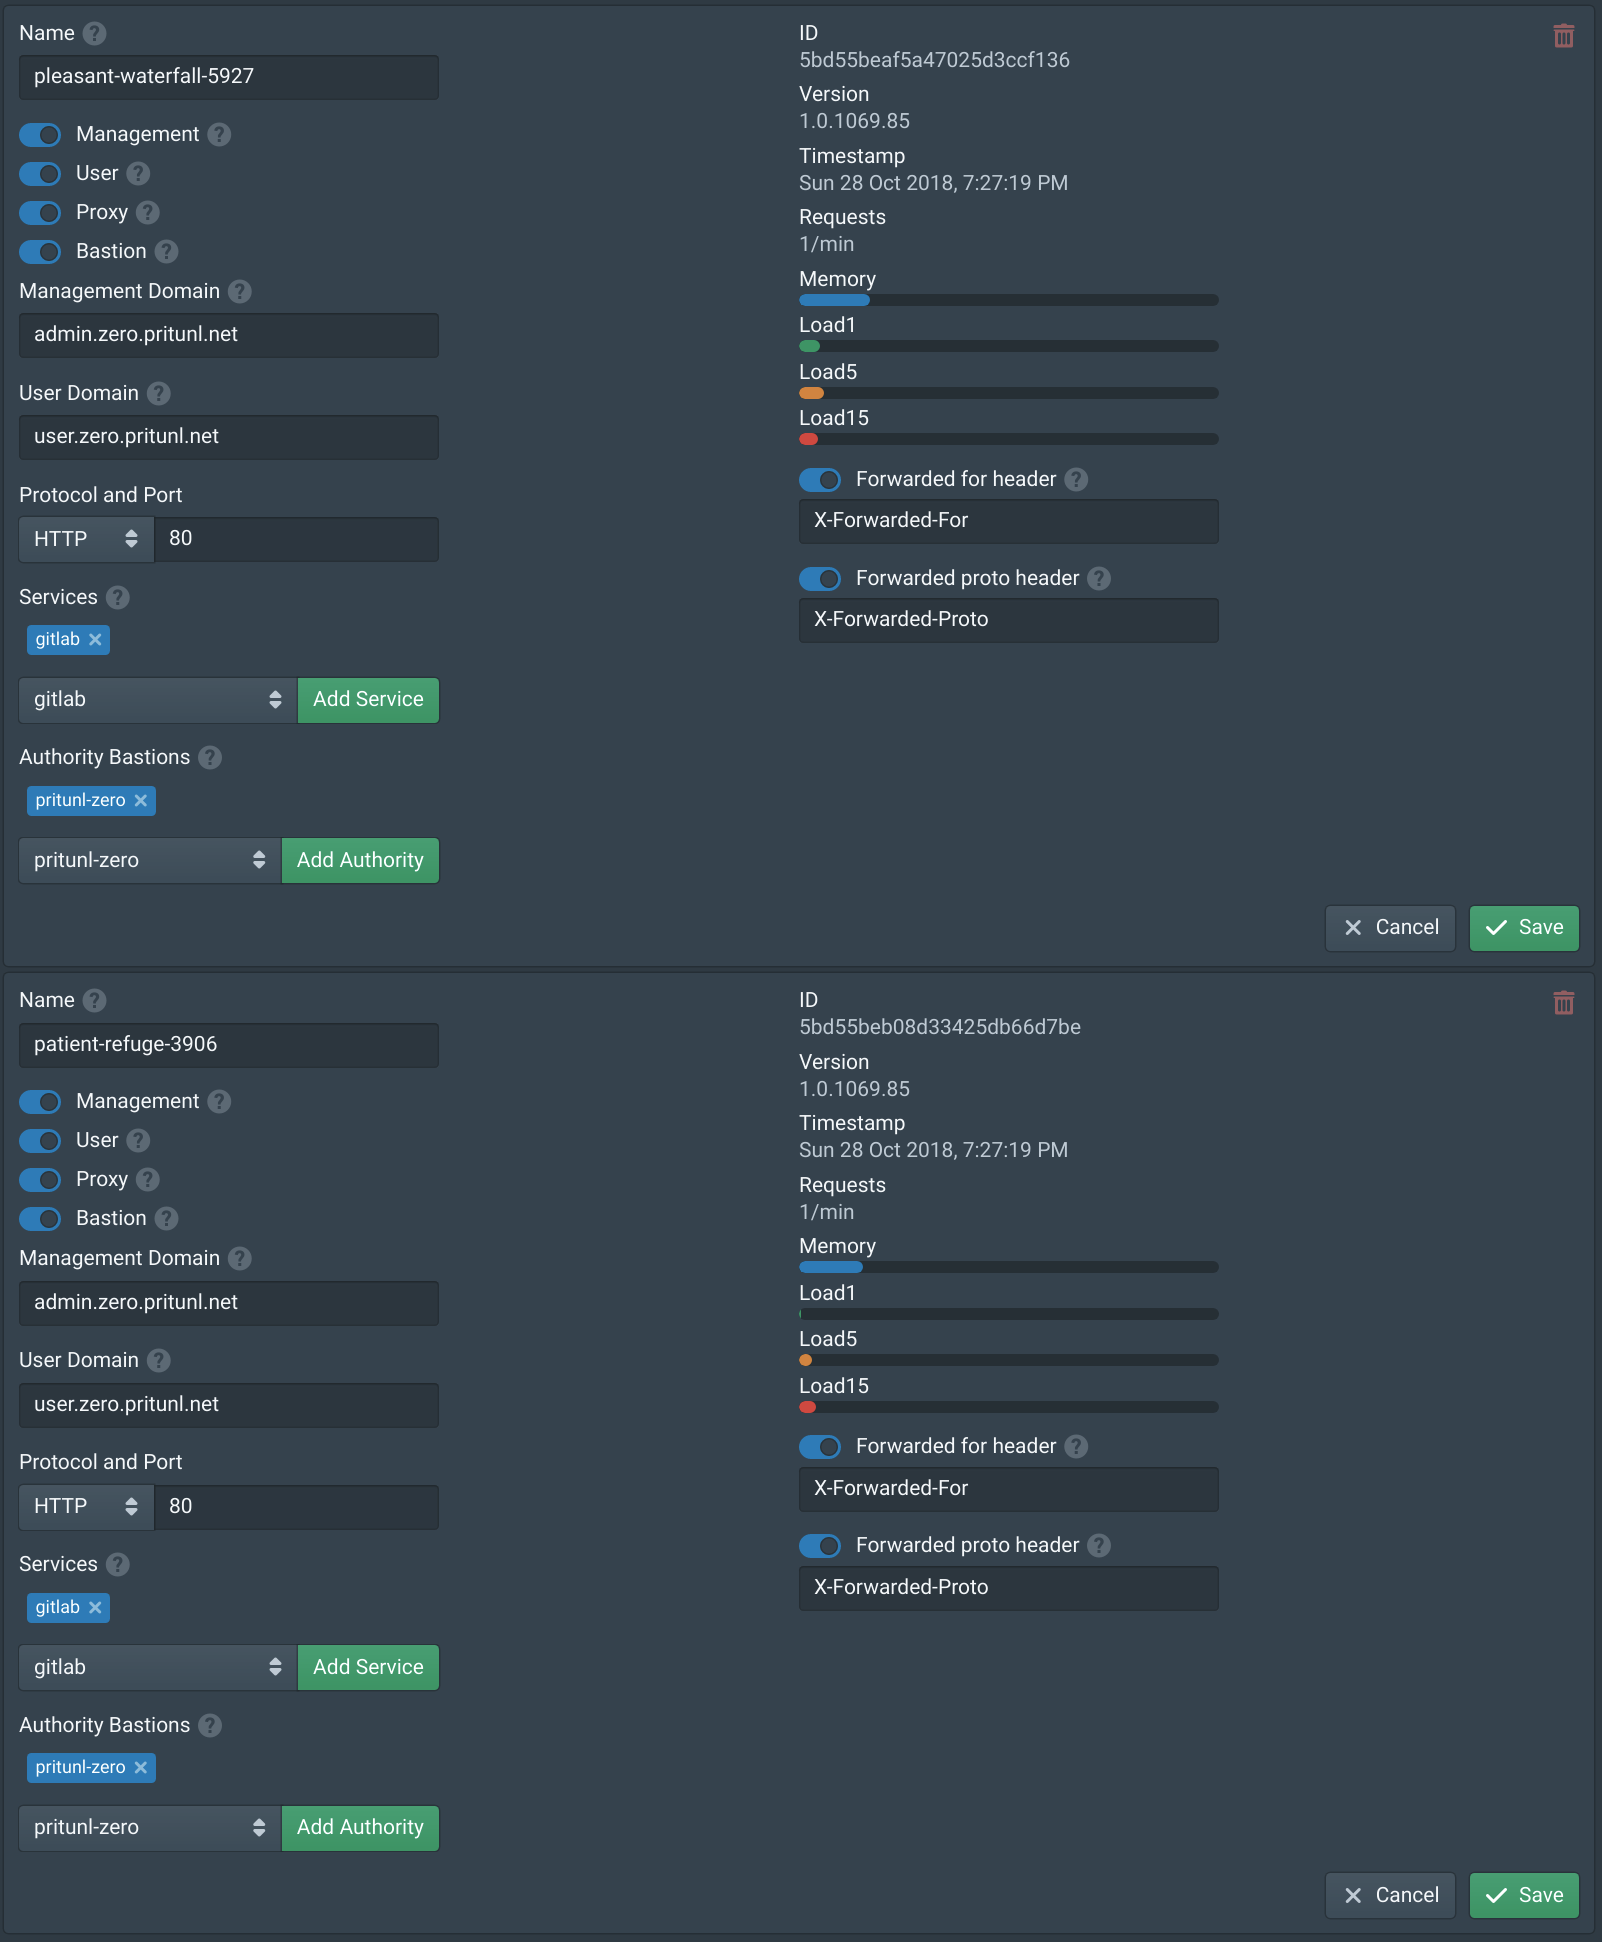
pritunl-ssh renewOpen the Nodes tab in the Pritunl Zero web console and enable Proxy on both the nodes. Then add the gitlab service to both nodes. Then click Save.
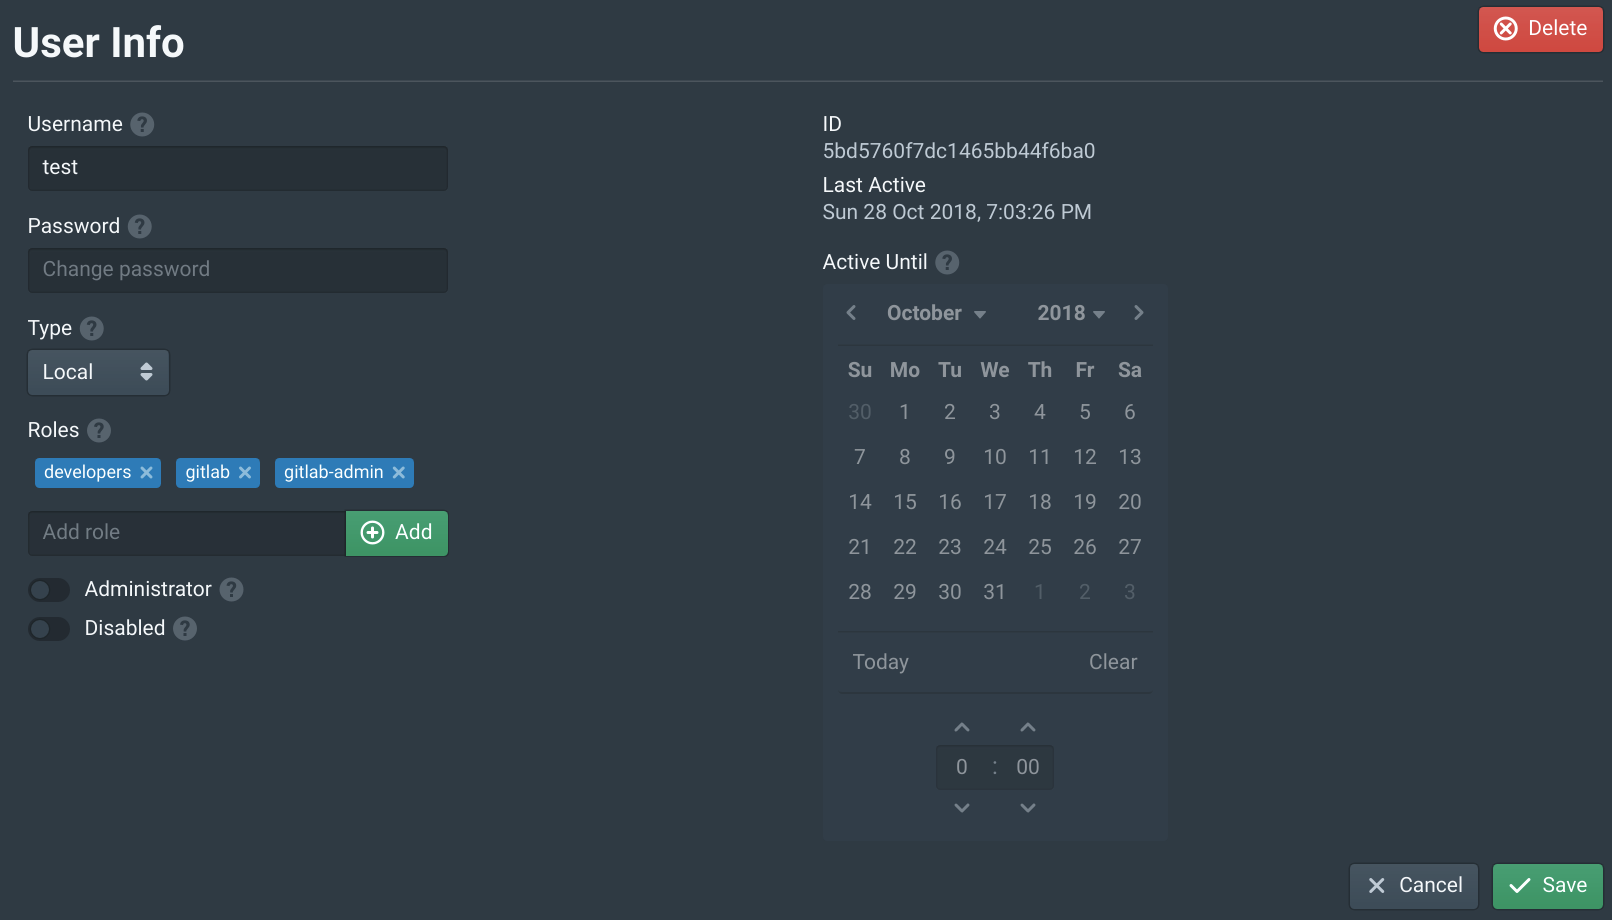
Open the Users tab in the Pritunl Zero web console and select the test user. Then add the gitlab to Roles. This will allow this user to access the GitLab web console. All users that need access to GitLab will need this role. Once done click Save.
Configure GitLab
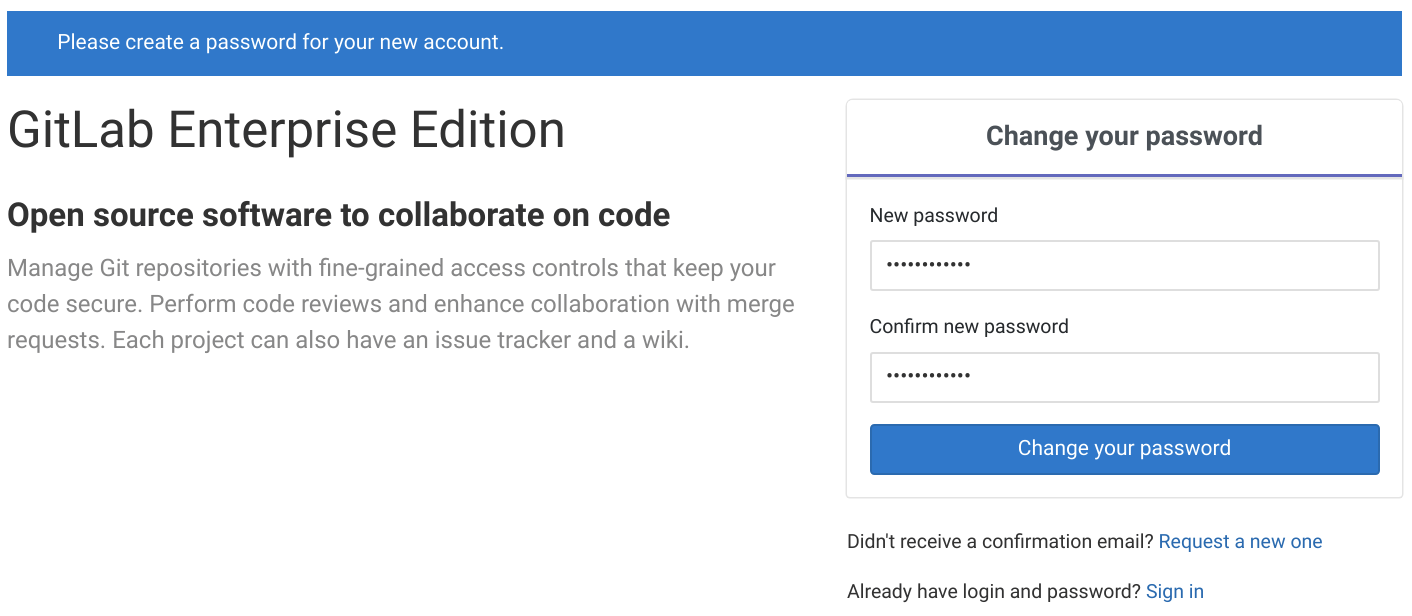
Open https://gitlab.pritunl.net using your top level domain and login using the test user to access the GitLab web console. Then set a GitLab administrator password.
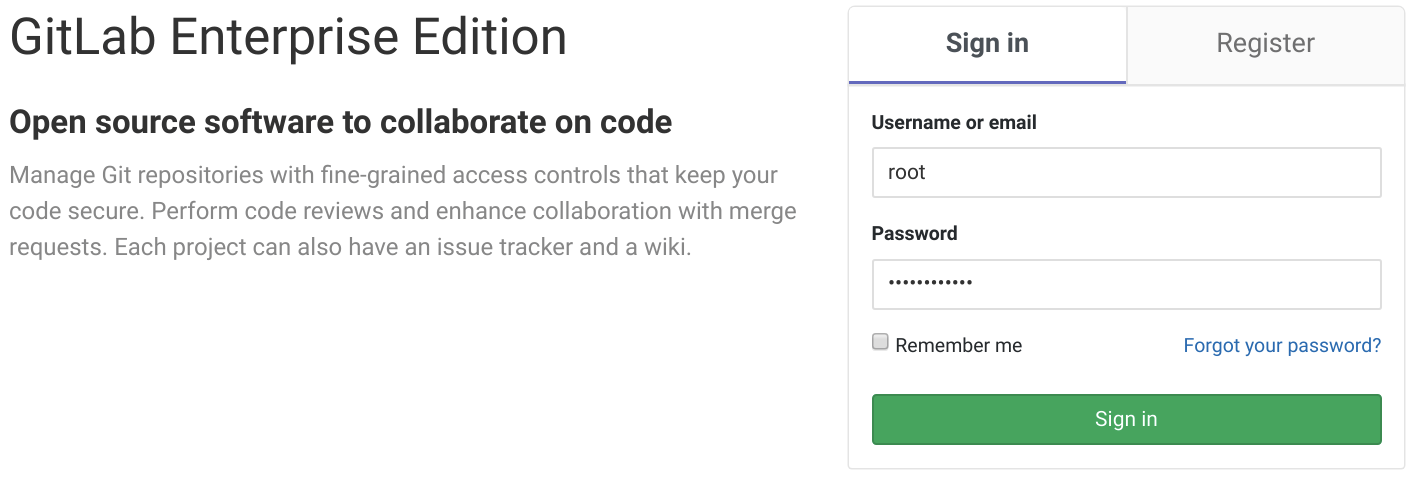
Next login with the username root and the password set above. Once logged in open the Admin area in the top.
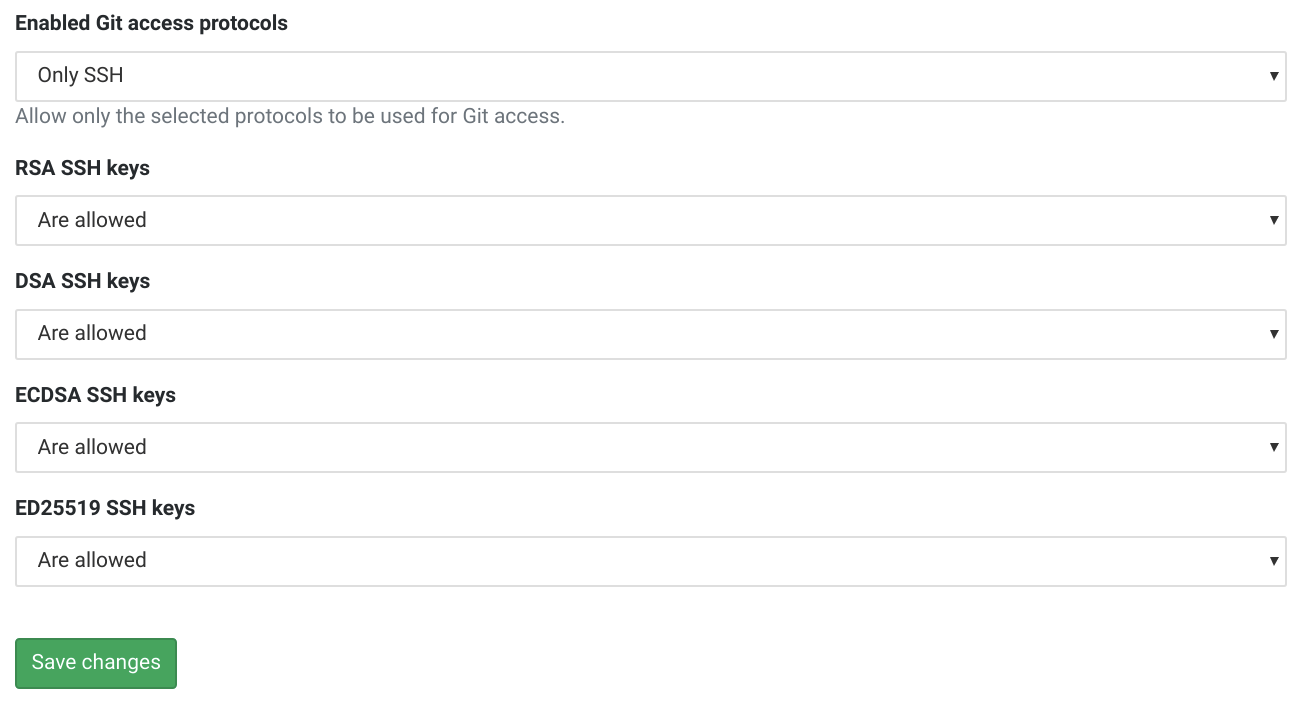
In the Admin Area select Settings the click General. Expand Visibility and access controls and set Enabled Git access protocols to Only SSH. Then click Save. The other default settings should work for small enterprise deployments. Once done click Sign out in the top right.
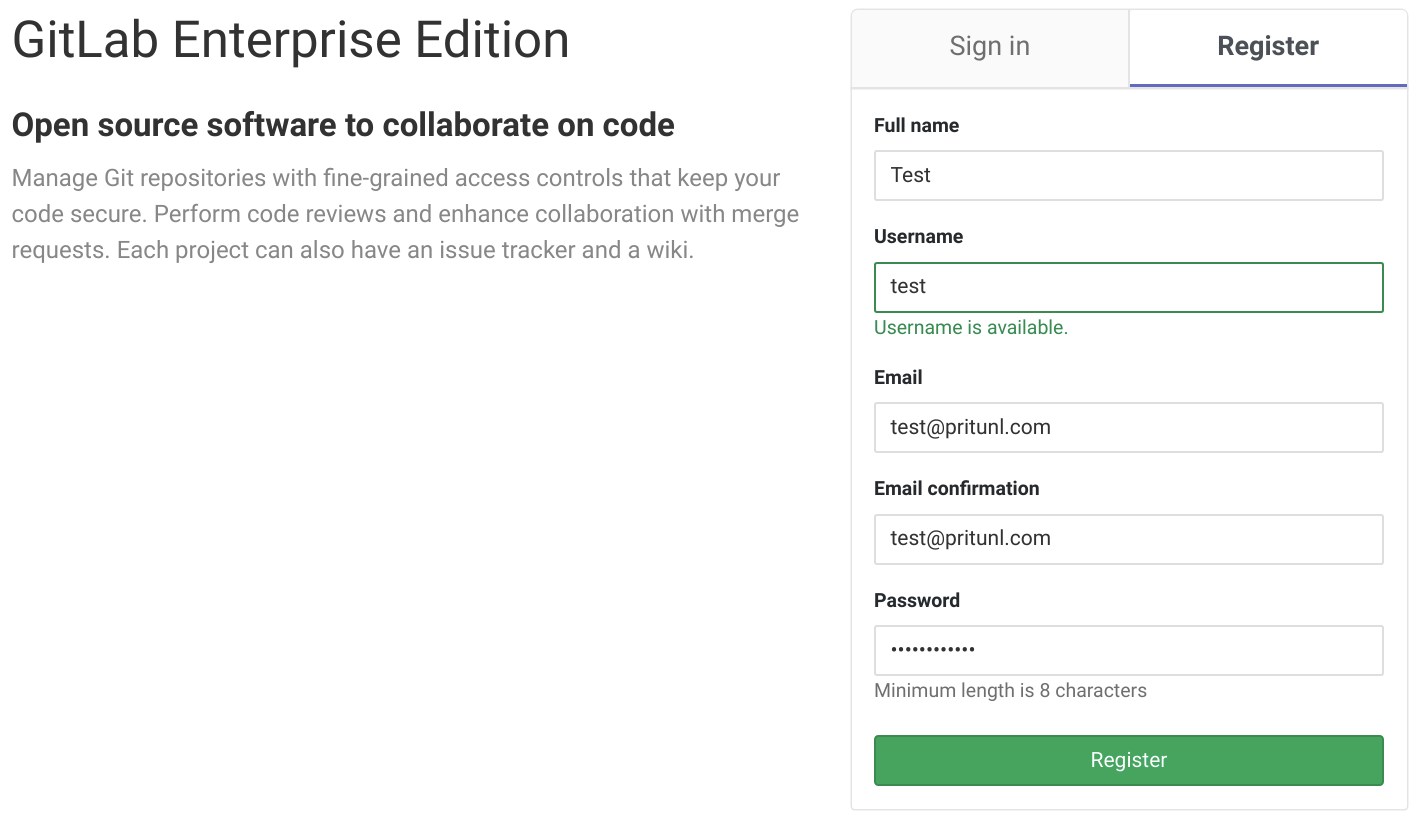
After logging out click Register and create a personal user account. This is the process employees will follow after authenticating with Pritunl Zero. Single sign-on is available for both Pritunl Zero and GitLab which is recommended for larger companies.
After logging into the personal GitLab account click Settings in the top right menu then open the SSH Keys tab. Then set the Title to pritunl-test. Run the command cat ~/.ssh/id_ed25519.pub on the computer with the pritunl-ssh client. Copy the public key to the Key field on GitLab. Then click Add key.
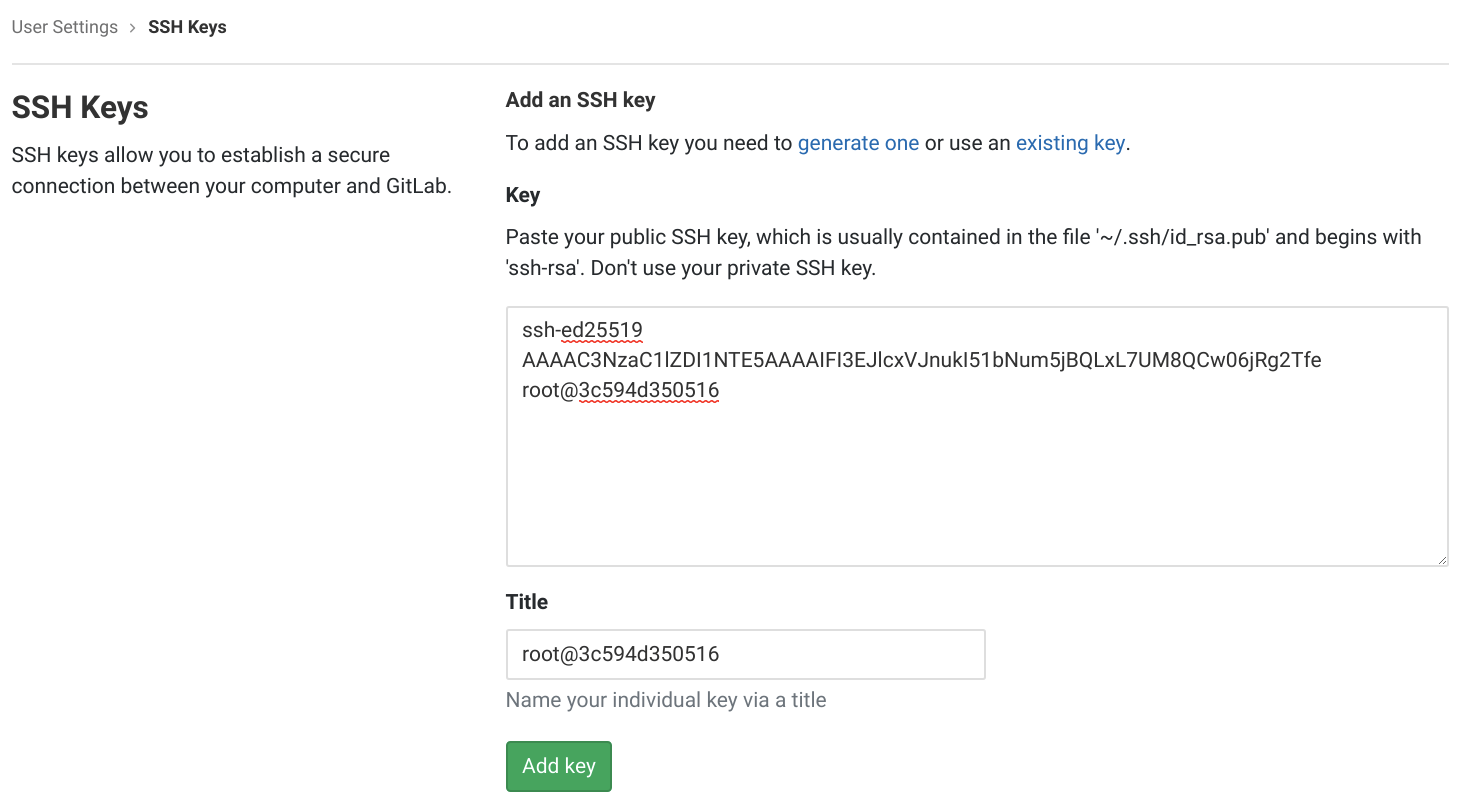
After the key has been added click the GitLab logo in the top left and then New project. Set the Project name to test and click Create project.
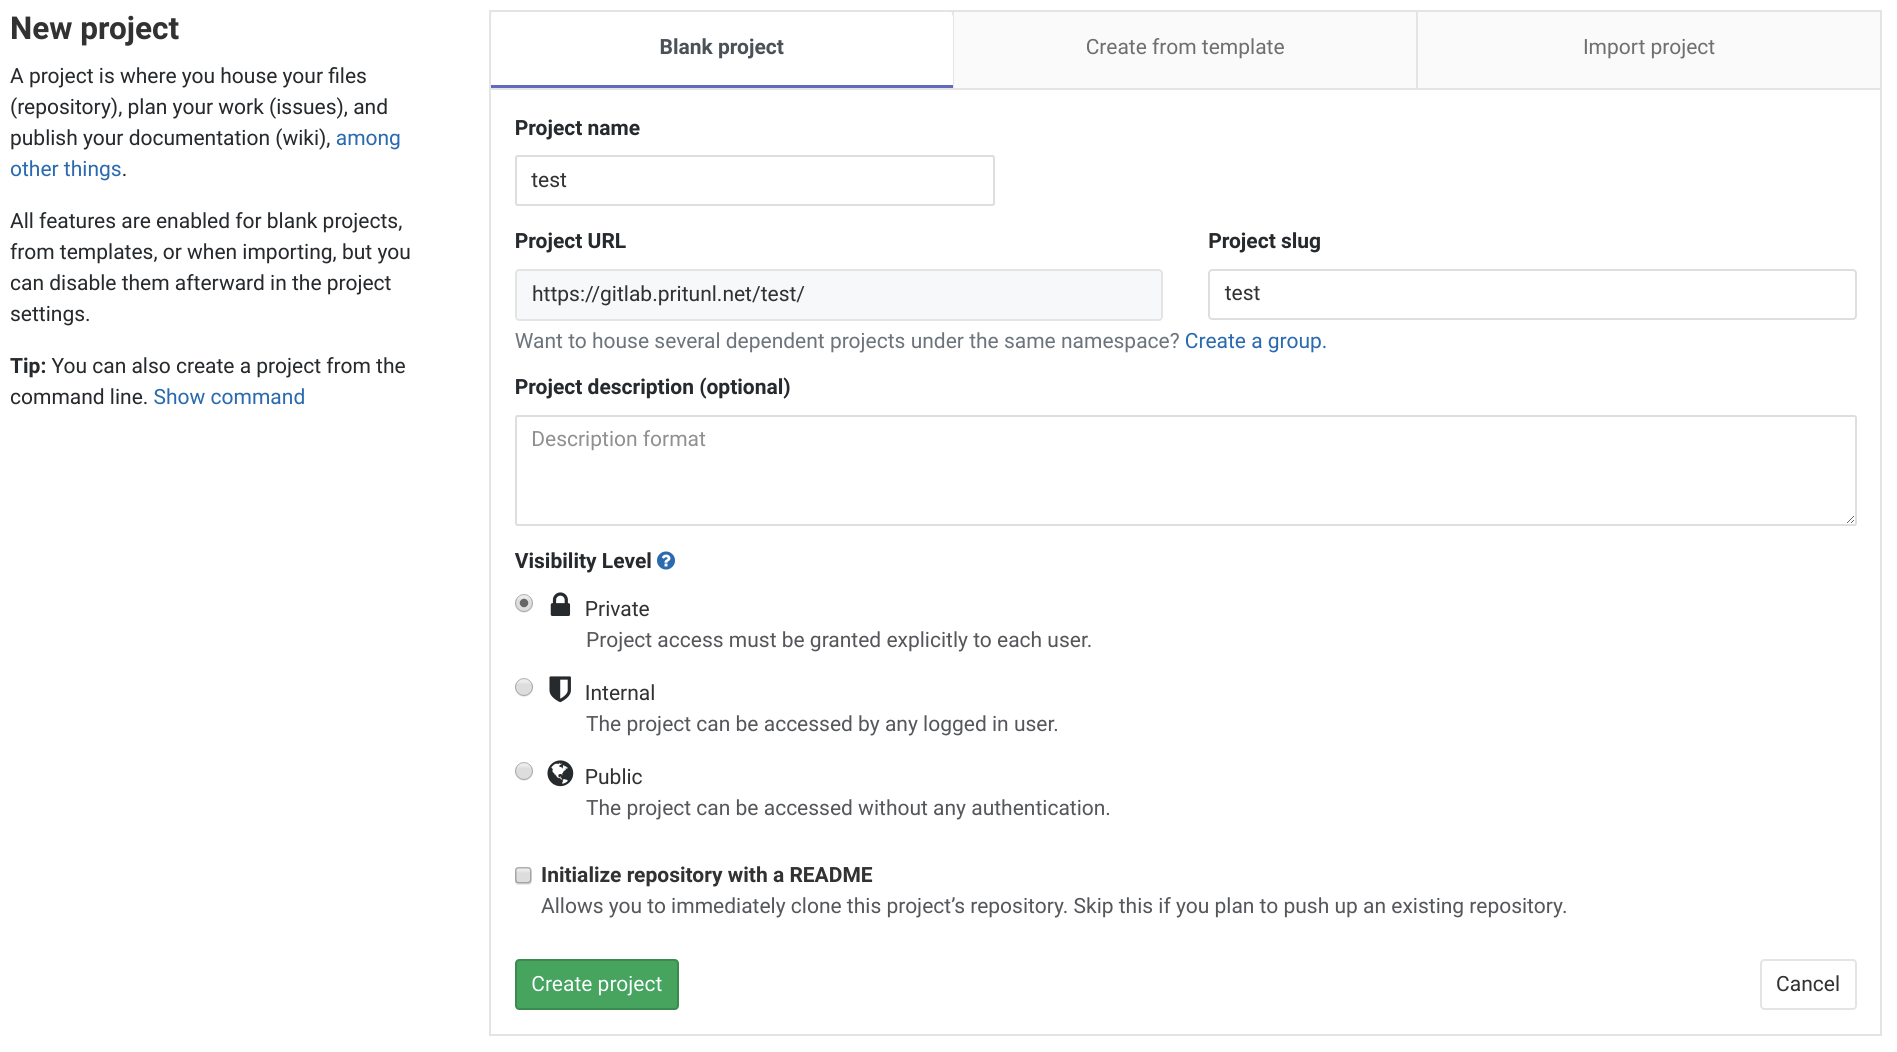
On the pritunl-ssh client install and configure git using the command below. Use the same email address that was used for the personal account above.
yum install -y git
tee ~/.gitconfig << EOF
[user]
	name = Test
	email = test@pritunl.com
EOF
Then open the new GitLab project and copy the clone command.

Then run the clone command on the pritunl-ssh client computer. This Git connection will first go through the Pritunl Zero SSH bastion server. The bastion server connection will authenticate using the Pritunl Zero SSH certificate. Once the connection is at the GitLab server authentication will be done with the SSH key that was registered to the GitLab account above. Enter the repository directory and push an example file to test the repository.
git clone git@ssh.gitlab.pritunl.net:test/test.git
cd test
touch example
git add example
git commit -m "Initial commit"
git push -u origin master
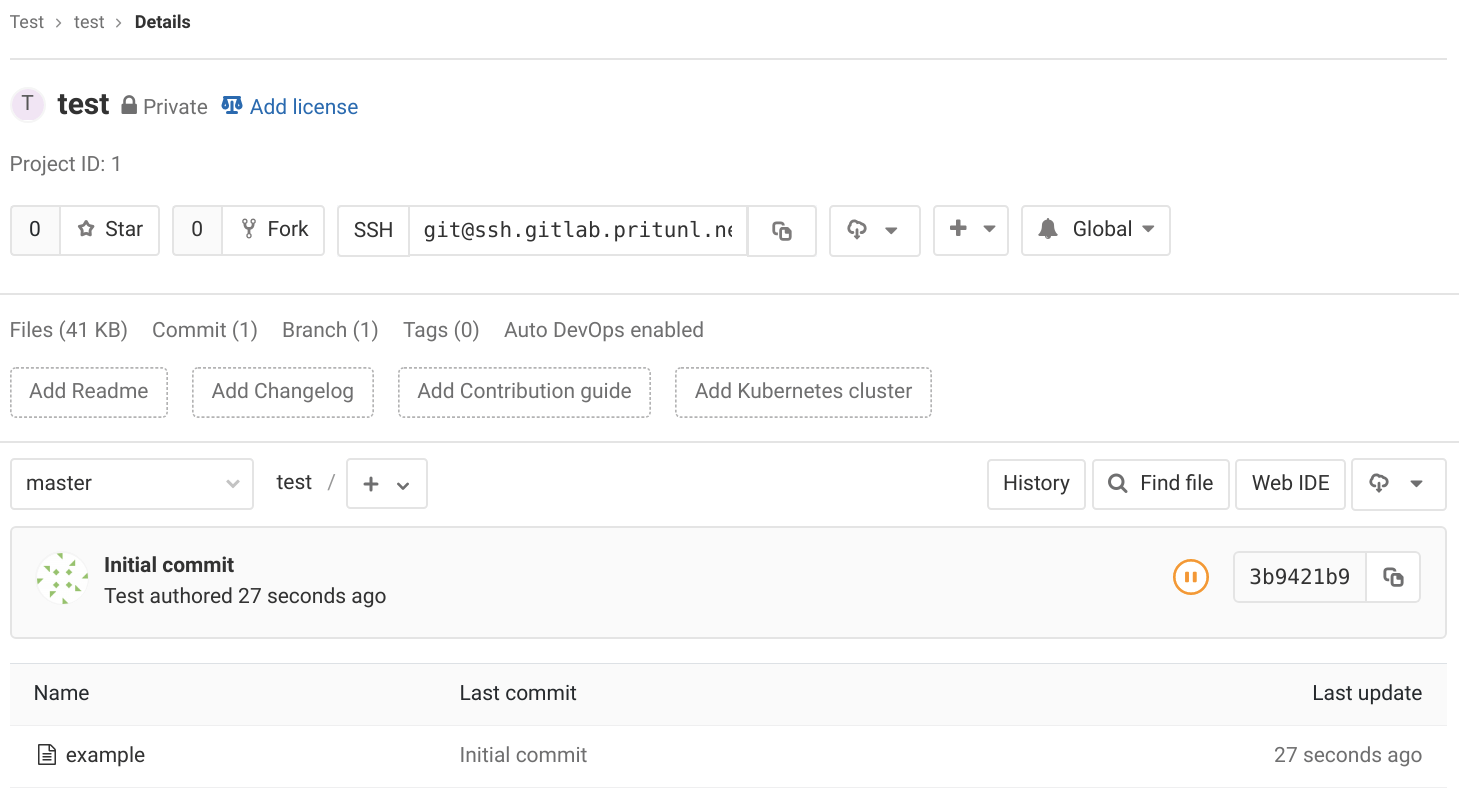
After refreshing the GitLab project the file should be shown in the repository.
Provision New Users
The Pritunl Zero cluster is now ready for production use. After testing the system remove both the test accounts in Pritunl Zero and GitLab. To provision access to employees first create a Pritunl Zero account for the user or configure single sign-on with Pritunl Zero. Add the gitlab role to the employees account and any roles that are needed to access SSH servers such as the developers role that was used to provide access to the Linux test instance.
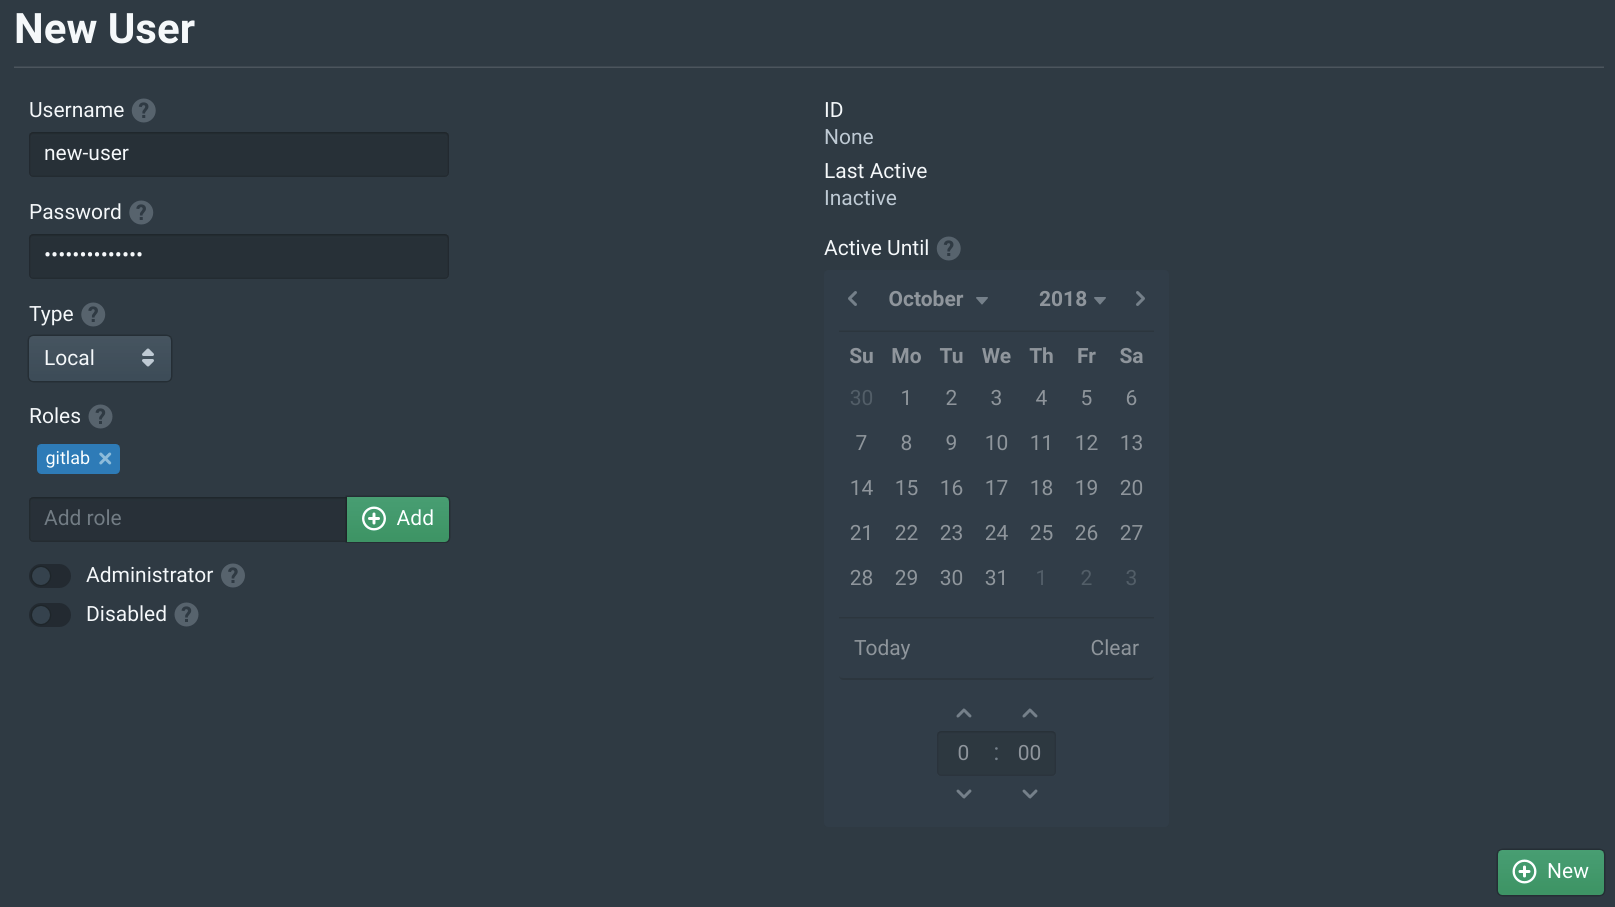
Then direct the employee to the Pritunl Zero user page https://user.zero.pritunl.net. Once they login they can click Install SSH Client to be directed to instructions on configuring the SSH client.
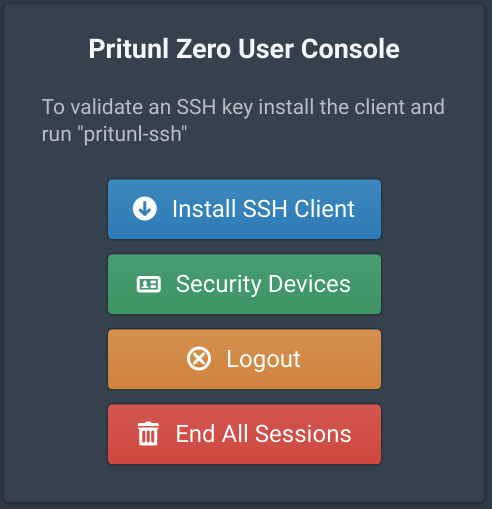
After they have configured the SSH client direct them to the GitLab server https://gitlab.pritunl.net where they can sign-up for a GitLab account after authenticating with Pritunl Zero using their user account.
Updated 3 months ago
