Gitlab SSH
Protecting Gitlab SSH with Pritunl Zero and two-factor authentication
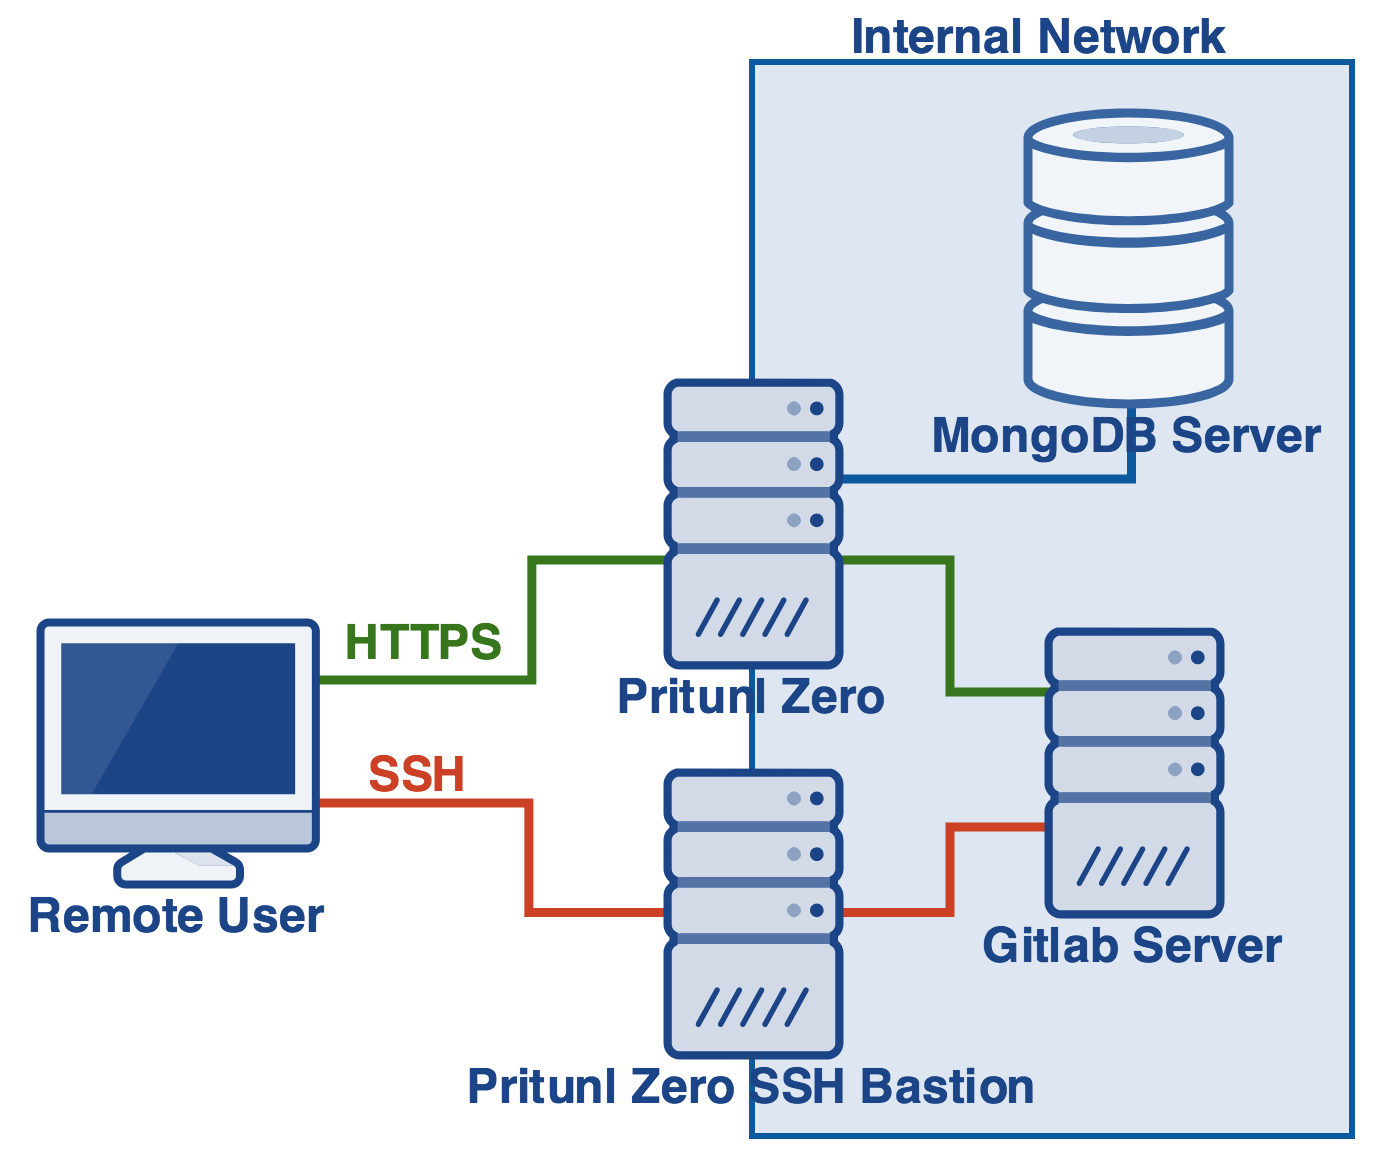
This tutorial will explain configuring a bastion host for Gitlab SSH access. This will provide an additional layer of protection and authentication to the SSH server on Gitlab. This will also add strict host checking to protect against man-in-the-middle attacks. Before starting create an additional instance that will act as a bastion host it should be on the same VPC/local network as the Gitlab server. Additionally the SSH port should be closed to the internet on the Gitlab server. This port should only be open for the VPC/local network or only the bastion host. This ensures SSH access to the Gitlab server is only possible through the bastion host.
Create DNS Records
First choose three domains, one that will be the domain that users will enter when using Git SSH, another that will be used for the bastion host and a third domain that will be used when users validate an SSH key. The first two domains must both be in a separate subdomain, in this example the .gitlab subdomain is used. Any hosts in this subdomain will have strict host checking enabled so it should only be used for Gitlab servers and bastion hosts. The subdomain its self gitlab.pritunl.com can still be used and will not have strict host checking. The SSH domain should point to the IP address that the bastion host will use to access the Gitlab server. This is generally the private IP address of the Gitlab server. The user will not connect directly to this address. The bastion domain should point to the public IP address of the bastion host. Additionally for the host certificate verification step when the Pritunl Zero server queries these domains it must point to an address that is accessible by the Pritunl Zero server. This will generally require the Pritunl Zero server to be on the same VPC/local network as the Gitlab server. The third domain will be the Pritunl Zero user access domain that users will visit when validating SSH keys. This domain should point to the public IP address of the Pritunl Zero server. If you created a Gitlab SSH domain gitlab-ssh.pritunl.com in the previous tutorial that will no longer be used and can be removed.

Create Authority
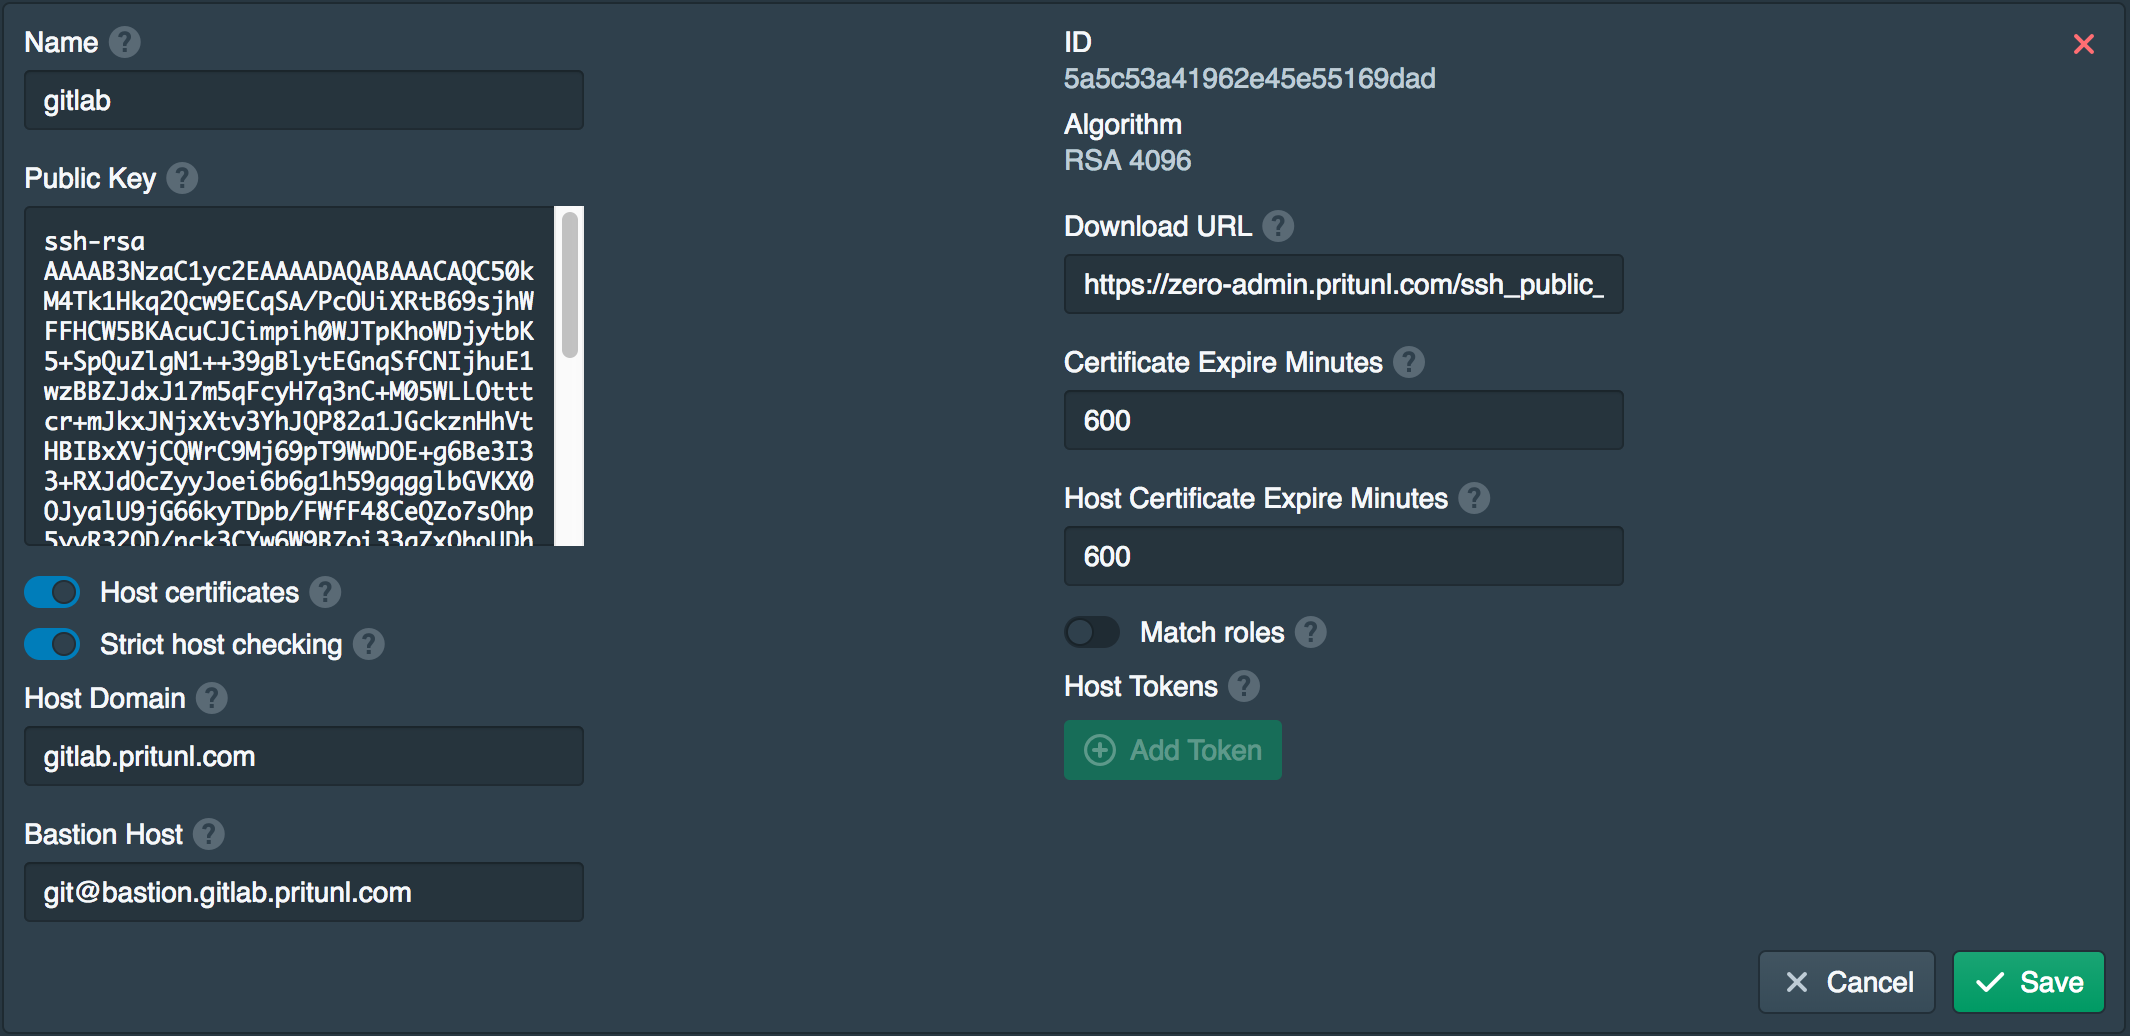
Open the Authorities tab in Pritunl Zero and click New. Enable Host certificates and Strict host checking. Set the Host Domain to the subdomain created above in this example gitlab.pritunl.com. Set the Bastion Host to the bastion domain created above with the git username prefixed git@bastion.gitlab.pritunl.com. After clicking save a token will be shown in Host Tokens this will be needed later.
Update Certificate
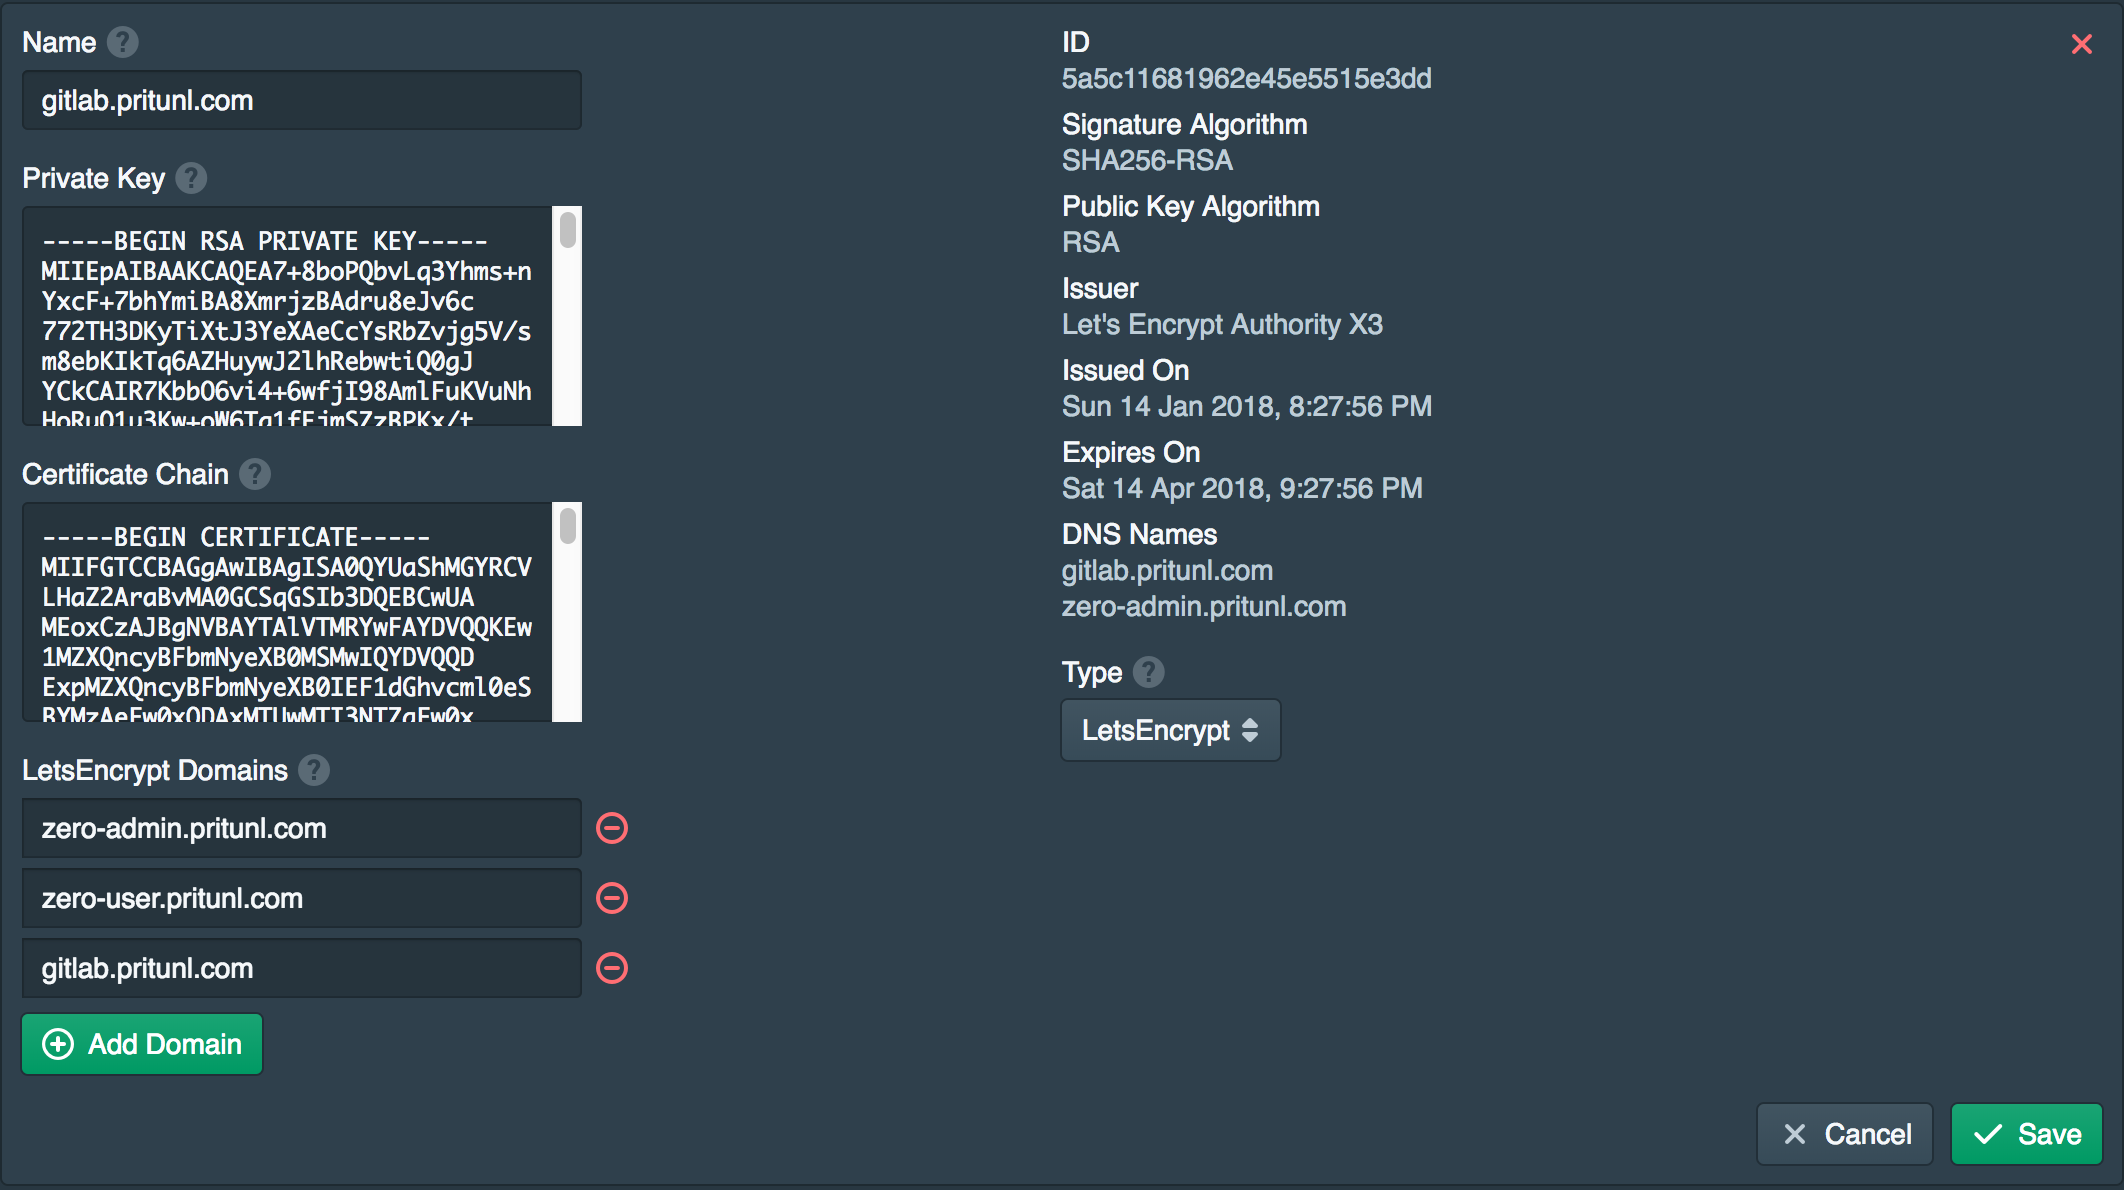
The new Pritunl Zero user domain will need to be added to the certificate. Open the Certificates tab and add the user domain zero-user.pritunl.com to the certificate LetsEncrypt Domains. You may need to wait for the DNS changes to become available to the LetsEncrypt verification servers.
Enable Node User Domain
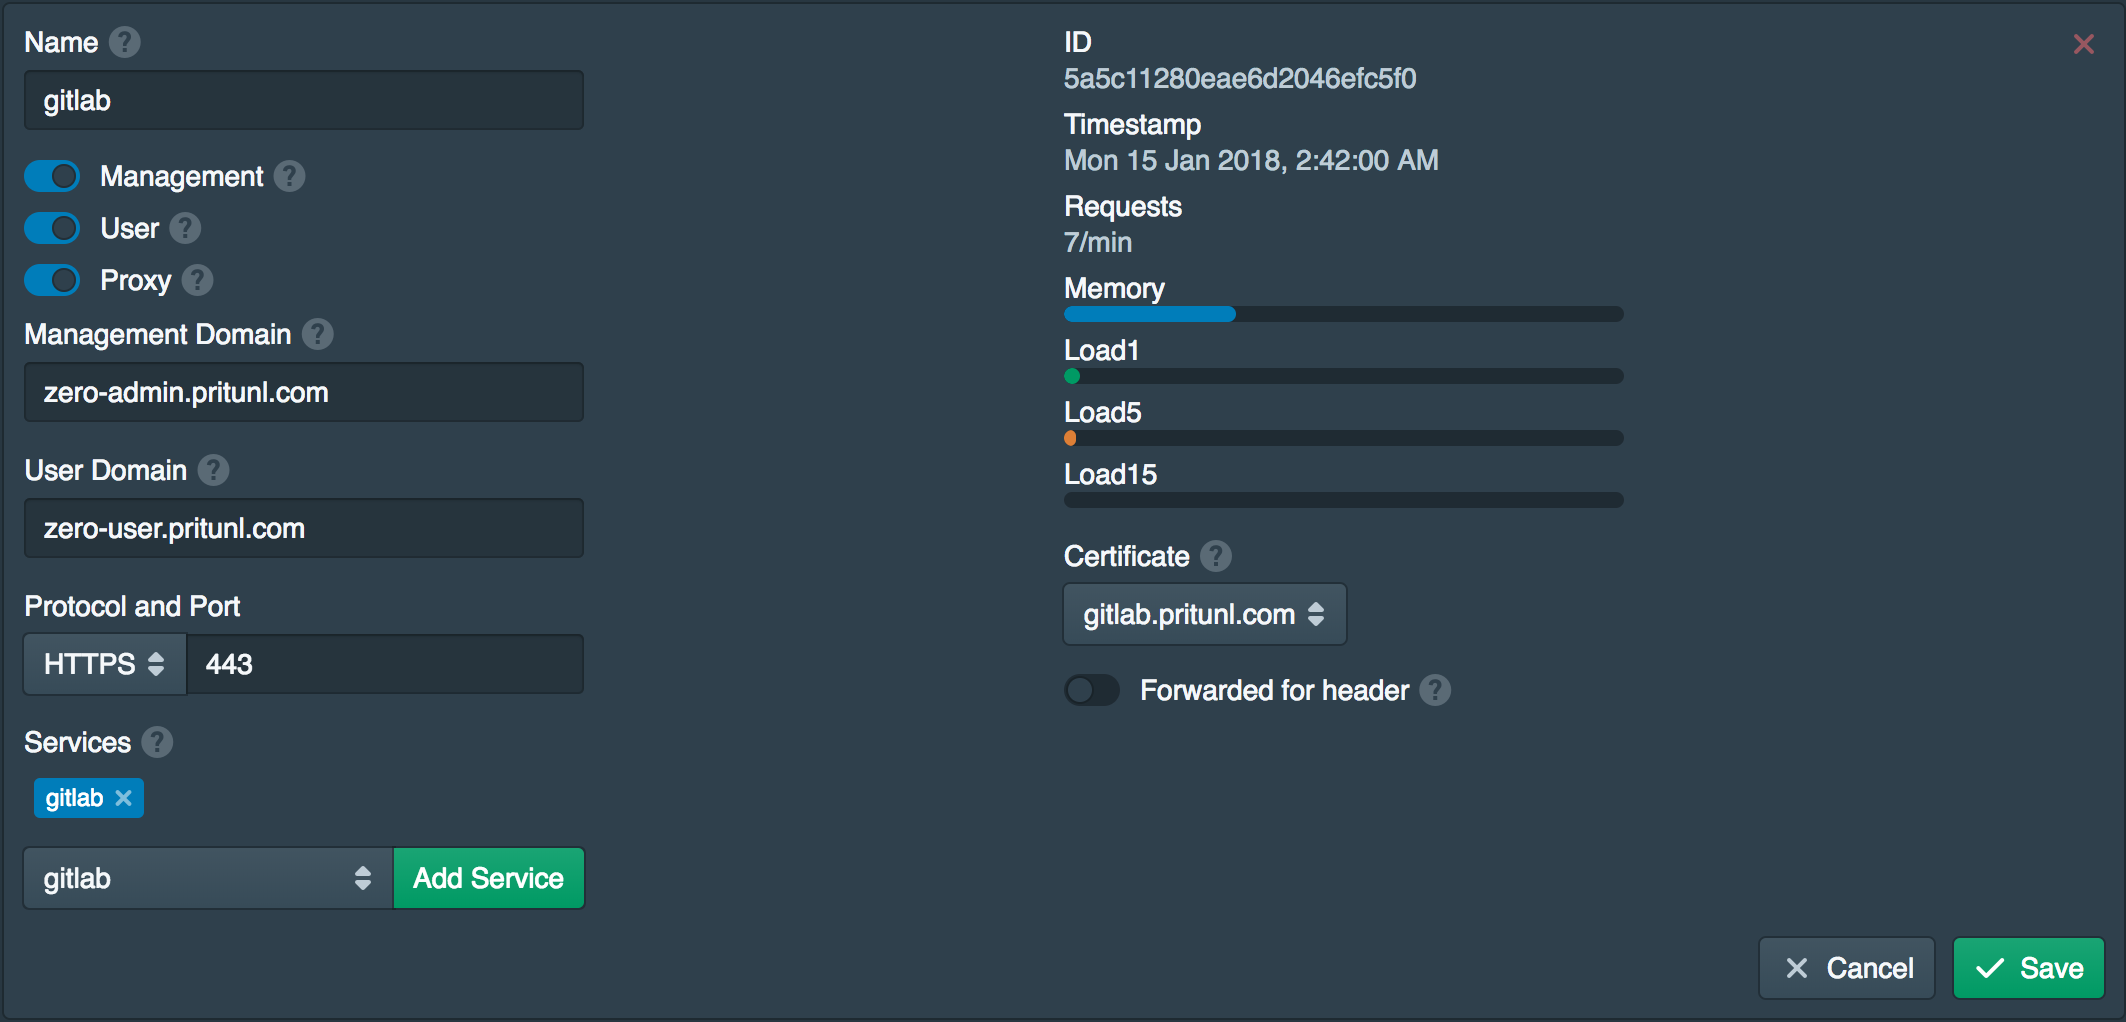
Open the Nodes tab and enable User. Then set the User Domain to the Pritunl Zero user domain zero-user.pritunl.com.
Open SSH Host Client Port
Before installing the Pritunl Zero SSH host client the port tcp 9748 must be opened on both the Gitlab server and the bastion host. The Pritunl Zero will connect to this port to verify the host has ownership of the domain it is requesting a host certificate for.
Install SSH Host Client
The Pritunl Zero SSH host client must be installed on both the Gitlab server and bastion host. This client is a simple Python script scheduled with cron. The commands below apply only to AmazonLinux 1 for more distros refer to the Install SSH Host Client documentation.
sudo tee -a /etc/yum.repos.d/pritunl.repo << EOF
[pritunl]
name=Pritunl Repository
baseurl=https://repo.pritunl.com/stable/yum/amazonlinux/1/
gpgcheck=1
enabled=1
EOF

sudo yum -y install epel-release
gpg --keyserver hkp://keyserver.ubuntu.com --recv-keys 7568D9BB55FF9E5287D586017AE645C0CF8E292A
gpg --armor --export 7568D9BB55FF9E5287D586017AE645C0CF8E292A > key.tmp; sudo rpm --import key.tmp; rm -f key.tmp
sudo yum -y install pritunl-ssh-host
Next configure the SSH host client using the commands below. The server must be set to the Pritunl Zero user domain created earlier. The hostname option must match the host portion of the domains created in the first step. For this example that is bastion and ssh. Ensure the correct hostname is set for each server.
sudo pritunl-ssh-host config add-token Hi9LBYn8MxGlP5z7F460svVS4ZSBxTweg7FQK071qX9yIa4t
sudo pritunl-ssh-host config hostname bastion
sudo pritunl-ssh-host config server zero-user.pritunl.comsudo pritunl-ssh-host config add-token Hi9LBYn8MxGlP5z7F460svVS4ZSBxTweg7FQK071qX9yIa4t
sudo pritunl-ssh-host config hostname ssh
sudo pritunl-ssh-host config server zero-user.pritunl.comNext run the command sudo pritunl-ssh-host renew on both the servers to manually verify the host certificates are working. The command should return a path to the SSH host certificate.
Configure SSH Authority
Open the Authorities tab and copy the Public Key to replace the one in the example below. Then replace the ssh.gitlab.pritunl.com domain with the SSH domain created earlier. Run these commands on the bastion host only. This configuration will only allow users to SSH into the server using the restricted git user.
sudo useradd git
sudo sed -i '/^TrustedUserCAKeys/d' /etc/ssh/sshd_config
sudo sed -i '/^AuthorizedPrincipalsFile/d' /etc/ssh/sshd_config
sudo tee -a /etc/ssh/sshd_config << EOF

Match User git
    AllowAgentForwarding no
    AllowTcpForwarding yes
    PermitOpen ssh.gitlab.pritunl.com:22
    GatewayPorts no
    X11Forwarding no
    PermitTunnel no
    ForceCommand echo 'Pritunl Zero Bastion Host'
    TrustedUserCAKeys /etc/ssh/trusted
    AuthorizedPrincipalsFile /etc/ssh/principals
Match all

EOF
sudo tee /etc/ssh/principals << EOF
gitlab
EOF
sudo tee /etc/ssh/trusted << EOF
ssh-rsa AAAAB3NzaC1yc2EAAAADAQABAAACAQC50kM4Tk1Hkq2Qcw9ECqSA/PcOUiXRtB69sjhWFFHCW5BKAcuCJCimpih0WJTpKhoWDjytbK5+SpQuZlgN1++39gBlytEGnqSfCNIjhuE1wzBBZJdxJ17m5qFcyH7q3nC+M05WLLOtttcr+mJkxJNjxXtv3YhJQP82a1JGckznHhVtHBIBxXVjCQWrC9Mj69pT9WwDOE+g6Be3I33+RXJdOcZyyJoei6b6g1h59gqgglbGVKX0OJyalU9jG66kyTDpb/FWfF48CeQZo7sOhp5yvR32OD/nck3CYw6W9B7oi33qZxQhoUDhcTQMVuWYMaRf0aM2tdU7N9D9P053L72FQxPvluEtcO5XWA9Mft6LhPES1Reu3eTo8sxawqUMf5LUx78EievXzbYDvdBjsSmY7xiTyk6pMz3uW0E5NNvF8N0RRiyKYkcEeIy1SuOj/Sncs4Rpv4utFptSQqUJFUHArv/T89tXfJRyIENFKtH6oMcgQiuXIit8W4M0ozwjGKXUvgoOwfaDQDxSeOkfOLX9gF9hf6NrN6kGFLgsuQa10we3HxjW8m2/FyU/jYDpGO9aWf+bmIup2hi1H6l4SRyyx4nwxarWMoJKXkhb1Q9k55vOY0t4bjsaM/oRMbClEucQmbQl9vkBrAg8QrzFgcJtLPqU0ooHN75LzuJXI3978Q==
EOF
Restart SSH Servers
Restart the SSH server on both the Gitlab and bastion host to apply the configuration changes. This command will differ for each Linux distribution.
sudo service sshd restartConfigure User SSH Client
These next steps will need to be done by the user to access SSH on the Gitlab server. Refer to the Install SSH Client documentation on installing the SSH client. Run the pritunl-ssh command to configure the client. Use the Pritunl Zero user domain created earlier. The user should select an SSH key that they generally use to SSH into servers this doesn't need to be the same key associated with their Gitlab account. The link should automatically open, if it does not cmd/ctrl click it. The SSH client will also modify the users SSH configuration to enable strict host checking and the bastion host.
pritunl-ssh
# Enter Pritunl Zero user hostname: zero-user.pritunl.com
# Select SSH key:
# [1] id_rsa.pub
# Enter key number or full path to key: 1
# OPEN: https://zero-user.pritunl.com/ssh?ssh-token=8vGRiveoLztlBgRJxrZPG9qzWu6bTzzmJUUkyuEo0dIEqpMc
After opening the link login with a Google user in the permitted G Suite domain and click Approve. This will give the user an SSH certificate that will allow access to the bastion host.
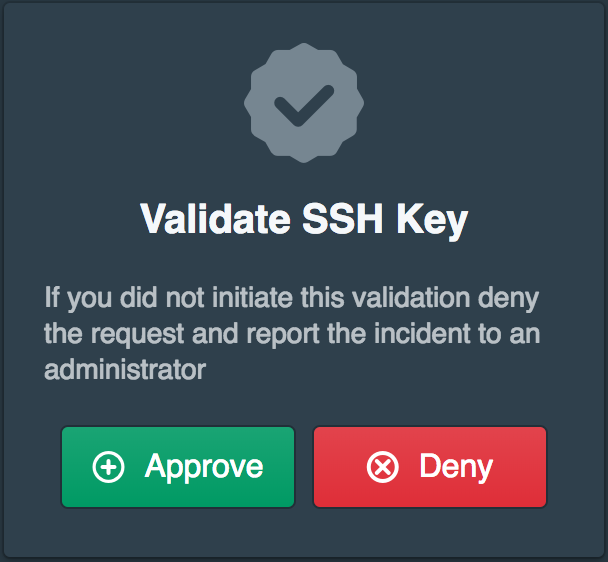
Test the SSH certificate by running ssh git@bastion.gitlab.pritunl.com the connect should be successful. To verify the security of the configuration also ensure that any attempts to SSH to the public IP address of the Gitlab server timeout ssh git@52.72.58.145. The Gitlab server should only allow SSH connections from the VPC/local network or only from the bastion host. Then check that the bastion host is functioning with ssh git@ssh.gitlab.pritunl.com this command should return Permission denied and not any connection errors.
Configure Gitlab
Next the SSH host URL will need to be updated in the Gitlab configuration sudo nano /etc/gitlab/gitlab.rb. Use the SSH domain ssh.gitlab.pritunl.com created earlier.
gitlab_rails['gitlab_ssh_host'] = 'ssh.gitlab.pritunl.com'Then reconfigure and restart Gitlab with the commands below.
sudo gitlab-ctl reconfigure
sudo gitlab-ctl restart
Once done cloning a project from Gitlab should work through the bastion host. Users will likely need to update their remote in the Git repository configuration.
Users Work Flow
The only change to the work flow of the user is the need to install the SSH client and run the command pritunl-ssh when the SSH certificate has expire. Running command pritunl-ssh will only renew the certificate when it has expired so users can combine this command with the git command using a bash alias. To get users started instruct them follow the Install SSH Client documentation and to run the pritunl-ssh command when needed to renew the certificate.
Two-Factor SSH Authentication (Optional)
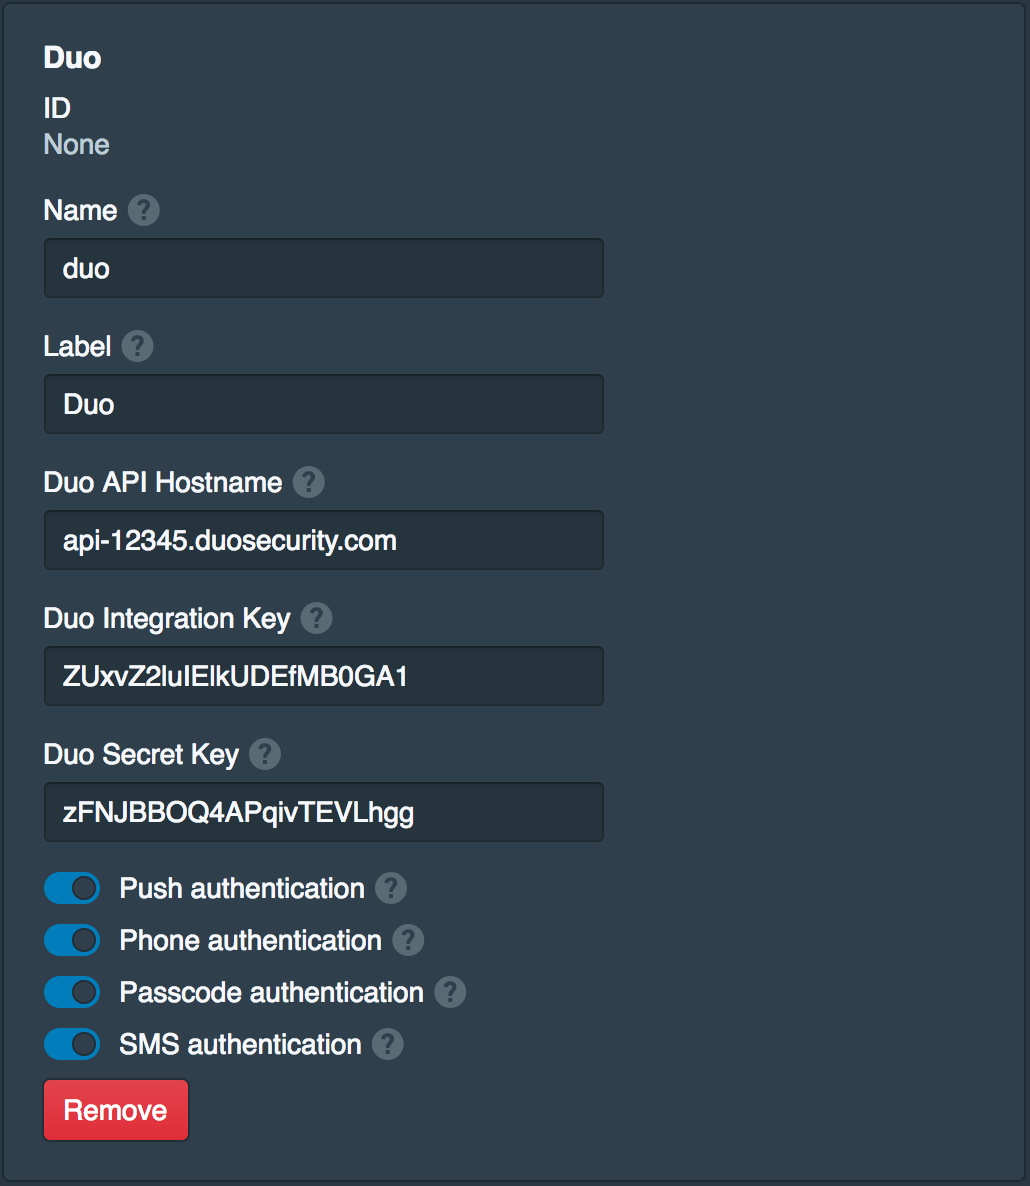
For additional security two-step authentication can also be enabled to require the user to authenticate with two-step authentication when approving SSH keys. For this example it is assumed Duo is configured with Duo usernames that match the Google G Suite usernames. Open the Settings tab and click Add Two-Factor Provider. Set Name to duo and Label to Duo then fill in the Duo API keys provided by Duo. Then enable Push authentication, Phone authentication, Passcode authentication and SMS authentication. Click Save when done.
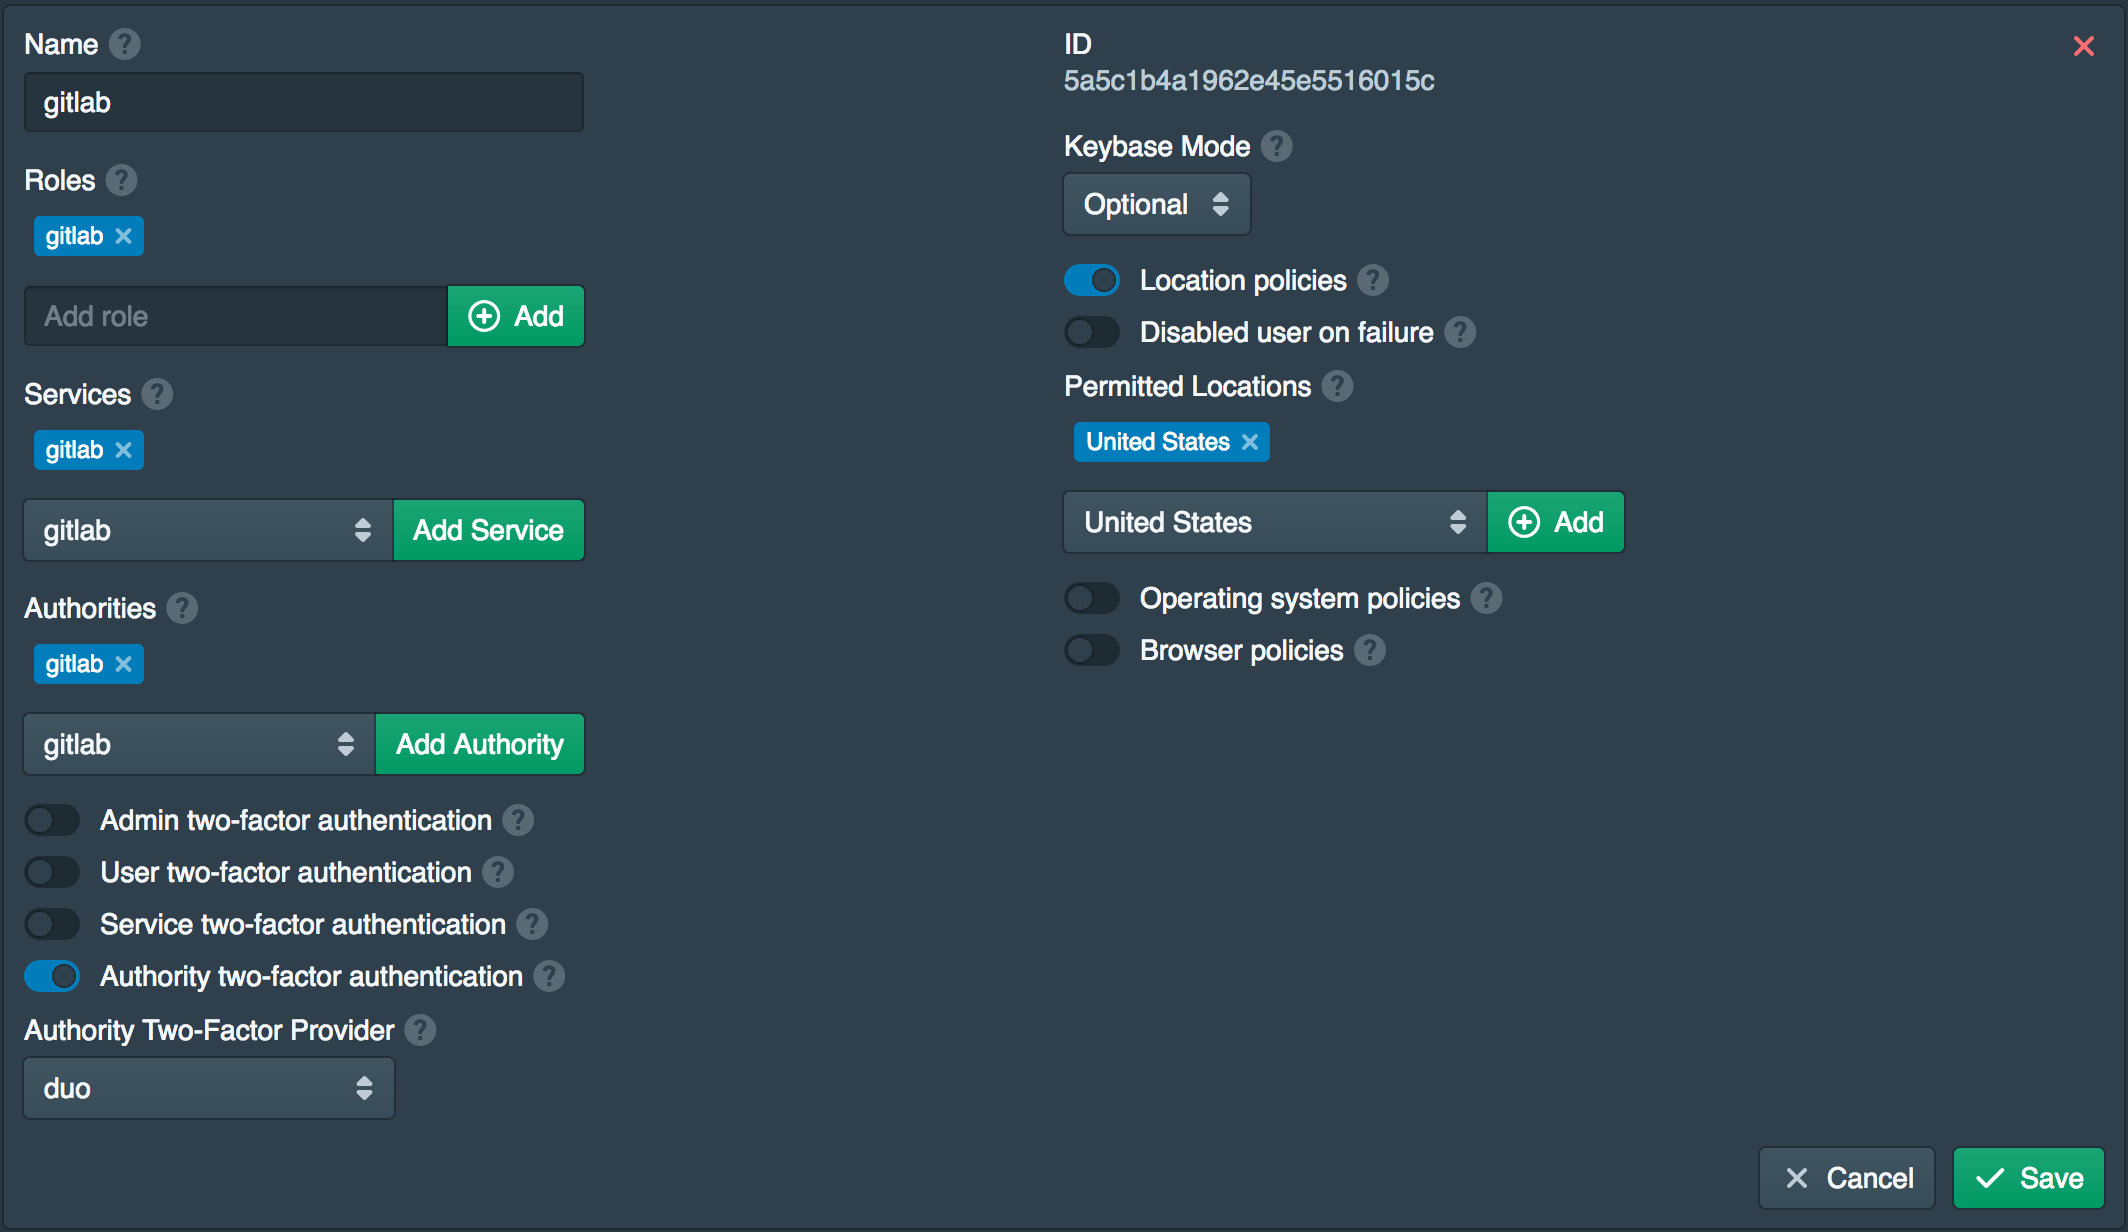
Open the Policies tab and add gitlab to Authorities. Then enable Authority Two-Factor Provider and set the provider to duo. This will require Duo only for approving SSH keys.
Test Two-Factor Authentication (Optional)
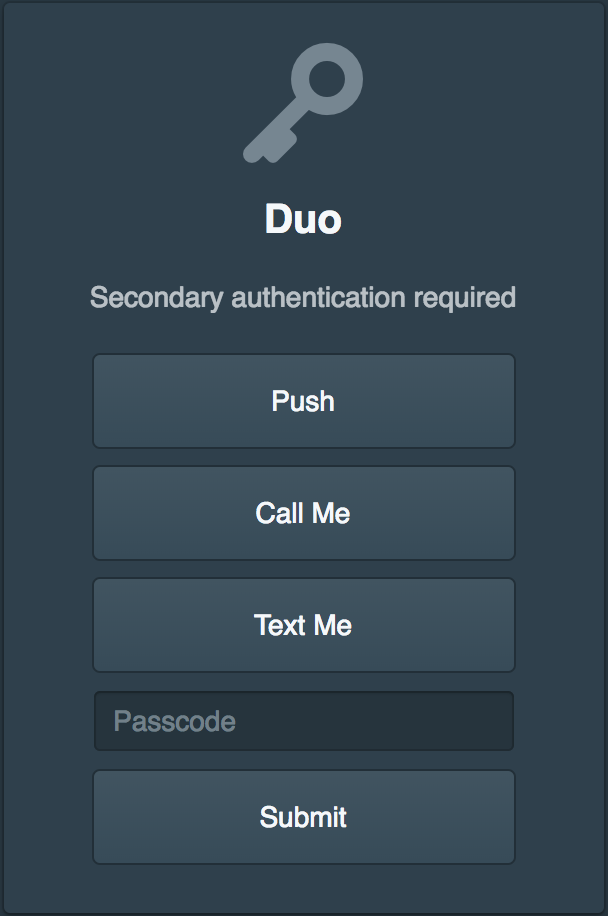
Back on the SSH client run the command pritunl-ssh renew to force an SSH certificate renewal. After clicking Approve a prompt will be shown asking for a Duo factor. Authenticate with one of the factors and the SSH key will be approved.
Updated about 2 months ago
