Debugging Client
Debugging Pritunl Client
Connection Issues
The most common causes of connection issues are:
-
Firewall configured incorrectly
Any external firewalls including instance security groups and VPC network firewalls need to be configured to accept traffic to the VPN ports. -
Unstable internet connections
If users have unstable internet connections the Ping Timeout and Ping Interval should be increased. For less stable connections a Ping Interval of20and Ping Timeout of120can be used. -
Overloaded server
The memory and CPU usage of the server should be checked if connection issues are occurring. If all internet traffic is being routed through the VPN with the0.0.0.0/0route this can quickly consume all the available network bandwidth on that server. Multiple hosts and replicated servers should be used to handle a large number of concurrent VPN connections. -
MTU issues
Some internet service providers don't provide the standard 1500 MTU connection and some cloud providers have overlay networks that reduce the MTU below the standard 1500. If the client and server cannot detect the correct MTU unexpected problems can occur. The connection may be successful and ping may work but there will still be connectivity issues with certain protocols. Refer to the Connection MTU section below for addressing this issue. -
Country VPN Filters
Some countries will block VPN connections. This is often difficult to reliably determine because these systems will only inspect a fraction of the overall packets due to the performance limitations involved with inspecting every internet packet. Different methods are also used for disrupting a connection after it is detected. Some of the systems will drop only a fraction of the connections packets causing a slow unreliable connection.
Linux
Log Locations:
- Service Log:
/var/log/pritunl-client.log - Interface Logs:
~/.config/pritunl/pritunl.log - Profile Logs:
~/.config/pritunl/profiles/PROFILE_ID.log - Profile Configurations:
~/.config/pritunl/profiles/PROFILE_ID.ovpn - System Profile Logs
/var/lib/pritunl-client/profiles/PROFILE_ID.log - System Profile Configurations
/var/lib/pritunl-client/profiles/PROFILE_ID.ovpn
Manually Restart Service:
sudo systemctl restart pritunl-client.servicemacOS
Log Locations:
- Service Log:
/var/log/pritunl-client.log - Interface Log:
~/Library/Application Support/pritunl/pritunl.log - Profile Logs:
~/Library/Application Support/pritunl/profiles/PROFILE_ID.log - Profile Configurations:
~/Library/Application Support/pritunl/profiles/PROFILE_ID.ovpn - System Profile Logs
/var/lib/pritunl-client/profiles/PROFILE_ID.log - System Profile Configurations
/var/lib/pritunl-client/profiles/PROFILE_ID.ovpn
Manually Restart Service:
([doc:debugging]Use the commands below to manually restart the service.
sudo launchctl unload /Library/LaunchDaemons/com.pritunl.service.plist
sudo launchctl disable system/com.pritunl.service
sudo launchctl enable system/com.pritunl.service
sudo launchctl load /Library/LaunchDaemons/com.pritunl.service.plist
Manually Run Service:
Use the commands below to stop the background service and manually run it in the foreground to debug issues. After testing use the command above to restore the background service.
sudo launchctl unload /Library/LaunchDaemons/com.pritunl.service.plist
sudo launchctl disable system/com.pritunl.service
sudo pritunl-service
Service Status:
sudo launchctl print system/com.pritunl.serviceManually Uninstall:
# Service
kill -2 $(ps aux | grep Pritunl.app | awk '{print $2}') &> /dev/null || true
sudo launchctl unload /Library/LaunchAgents/com.pritunl.client.plist &> /dev/null || true
sudo launchctl unload /Library/LaunchDaemons/com.pritunl.service.plist &> /dev/null || true

# Pritunl
sudo rm -rf /Applications/Pritunl.app
sudo rm -f /Library/LaunchAgents/com.pritunl.client.plist
sudo rm -f /Library/LaunchDaemons/com.pritunl.service.plist
sudo rm -f /private/var/db/receipts/com.pritunl.pkg.Pritunl.bom
sudo rm -f /private/var/db/receipts/com.pritunl.pkg.Pritunl.plist

# Profiles
rm -rf ~/Library/Application Support/pritunl
rm -rf ~/Library/Caches/pritunl
rm -rf ~/Library/Preferences/com.electron.pritunl.plist

# Files
sudo rm -f /var/run/pritunl_auth
sudo rm -f /var/run/pritunl.sock
sudo rm -f /var/log/pritunl.log
sudo rm -f /var/log/pritunl.log.1
sudo rm -rf /var/lib/pritunl-client

# Old Files
sudo rm -rf /var/lib/pritunl
sudo kextunload -b net.sf.tuntaposx.tap &> /dev/null || true
sudo kextunload -b net.sf.tuntaposx.tun &> /dev/null || true
sudo rm -rf /Library/Extensions/tap.kext
sudo rm -rf /Library/Extensions/tun.kext
sudo rm -f /Library/LaunchDaemons/net.sf.tuntaposx.tap.plist
sudo rm -f /Library/LaunchDaemons/net.sf.tuntaposx.tun.plist
sudo rm -rf /usr/local/bin/pritunl-openvpn
sudo rm -rf /usr/local/bin/pritunl-service
Check keychain:
security add-generic-password -U -s pritunl -a test -w password login-keychain
security find-generic-password -w -s pritunl -a test
security delete-generic-password -s pritunl -a test
Check DNS:
sudo scutil --dns
sudo scutil
> open
> show State:/Network/Service/Pritunl/DNS
> show Setup:/Network/Service/Pritunl/DNS
list State:/Network/Pritunl/Connection
> show State:/Network/Global/DNS
> show State:/Network/Pritunl/DNS
> show State:/Network/Pritunl/Restore
> quit
Connection MTU
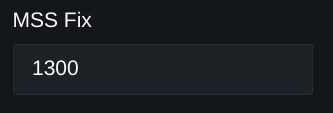
Some connections may have MTU issues this can be fixed by entering a lower MSS Fix value in the server settings. First test 1200 or lower to confirm that it is an MTU issue. If this fixes the connection increase the MTU in a range of 1200-1400 to find a working MTU.

To test for MTU issues first ping a over sized packet using the commands below. This should report an over size packet error. On Linux the discovered MTU will be shown. Take the expected MTU and subtract 28 then test that the ping functions. Replace 192.168.123.1 with the virtual IP address of the Pritunl server to test both the internet and VPN connection for MTU issues. When pinging the VPN address the MTU will be lower then the MTU for non-VPN traffic.
Once a successful ping is completed increment the size until the ping returns an over sized packet error to verify there are no sizes that time out. All packet sizes should either return an over sized packet error or a successful ping. If a specific packet size times out this indicates an MTU issue.
ping -M do -s 2000 app.pritunl.com
Frag needed and DF set (mtu = 1500)
ping -M do -s 1472 app.pritunl.com

ping -M do -s 2000 192.168.123.1
Frag needed and DF set (mtu = 1500)
ping -M do -s 1392 192.168.123.1ping -D -s 2000 app.pritunl.com
Message too long
ping -D -s 1472 app.pritunl.com
ping -D -s 2000 192.168.123.1
Message too long
ping -D -s 1392 192.168.123.1ping -f -l 2000 app.pritunl.com
Package needs to be fragmented but DF set.
ping -f -l 1472 app.pritunl.com
ping -f -l 2000 192.168.123.1
Package needs to be fragmented but DF set.
ping -f -l 1392 192.168.123.1Asymmetric Routing
Asymmetric routing will occur in some routing configurations, specifically with non-NAT configurations. This can cause issues with firewalls and connections. If the endpoint on either side does not accept redirects the asymmetric routing will persist and cause routing problems. This will be visible when running ping to the other endpoint and the Redirect Host(New nexthop: ) message will be shown repeatedly indicating the host is not accepting the routing path. This can cause firewalls or VPNs to filter the traffic and can result in stalled connections. Run sudo sysctl net.ipv4.conf.all.accept_redirects to check if redirects are disabled, this would also need to be checked on the specific interface to verify the interface specific setting. Firewalls may also need to be configured bypass firewall rules for traffic on same interface.
Windows
Log Locations:
- Service Log:
C:\ProgramData\Pritunl\pritunl-client.log - Interface Log:
C:\Users\USERNAME\AppData\Roaming\pritunl\pritunl-client.log - Profile Logs:
C:\Users\USERNAME\AppData\Roaming\pritunl\profiles\PROFILE_ID.log - Profile Configurations:
C:\Users\USERNAME\AppData\Roaming\pritunl\profiles\PROFILE_ID.ovpn - System Profile Logs
C:\ProgramData\Pritunl\profiles\PROFILE_ID.log - System Profile Configurations
C:\ProgramData\Pritunl\profiles\PROFILE_ID.ovpn
Chrome OS
Press ctrl+alt+t in terminal run commands route -4 and route -6. Open chrome://net-internals select ChromeOS on the left then click Store Debug Logs. In the Downloads directory drag the log archive to Google Drive. Download the log archive and open the file var/log/messages.
Windows Connection Error
If profiles on Windows fail to start and a network adapter error is shown use follow the Microsoft Visual C++ 2015 Redistributable instructions to manually install the required Windows libraries.
DNS Issues
If the Block Outside DNS option has been enabled in the server settings the DNS server must be included in the routes. This can be done by adding the DNS server IP addresses with a /32 subnet such as 8.8.8.8/32 to the server routes.
Chrome or Browser DNS Issues
If DNS is only working outside the browser some web browsers route DNS queries to a custom encrypted DN S server. In Chrome the option is in Settings -> Privacy and security -> Secure DNS. Some addons may also reroute DNS queries.
macOS DNS Issues
Running sudo pritunl set vpn.dns_mapping_push_all false on the Pritunl server when using client DNS mapping may fix issues with the macOS DNS configuration. This will push only the Pritunl DNS server to the client to avoid issues with macOS DNS server priority.
A macOS device policy can block DNS configuration changes. Open Settings -> Network -> VPN & Filters and verify filtering for DNS Settings is Disabled. If the VPN & Filters menu is not shown the policy is not configured.
iOS DNS Issue
There are currently three fixes for the DNS issue on iOS.
Add the DNS server to the server routes. The default DNS server used is 8.8.8.8 add the route 8.8.8.8/32 to the server routes for this configuration.
Remove the DNS server from the settings. This will instruct the client to use their current DNS configuration. This could cause problems with some clients if that DNS configuration becomes unroutable due to the VPN routes.
Enable VPN Client DNS Mapping in the advanced server settings. This will start a DNS server on the Pritunl server that will proxy all DNS requests and will always be available to the client.
WireGuard
Some network connections will not support OpenVPN for these connections WireGuard should be configured to avoid connection issues.
macOS Installation Failed
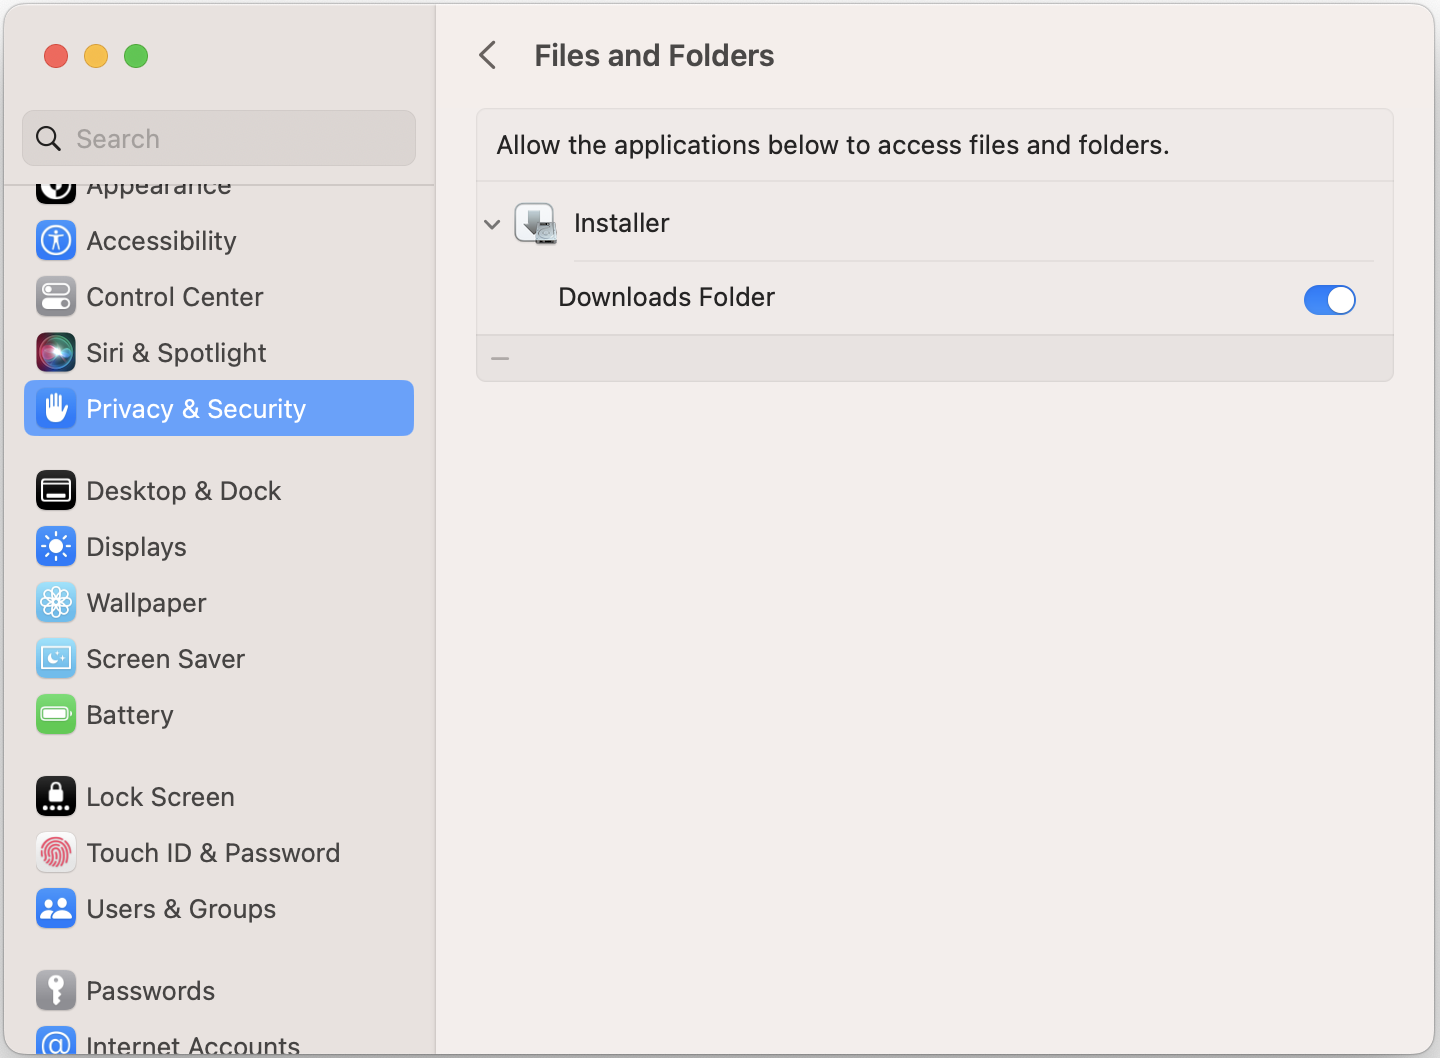
If the error The installer encountered an error that caused the installation to fail. open settings and select Privacy & Security then Files and Folders. Click the icon to expand the Installer application and verify the Downloads Folder is enabled.

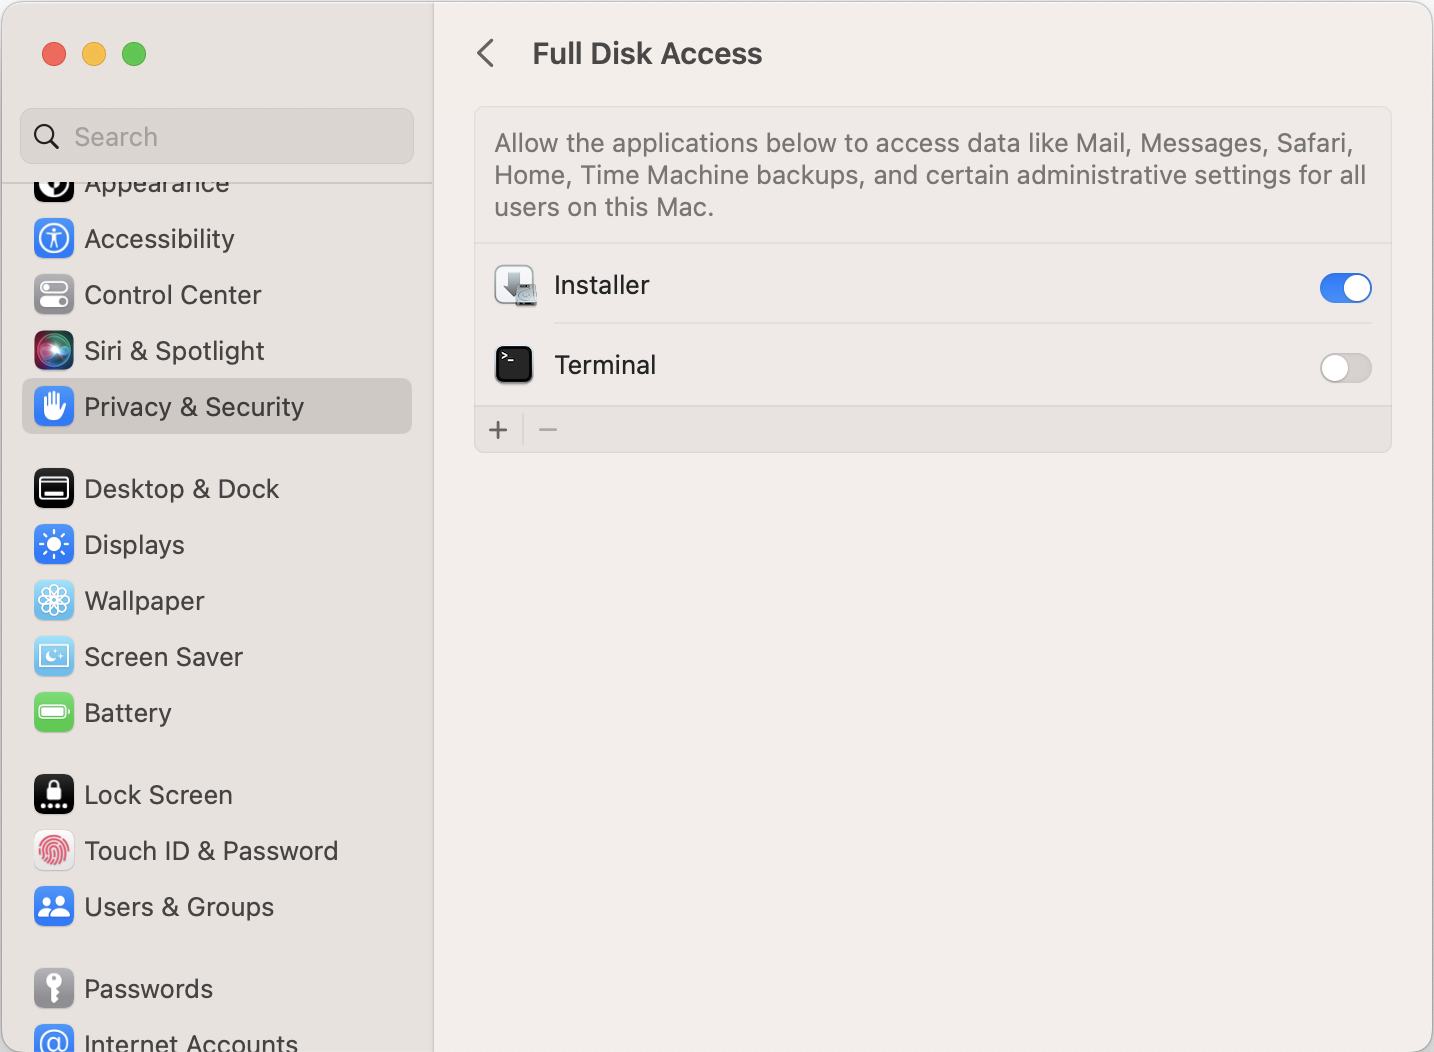
If this does not work open Full Disk Access and enable the Installer application.

Selecting the Installer application and clicking the - icon to remove the application in both the Files and Folders and Full Disk Access section can also be done to reset the options. Moving the installer out of the Downloads folder may also fix the issue.
Developer Tools
The Pritunl Client is an Electron app, the commands below can be used to start the client with the developer tools open for debugging. After the developer tools is shown open the top right menu in the tools and undock the window.
# macOS
/Applications/Pritunl.app/Contents/MacOS/Pritunl --dev-tools
# Windows
& 'C:\Program Files (x86)\Pritunl\pritunl.exe' --dev-tools
# Linux
pritunl-client-electron --dev-tools
Reset Configuration
If the configuration becomes corrupted and the client will not start it can be reset by removing the directories below.
# macOS
~/Library/Application Support/pritunl
# Windows
C:\Users\USERNAME\AppData\Roaming\pritunl
# Linux
~/.config/pritunl
Updated 3 months ago
