Oracle Cloud Bare Metal
Configure Pritunl Cloud on Oracle Cloud Bare Metal
Pritunl Cloud supports full integration with Oracle Cloud Bare Metal. The Oracle Cloud API is used by Pritunl Cloud to create a VNIC on the bare metal server for each Pritunl Cloud instance. This provides each Pritunl Cloud instance direct access to the Oracle Cloud VCN network. Each Pritunl Cloud instance will also have a public IP address.
For lower cost testing the VM.Standard2 instance types support nested virtualization. When running Pritunl Cloud on these instance types a different network configuration is used to support the different network adapters used by virtual Oracle Cloud instances. Using nested virtualization will not represent the performance or reliability of a bare metal server. Additionally these instance types have significantly lower VNIC limits which limit the number of Pritunl Cloud instances that can run on the host. For the VM.Standard2.1 instance only 1 Pritunl Cloud instance can be configured.
All the Oracle Cloud bare metal server shapes listed below except for BM.Optimized3.36 are billed hourly only while powered on. If the bare metal server is stopped from the Oracle Cloud console only the block volume will be billed when the server is powered off. The maximum number of Pritunl Cloud instances supported on each Oracle Cloud bare metal server is determined by the VNIC limit which is listed below for each shape.
When comparing pricing to AWS a vCPU on an AWS instance types above the t type represents one thread of a CPU core. All AWS t type instances use shared CPU cores and do not have a CPU core or thread dedicated to the instance. All Oracle Cloud bare metal instance shapes below have hyper-threaded CPUs and two threads in each core. Below are Oracle Cloud prices for the North America regions.
Oracle Cloud Bare Metal Hourly Pricing
- BM.Optimized3.36 - $2.712 (36 Intel Cores, 512 GB RAM, 100 Gbps Network, Max 256 VNICs)
- BM.Standard.E4.128 - $6.272 (128 AMD EPYC 7J13 Cores, 2048 GB RAM, 100 Gbps Network, Max 256 VNICs)
- BM.Standard.E3.128 - $6.272 (128 AMD EPYC 7742 Cores, 2048 GB RAM, 100 Gbps Network, Max 256 VNICs)
- BM.Standard2.52 - $3.318 (52 Intel Xeon 8167M Cores, 768 GB RAM, 50 Gbps Network, Max 200 VNICs)
Oracle Cloud Network Pricing
- Outbound Data First 10 TB - Free
- Outbound Data After 10TB - $0.0085/GB
Create Virtual Cloud Network
If a VCN has already been created this section can be skipped.Click here to skip to next section
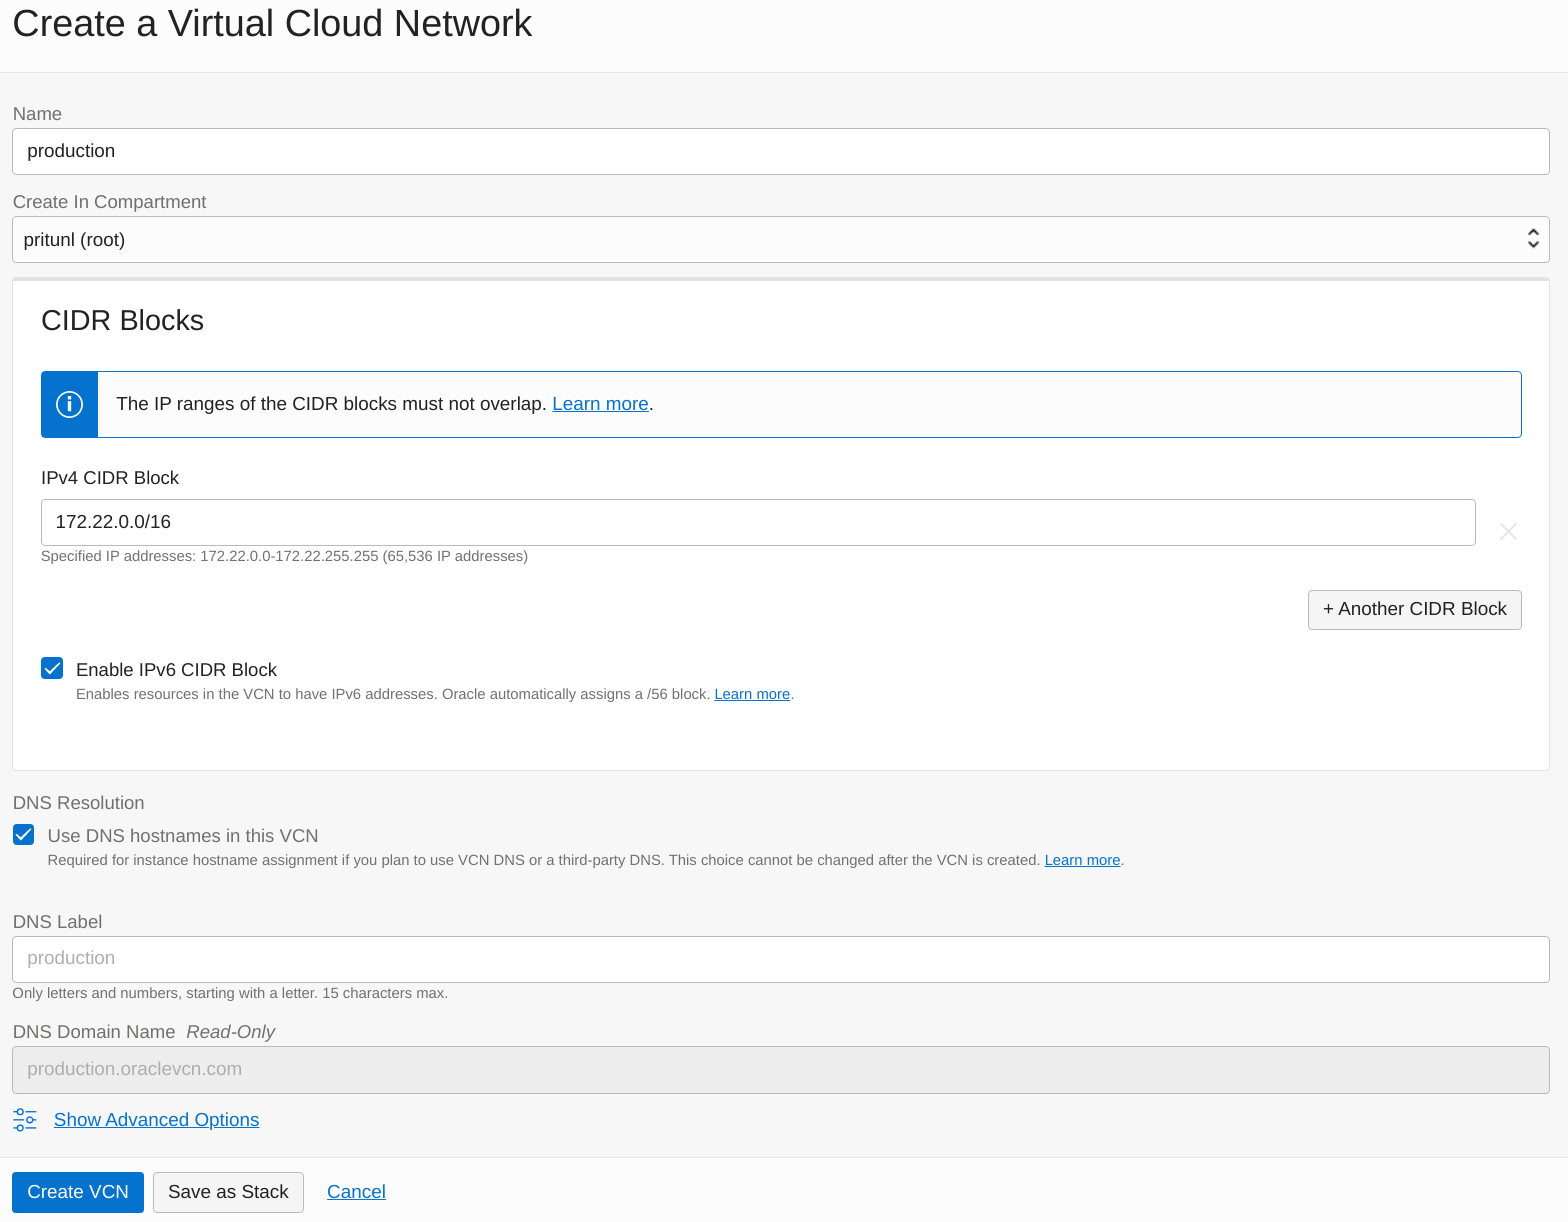
Open the Virtual Cloud Networks section of Networking in the Oracle Cloud console. The click Create VCN. Enter a name and CIDR block. This configuration will use 172.22.0.0/16. Then click Create VCN.
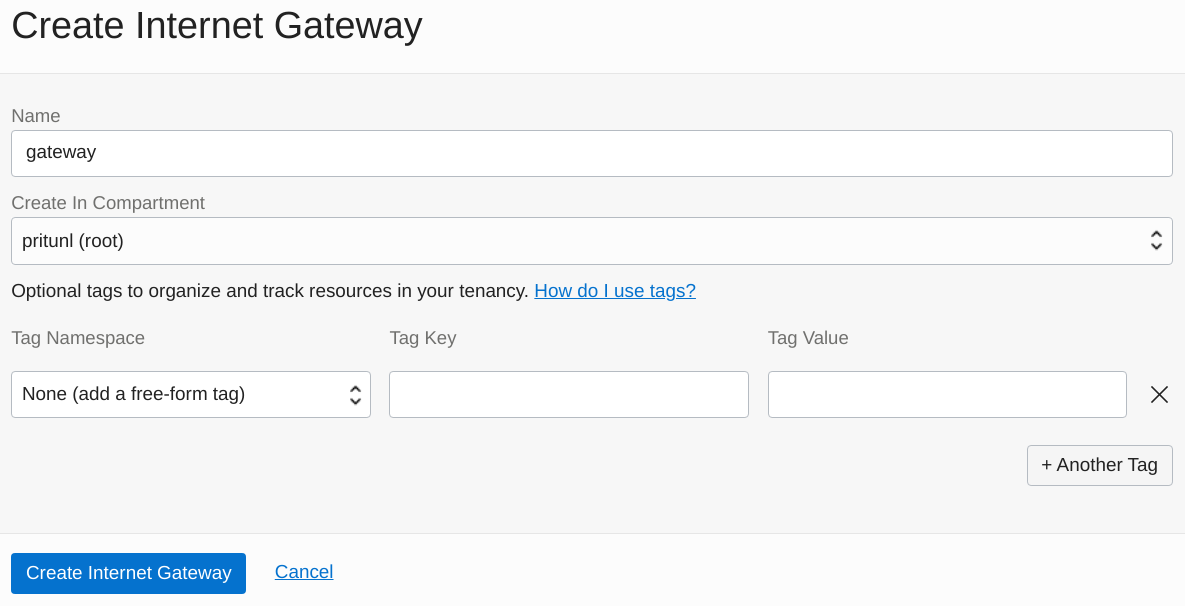
Open the Internet Gateways tab in the VCN. Then click click Create Internet Gateway. Then set the Name to gateway and click Create Internet Gateway.
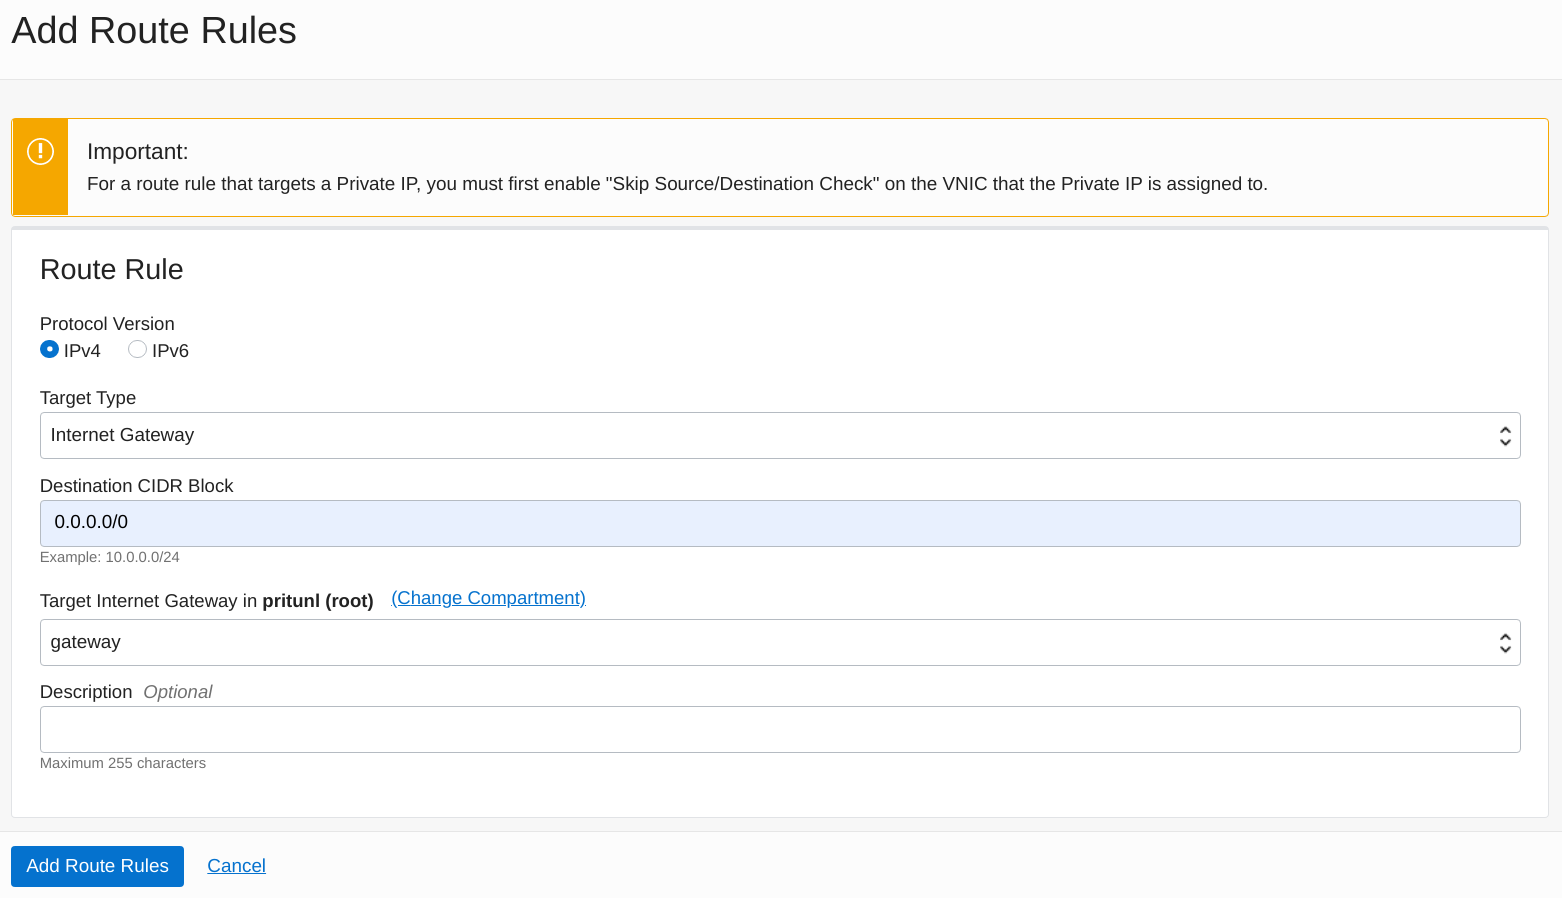
Open the Route Tables tab and select the default route table. Then click Add Route Rules. Set the Target Type to Internet Gateway. Set the Destination CIDR Block to 0.0.0.0/0 and set the Target Internet Gateway to gateway.
Oracle Cloud uses security lists that apply to VCN subnets instead of individual instances. To allow a more controlled firewall configuration small subnets should be created for each group of instances instead of large subnets. This configuration will create a subnet for the database servers, Pritunl Cloud servers and Pritunl Cloud instances.
First open the Security Lists section in the VCN to create security list rules for the subnets.
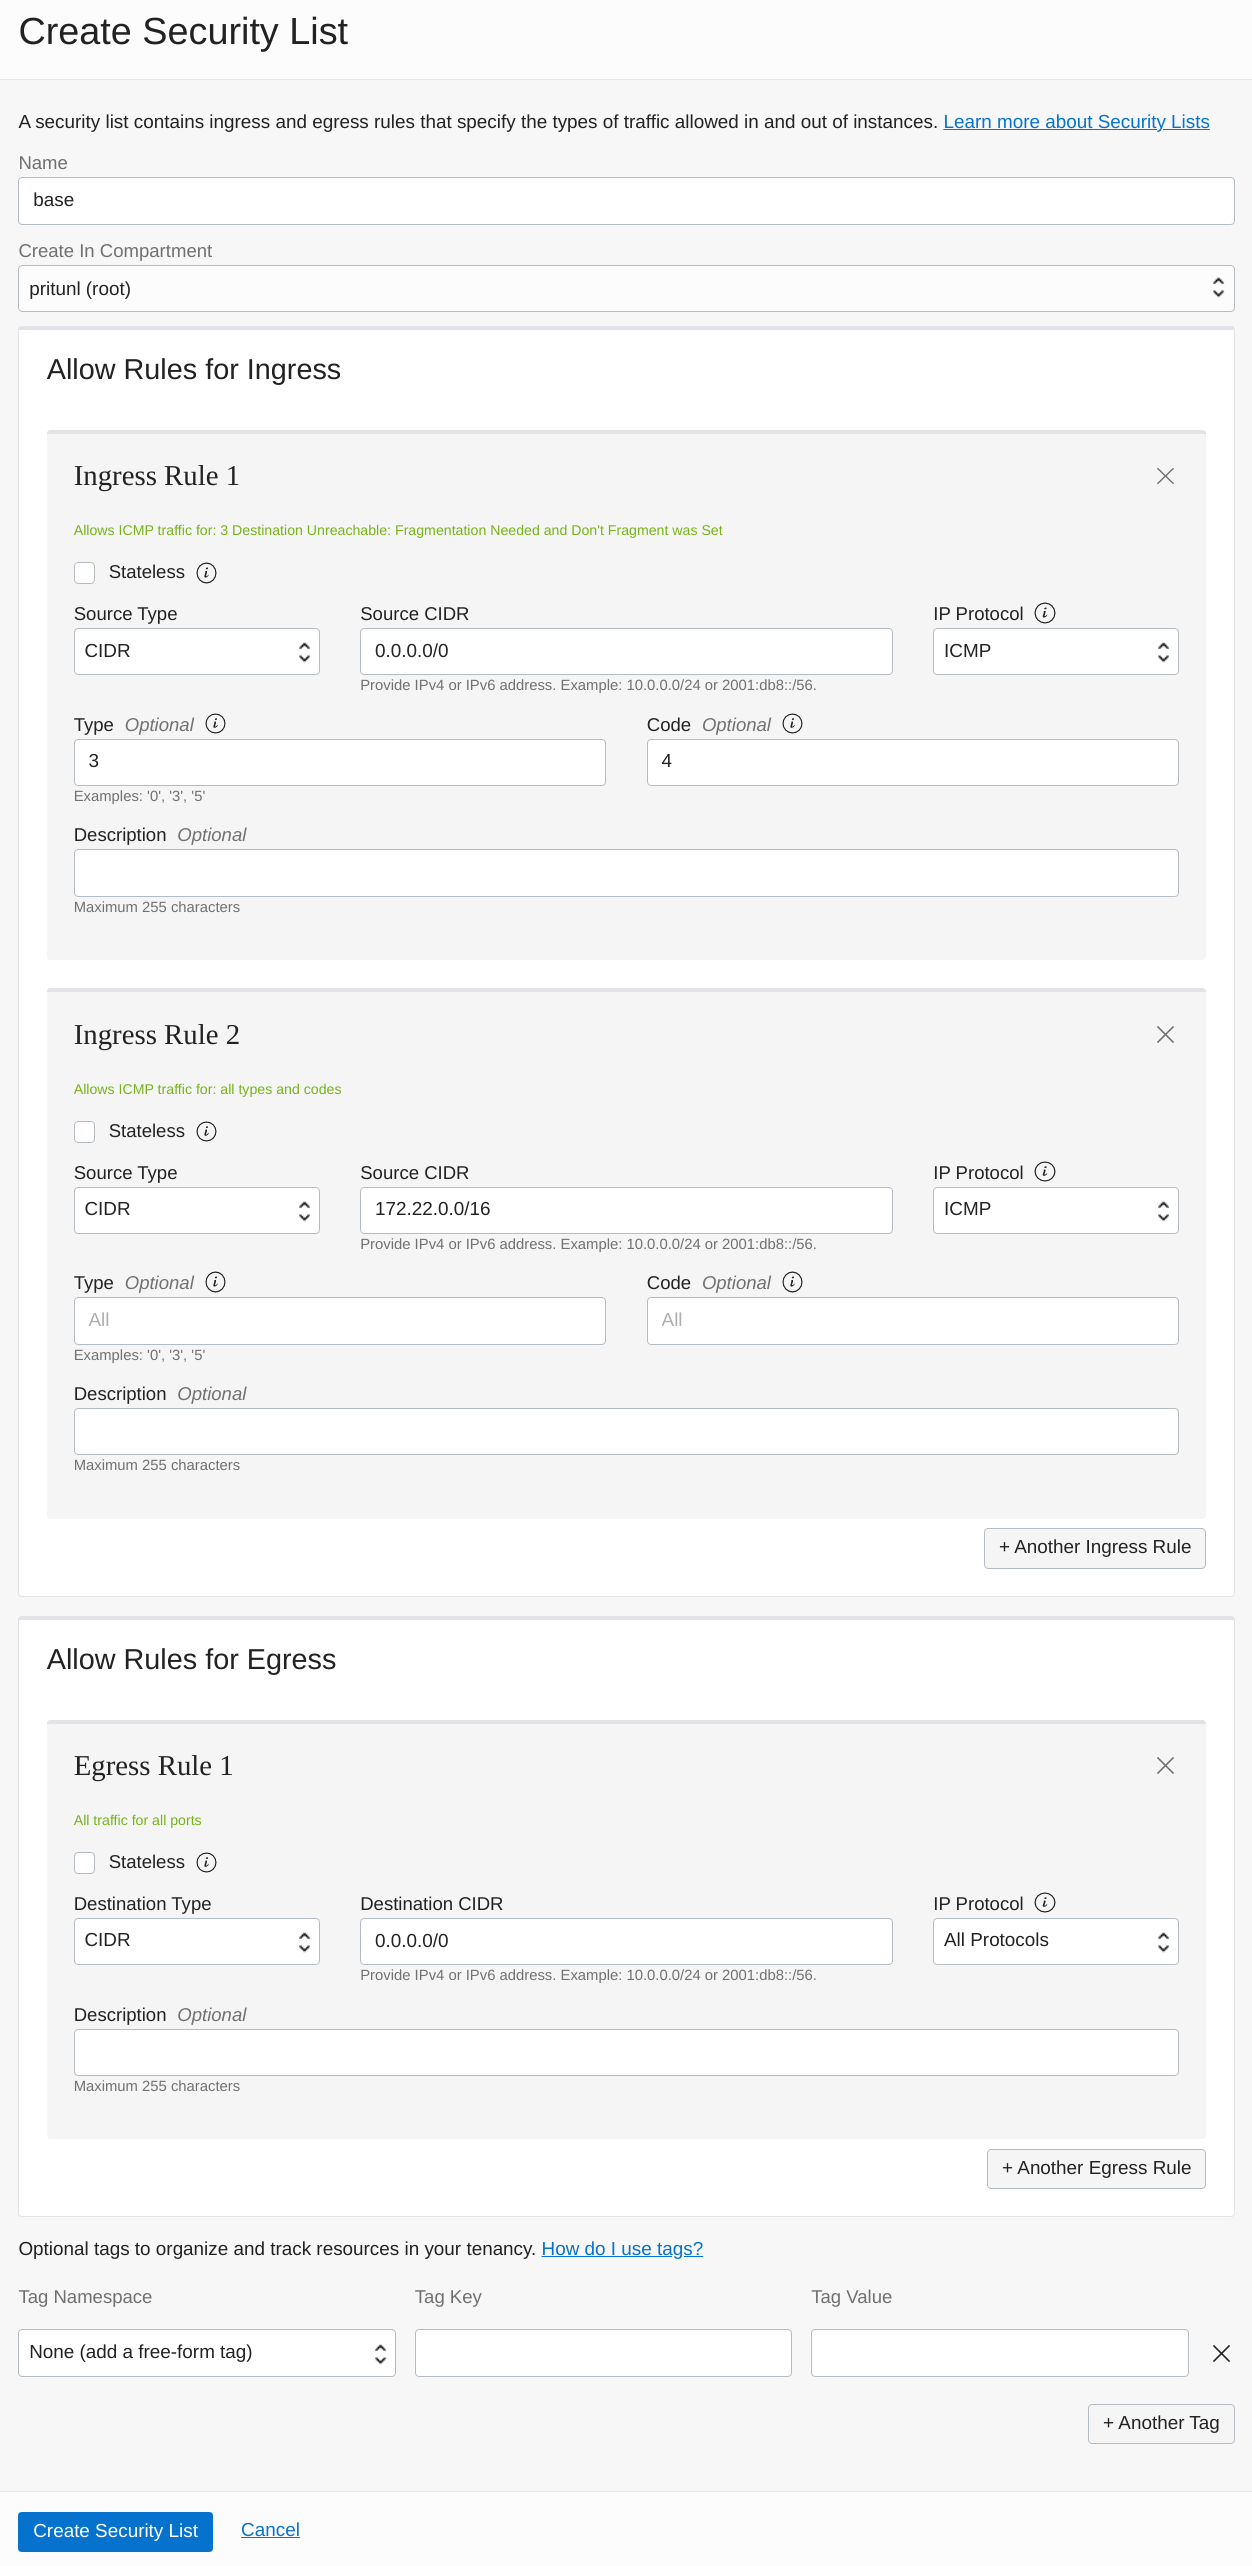
Click Create Security List and set the Name to base. This security list will be attached to all subnets to provide basic ICMP inbound and allow all outbound traffic. Change 172.22.0.0/16 to match your VCN network.
-
Ingress Rule 1
-
Source Type:
CIDR -
Source CIDR:
0.0.0.0/0 -
IP Protocol:
ICMP -
Type:
3 -
Code:
4 -
Ingress Rule 2
-
Source Type:
CIDR -
Source CIDR:
172.22.0.0/16 -
IP Protocol:
ICMP -
Type and Code:
All -
Egress Rule 1
-
Destination Type:
CIDR -
Destination CIDR:
0.0.0.0/0 -
IP Protocol:
All Protocols
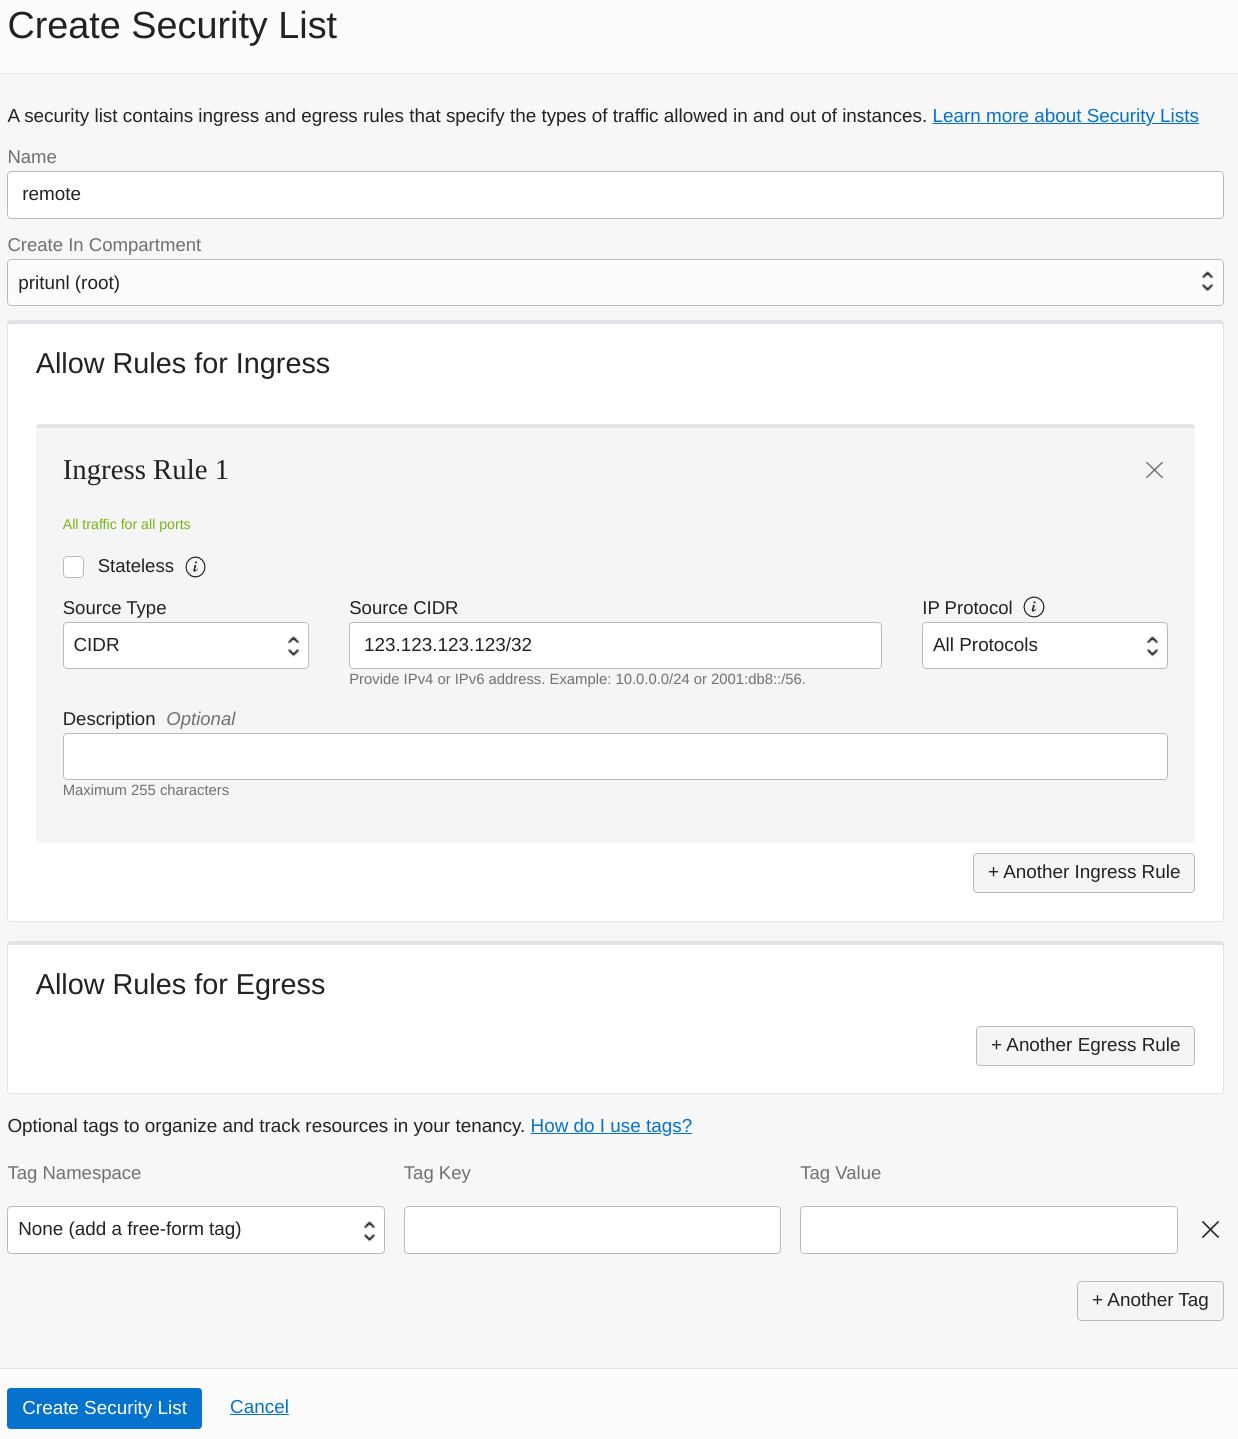
Next create the remote security list to allow remote access to the servers. Replace 123.123.123.123 with your public IP address. Optionally this can be more restrictive by only allowing traffic to SSH, HTTP and HTTPS.
- Ingress Rule 1
- Source Type:
CIDR - Source CIDR:
123.123.123.123/32 - IP Protocol:
All Protocols
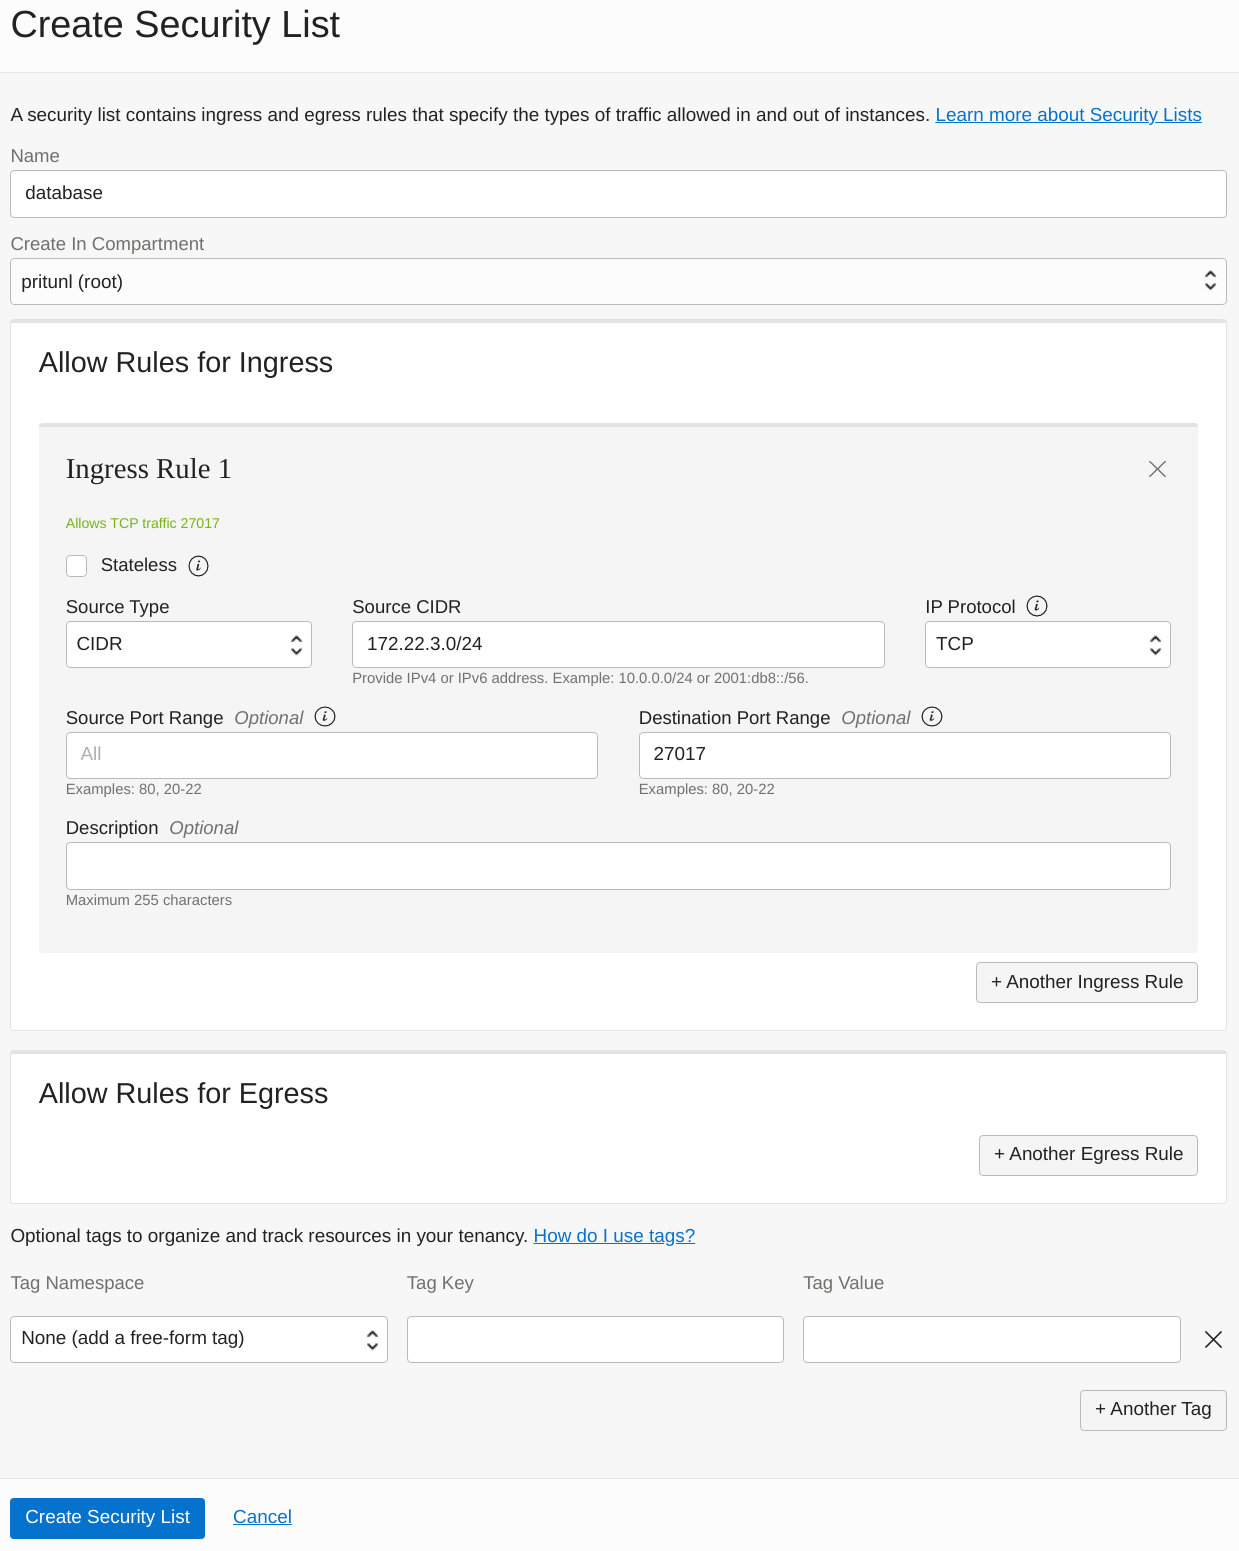
Next create the database security list to allow the Pritunl Cloud subnet to access to the MongoDB servers. This configuration will be using 172.22.3.0/24 for the cloud subnet which will be created in the next step. Change the prefix of this subnet XXX.XXX.3.0/24 to match your VCN network.
- Ingress Rule 1
- Source Type:
CIDR - Source CIDR:
172.22.3.0/24 - IP Protocol:
TCP - Destination Port Range:
27017
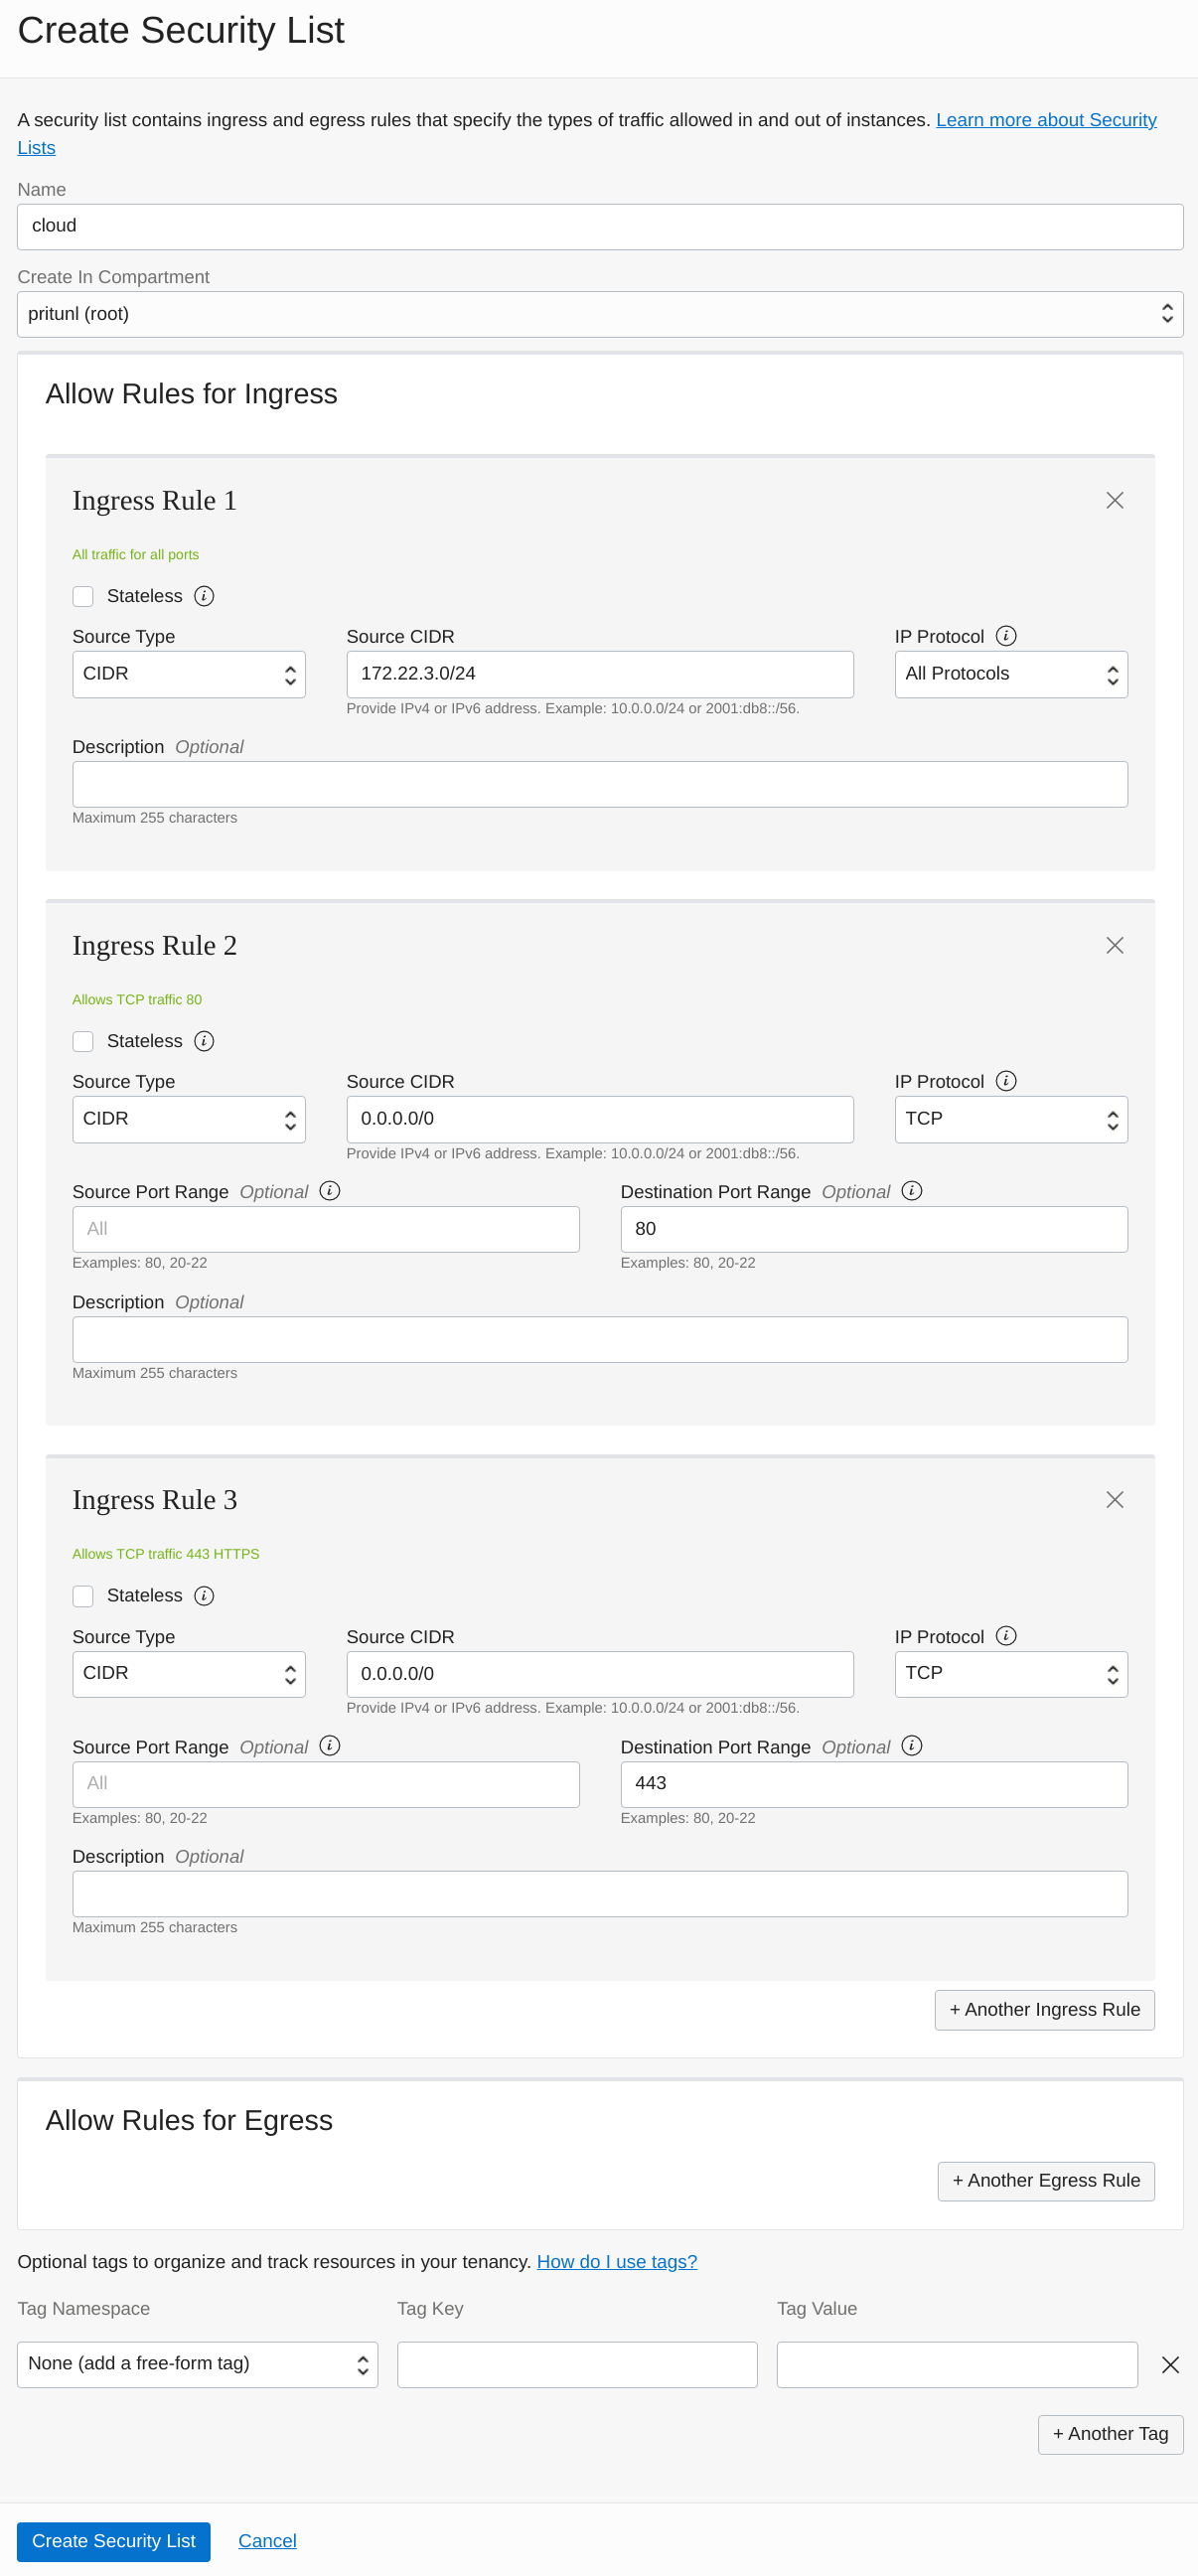
Next create the cloud security list to allow communication between Pritunl Cloud servers and also web server access. Allowing all traffic between Pritunl Cloud servers will support features such as VXLAN used for instance-to-instance communication and instance VNC access. Pritunl Cloud proxies instance VNC traffic with WebSockets from the Pritunl Cloud web server that the client is using to the Pritunl Cloud server that is hosting the instance. No external ports other then HTTPS is required for instance VNC access. HTTP port 80 must be opened if LetsEncrypt is going to be used. Optionally HTTPS port 443 can be excluded and be allowed for specific IP addresses in the remote security list.
This configuration will be using 172.22.3.0/24 for the cloud subnet which will be created in the next step. Change the prefix of this subnet XXX.XXX.3.0/24 to match your VCN network.
-
Ingress Rule 1
-
Source Type:
CIDR -
Source CIDR:
172.24.3.0/24 -
IP Protocol:
All Protocols -
Ingress Rule 2
-
Source Type:
CIDR -
Source CIDR:
0.0.0.0/0 -
IP Protocol:
TCP -
Destination Port Range:
80 -
Ingress Rule 3
-
Source Type:
CIDR -
Source CIDR:
0.0.0.0/0 -
IP Protocol:
TCP -
Destination Port Range:
443
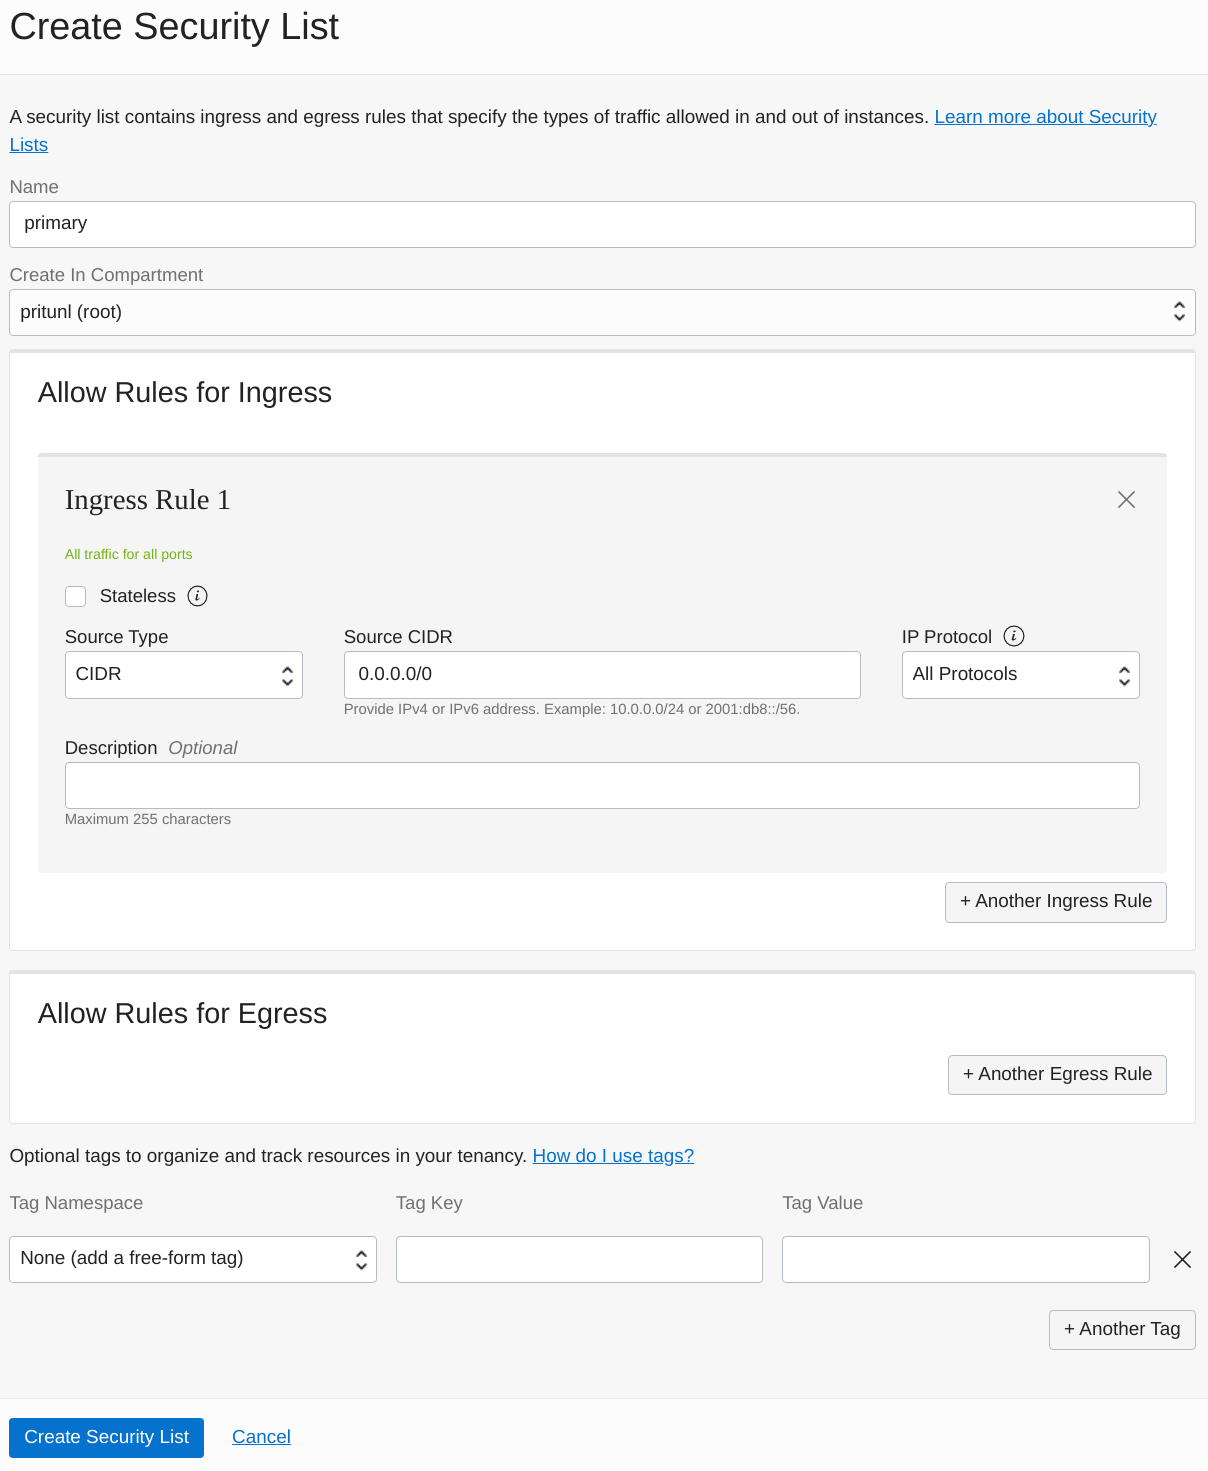
Next create the primary security list for the Pritunl Cloud instances. Because Pritunl Cloud manages firewall rules for instances this configuration will allow all traffic to this subnet. Optionally a more restrictive configuration can be configured but both the Pritunl Cloud and Oracle Cloud firewalls would need to be managed for Pritunl Cloud instance traffic.
- Ingress Rule 1
- Source Type:
CIDR - Source CIDR:
0.0.0.0/0 - IP Protocol:
All Protocols
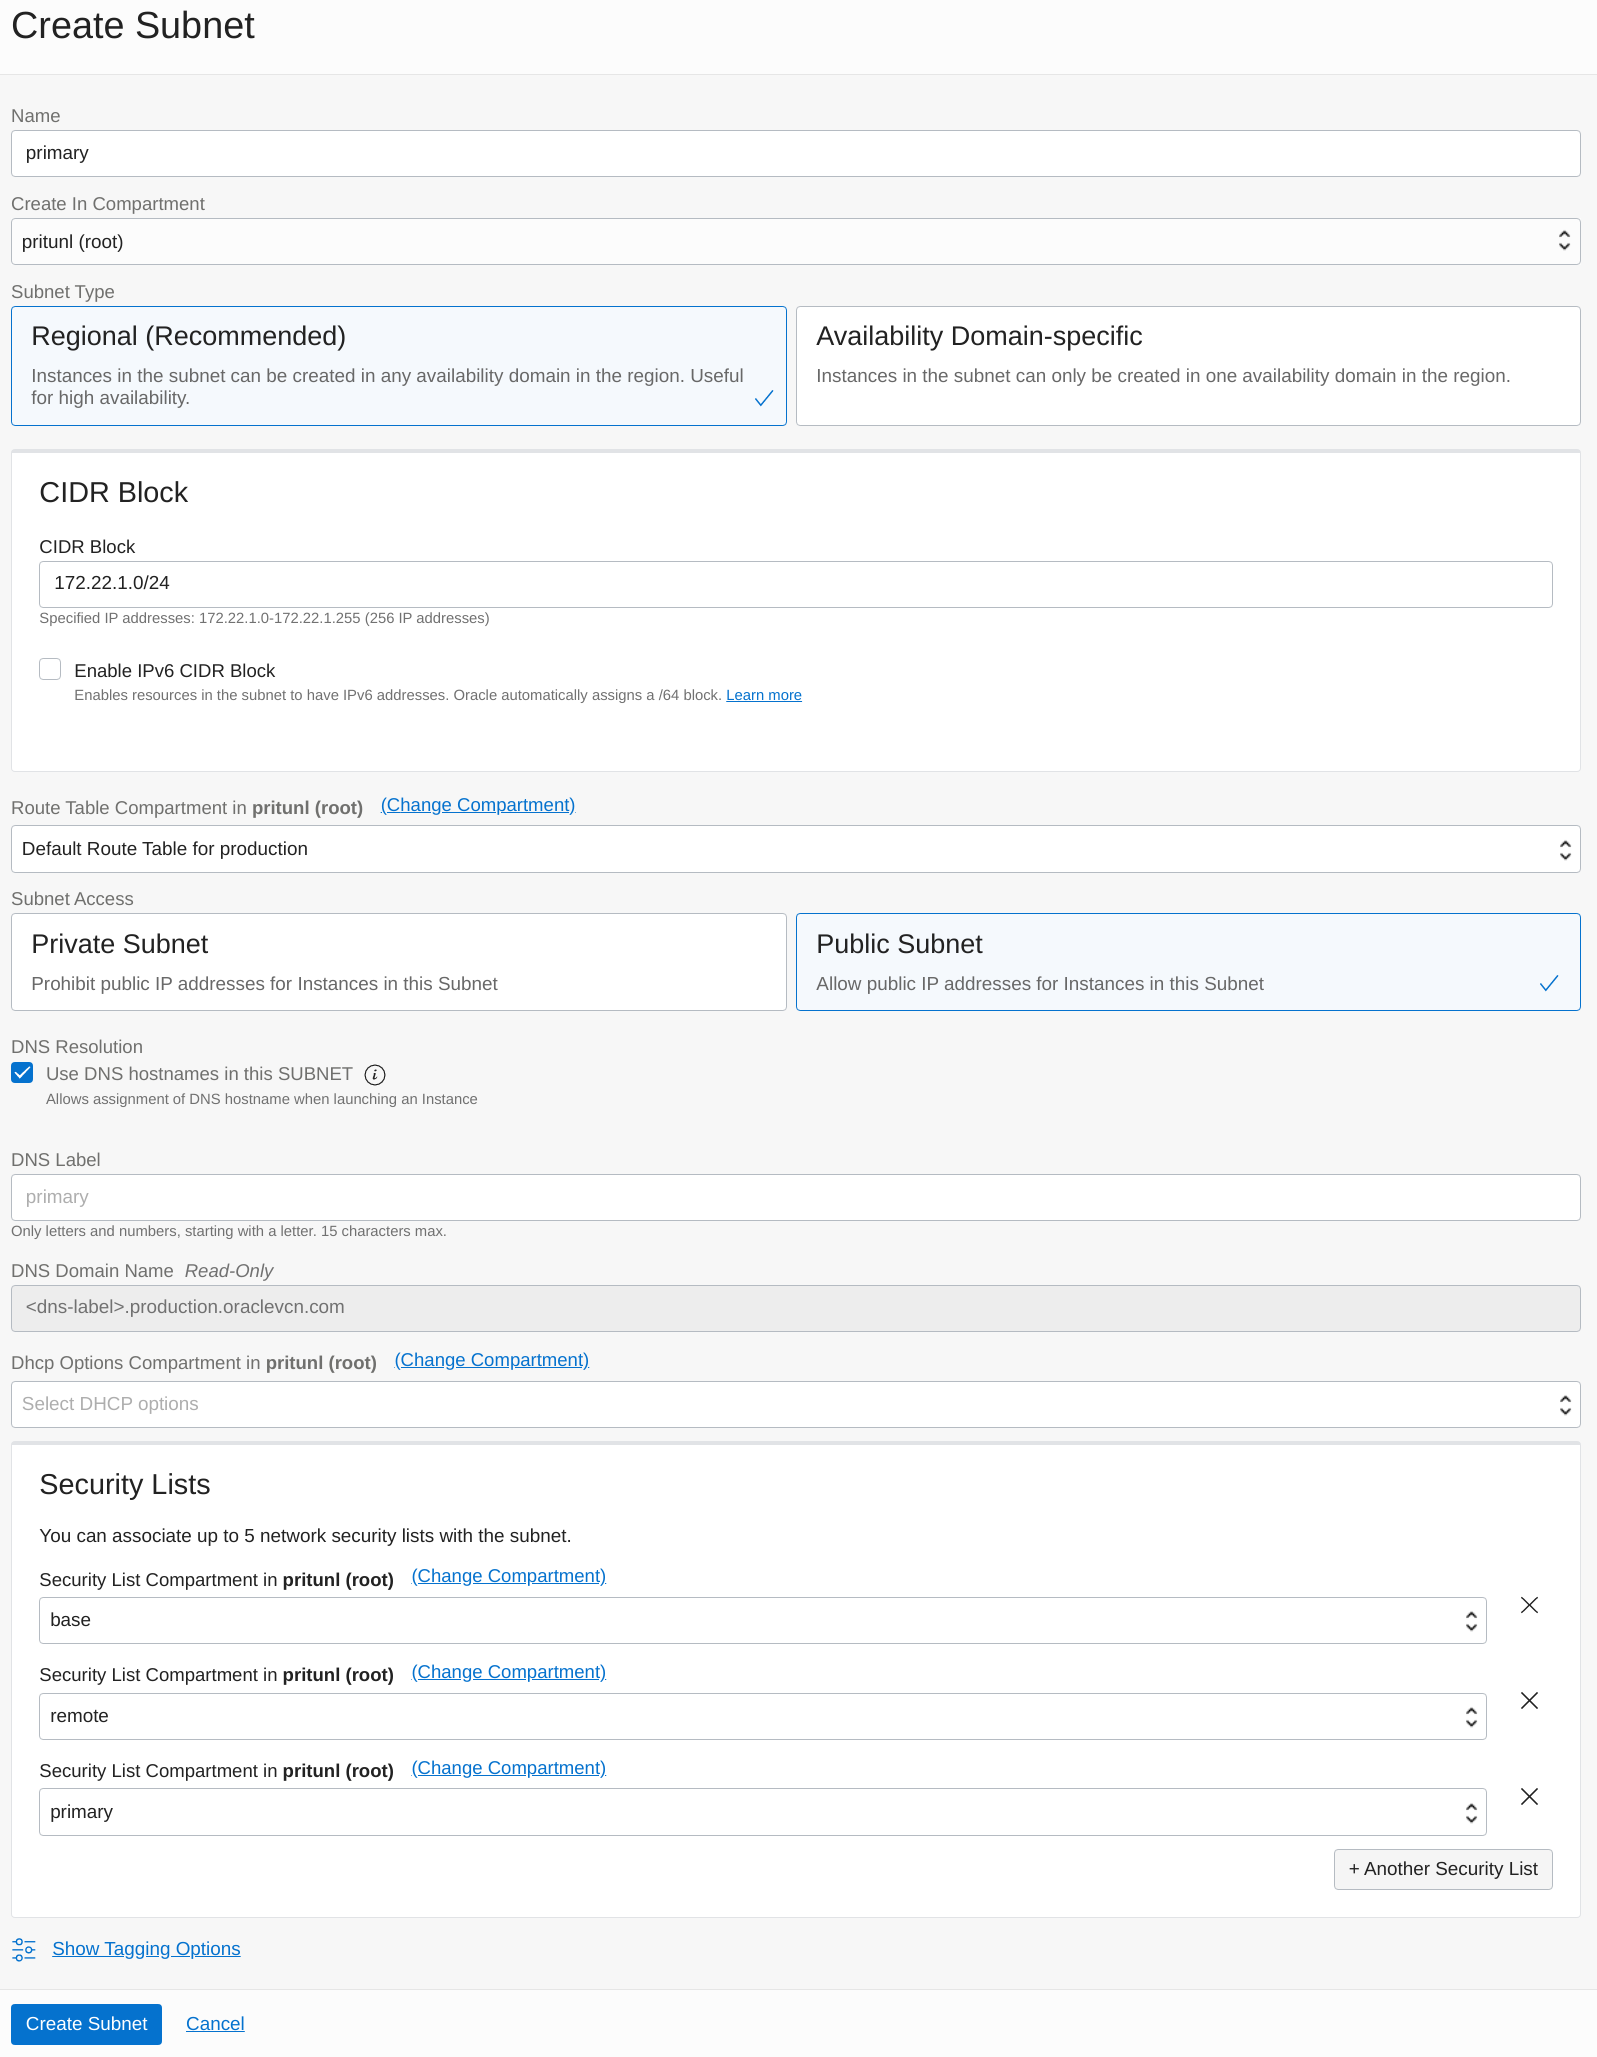
Next open the Subnets tab in the VCN. Click Create Subnet to create the first subnet. Set the Name to primary and the Subnet Type to Regional. This configuration will use 172.22.1.0/24 for the CIDR Block. Change the prefix of this subnet XXX.XXX.1.0/24 to match your VCN network. This subnet will be used for Pritunl Cloud instances. Set the Route Table Compartment to Default Route Table. Then add base, remote and primary to the Security Lists. Once done click Create Subnet.
- Primary Subnet
- Name:
primary - CIDR Block:
172.22.1.0/24 - Route Table:
Default - Security Lists:
base, remote, primary
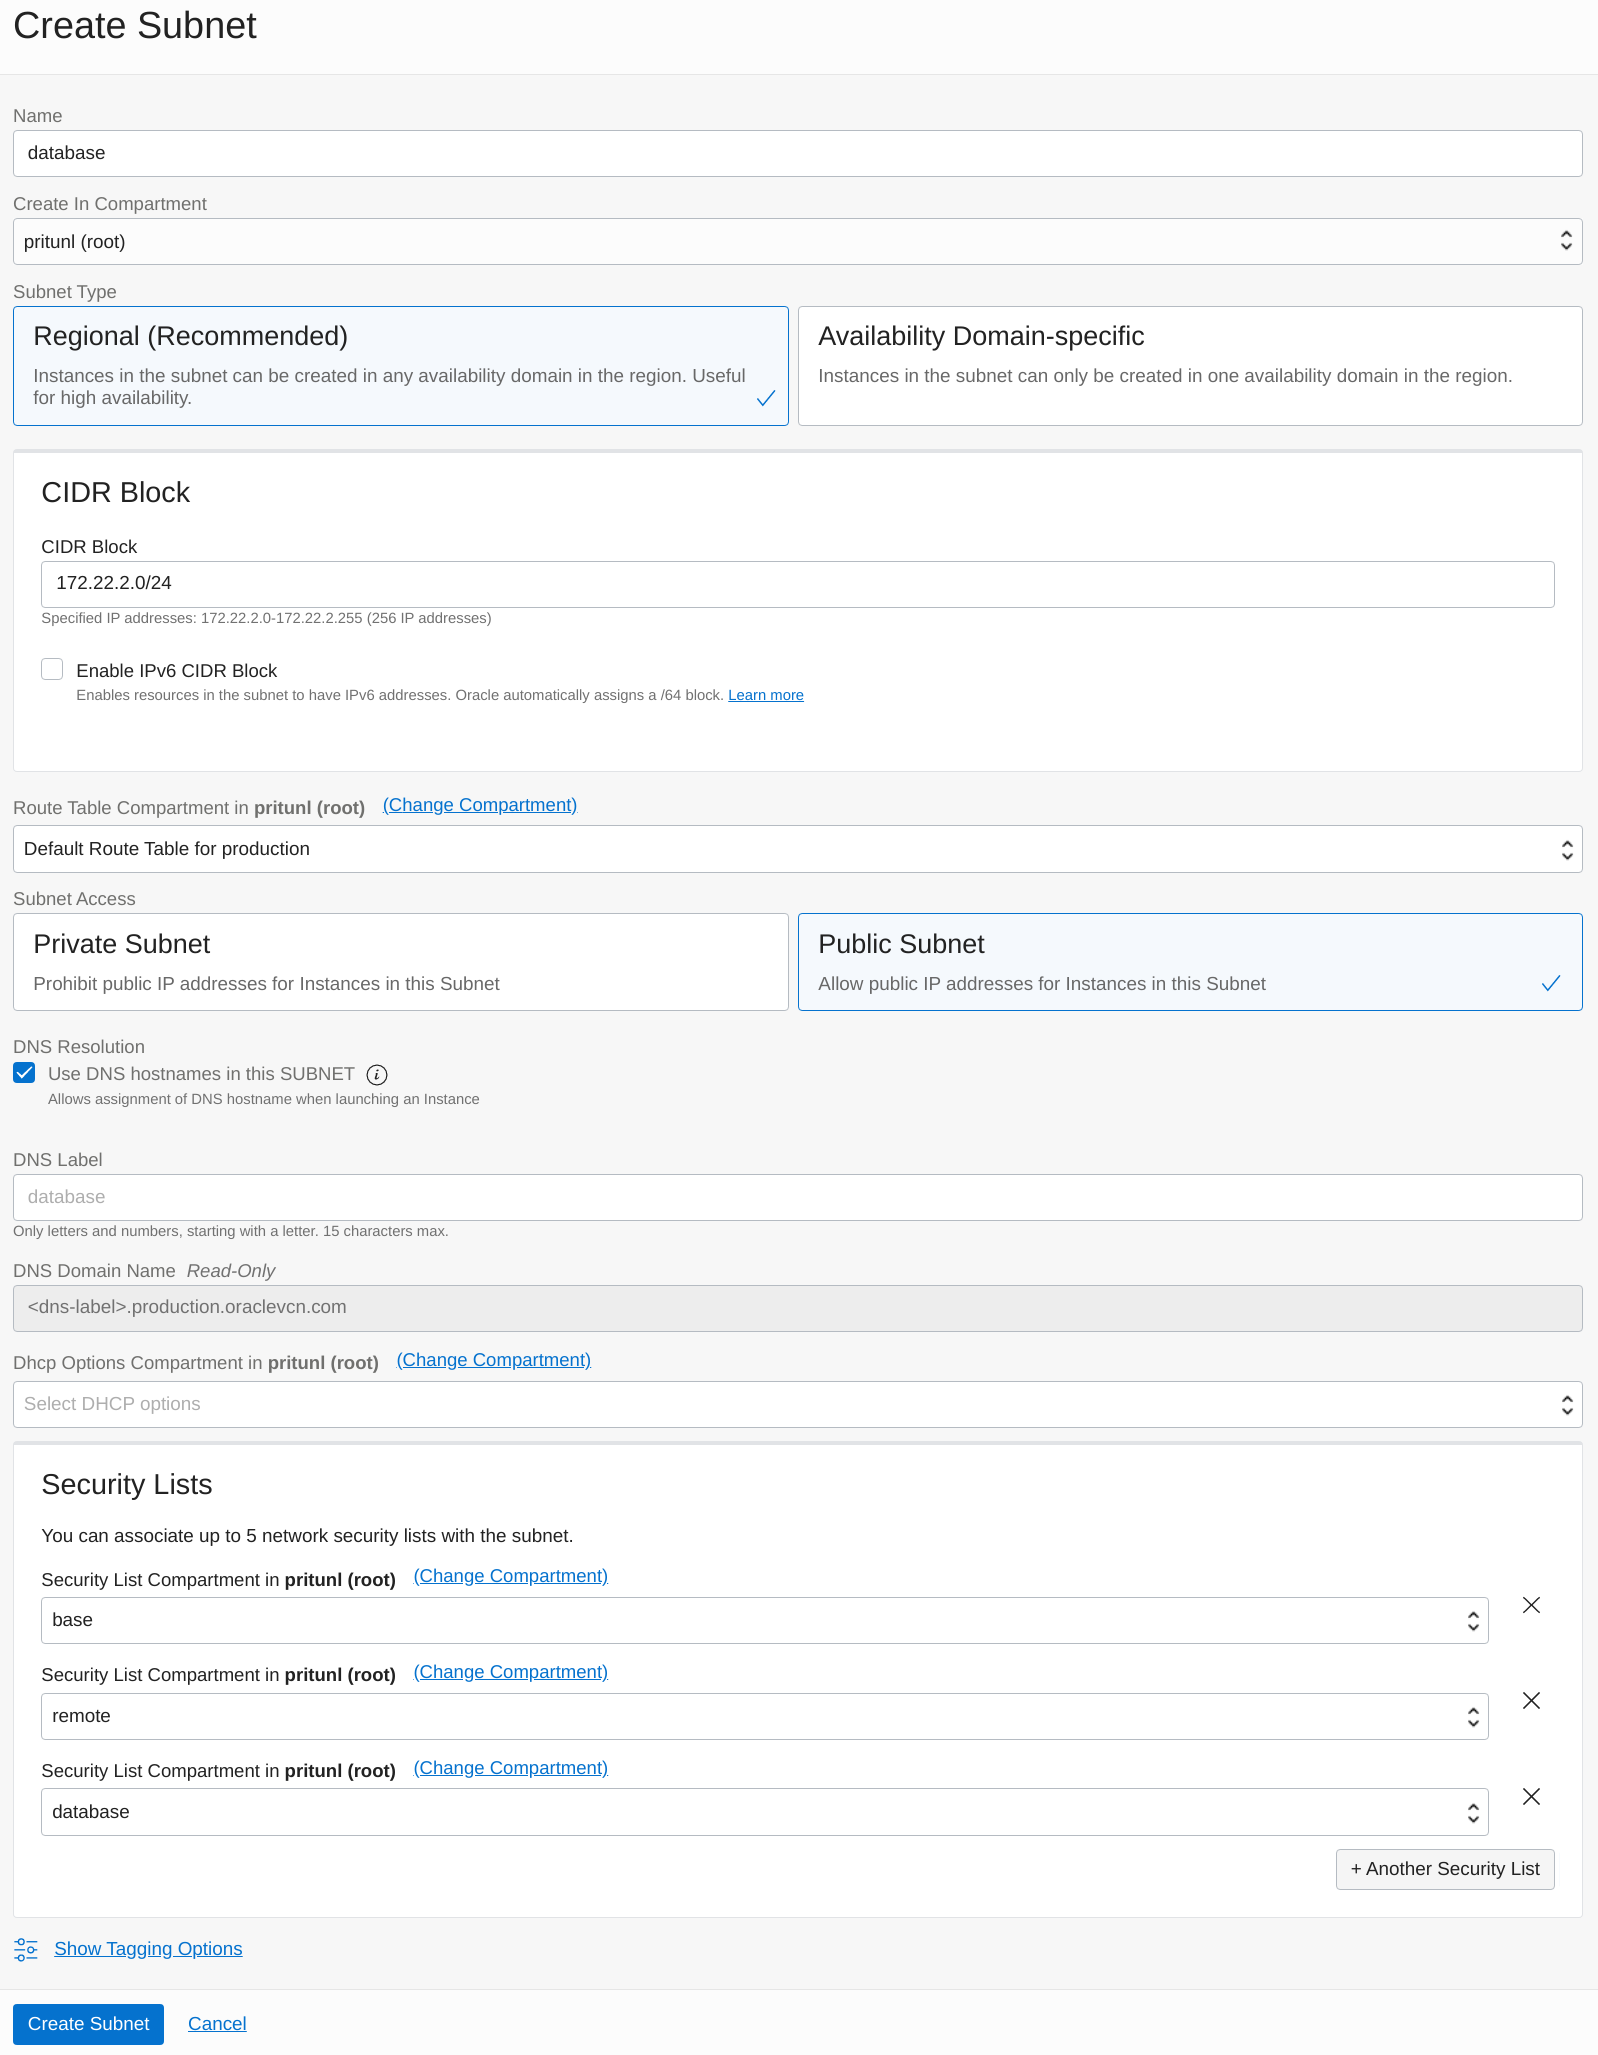
Next create the database subnet for the MongoDB servers. Set the Name to database and the Subnet Type to Regional. This configuration will use 172.22.2.0/24 for the CIDR Block. Change the prefix of this subnet XXX.XXX.2.0/24 to match your VCN network. This subnet will be used for Pritunl Cloud instances. Set the Route Table Compartment to Default Route Table. Then add base, remote and database to the Security Lists. Once done click Create Subnet.
- Database Subnet
- Name:
database - CIDR Block:
172.22.2.0/24 - Route Table:
Default - Security Lists:
base, remote, database
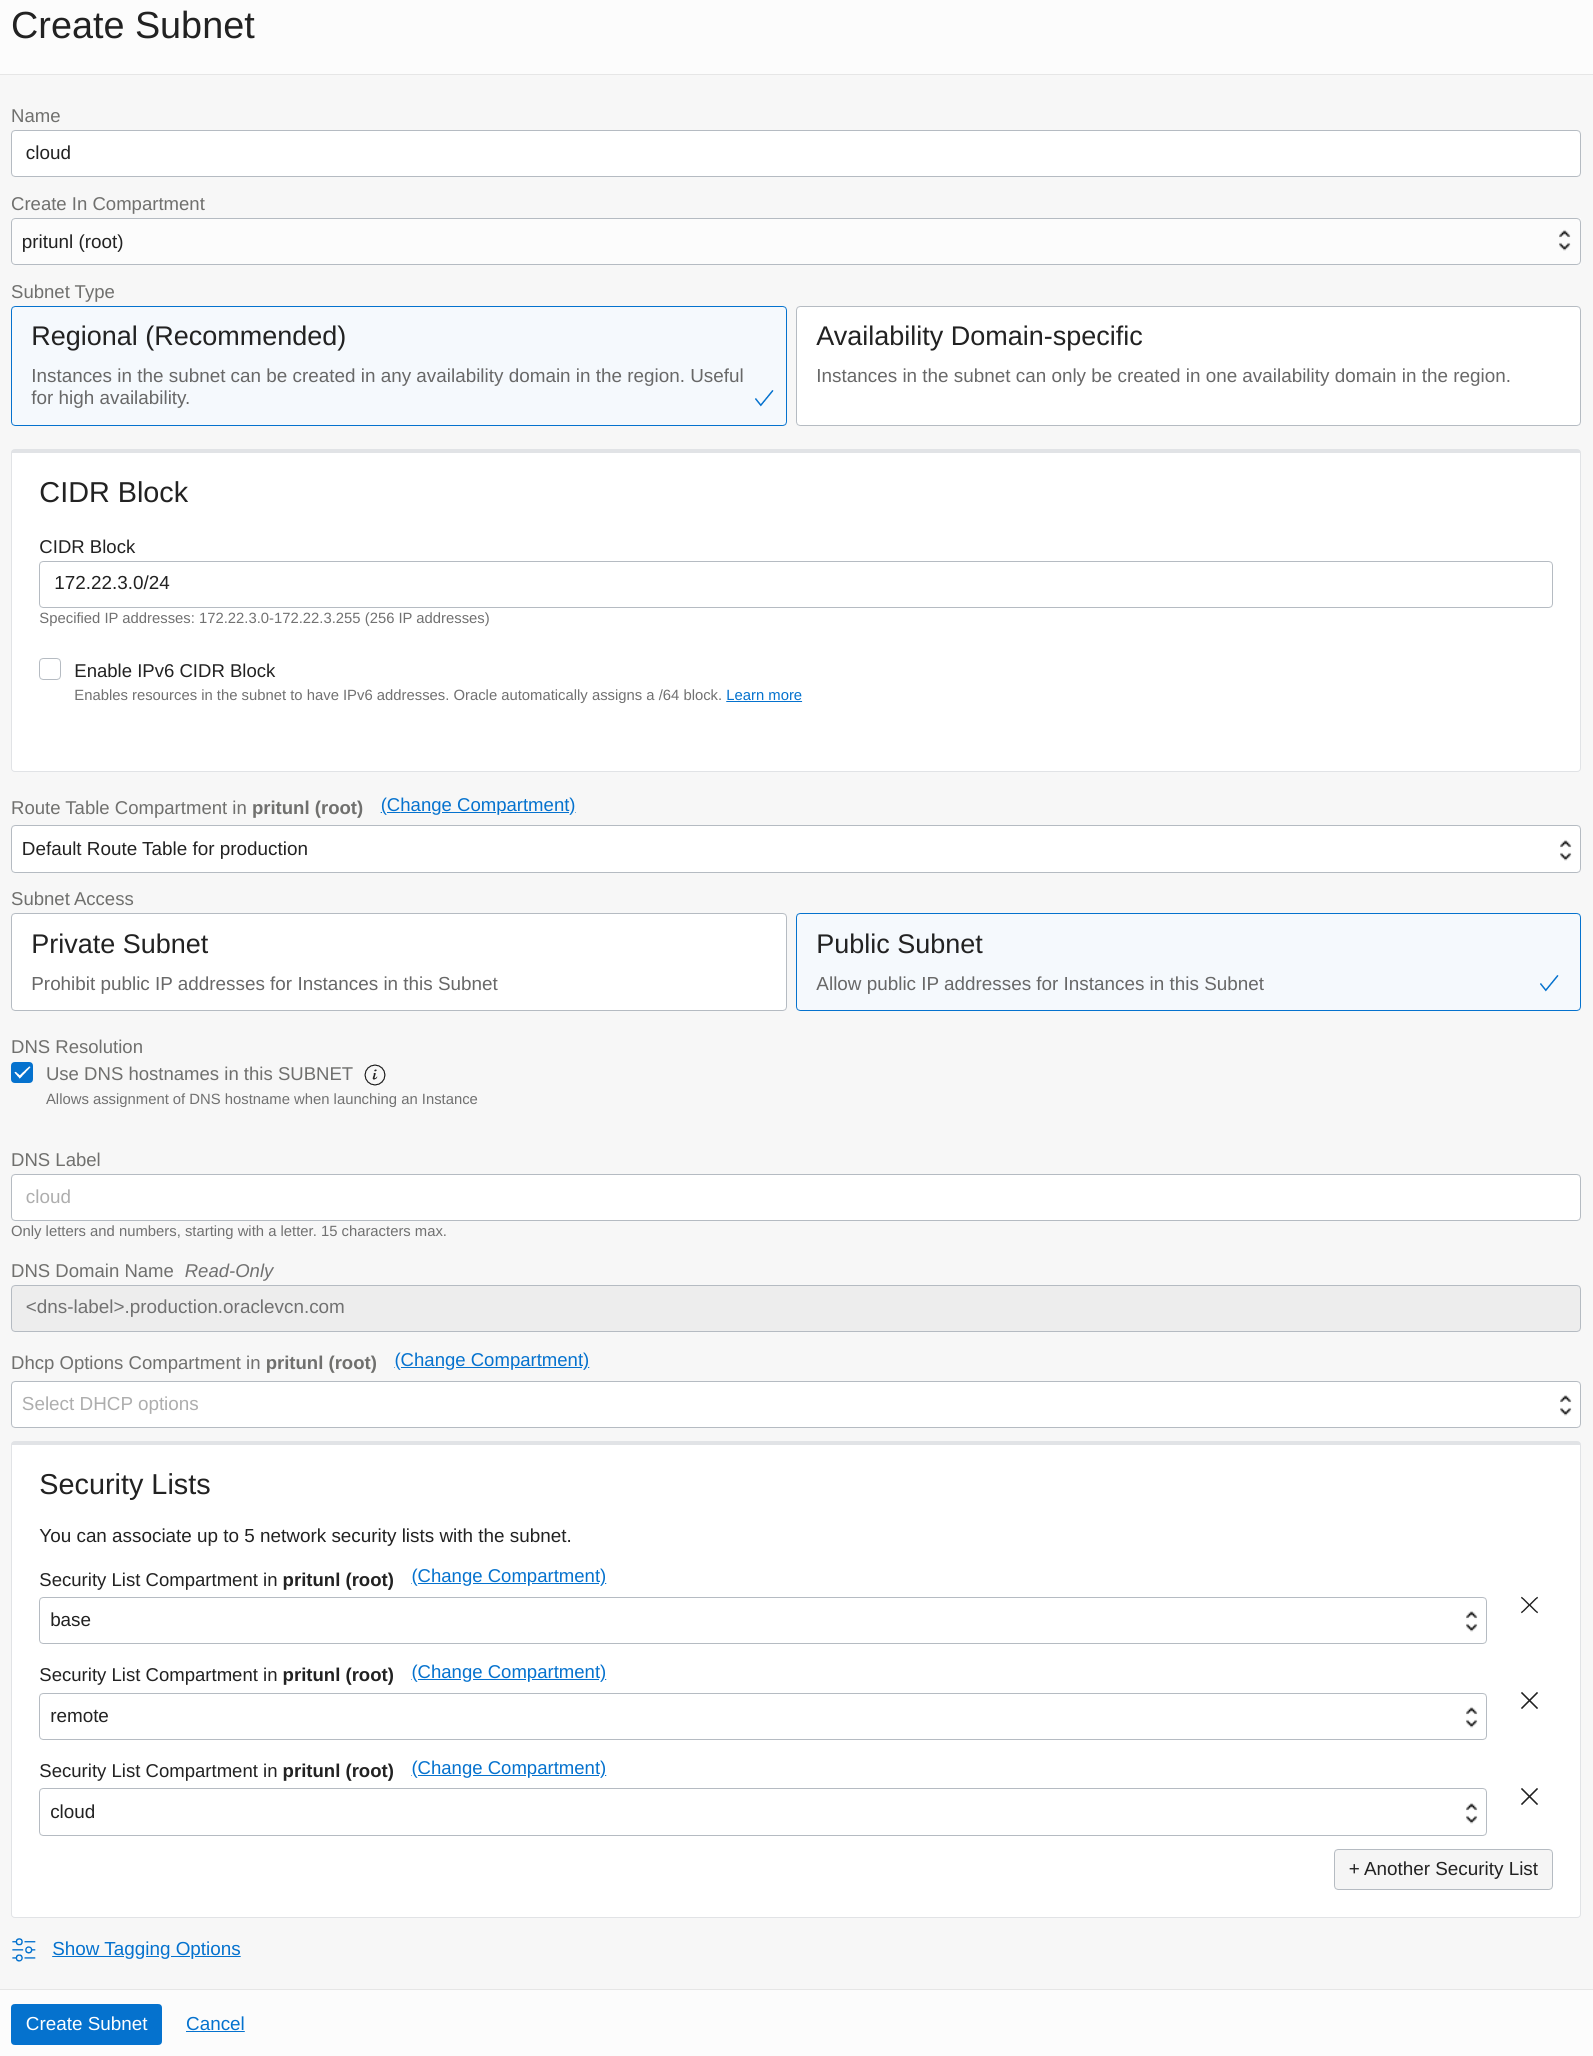
Next create the cloud subnet for the Pritunl Cloud servers. Set the Name to cloud and the Subnet Type to Regional. This configuration will use 172.22.3.0/24 for the CIDR Block. Change the prefix of this subnet XXX.XXX.3.0/24 to match your VCN network. This subnet will be used for Pritunl Cloud instances. Set the Route Table Compartment to Default Route Table. Then add base, remote and cloud to the Security Lists. Once done click Create Subnet.
- Cloud Subnet
- Name:
cloud - CIDR Block:
172.22.3.0/24 - Route Table:
Default - Security Lists:
base, remote, cloud
Create MongoDB Cluster (Multi-Host Configurations Only)
For single host Pritunl Cloud configurations the MongoDB server can be run on the Pritunl Cloud host and this section can be skipped.Click here to skip to next section
For high availability a three member MongoDB replica set will be created. Optionally a single server MongoDB database can be used. The VM.Standard.E4.Flex instance shape with 4 GB RAM will be sufficient for Pritunl Cloud.
SelectOracle Linux 9 for the instance image.
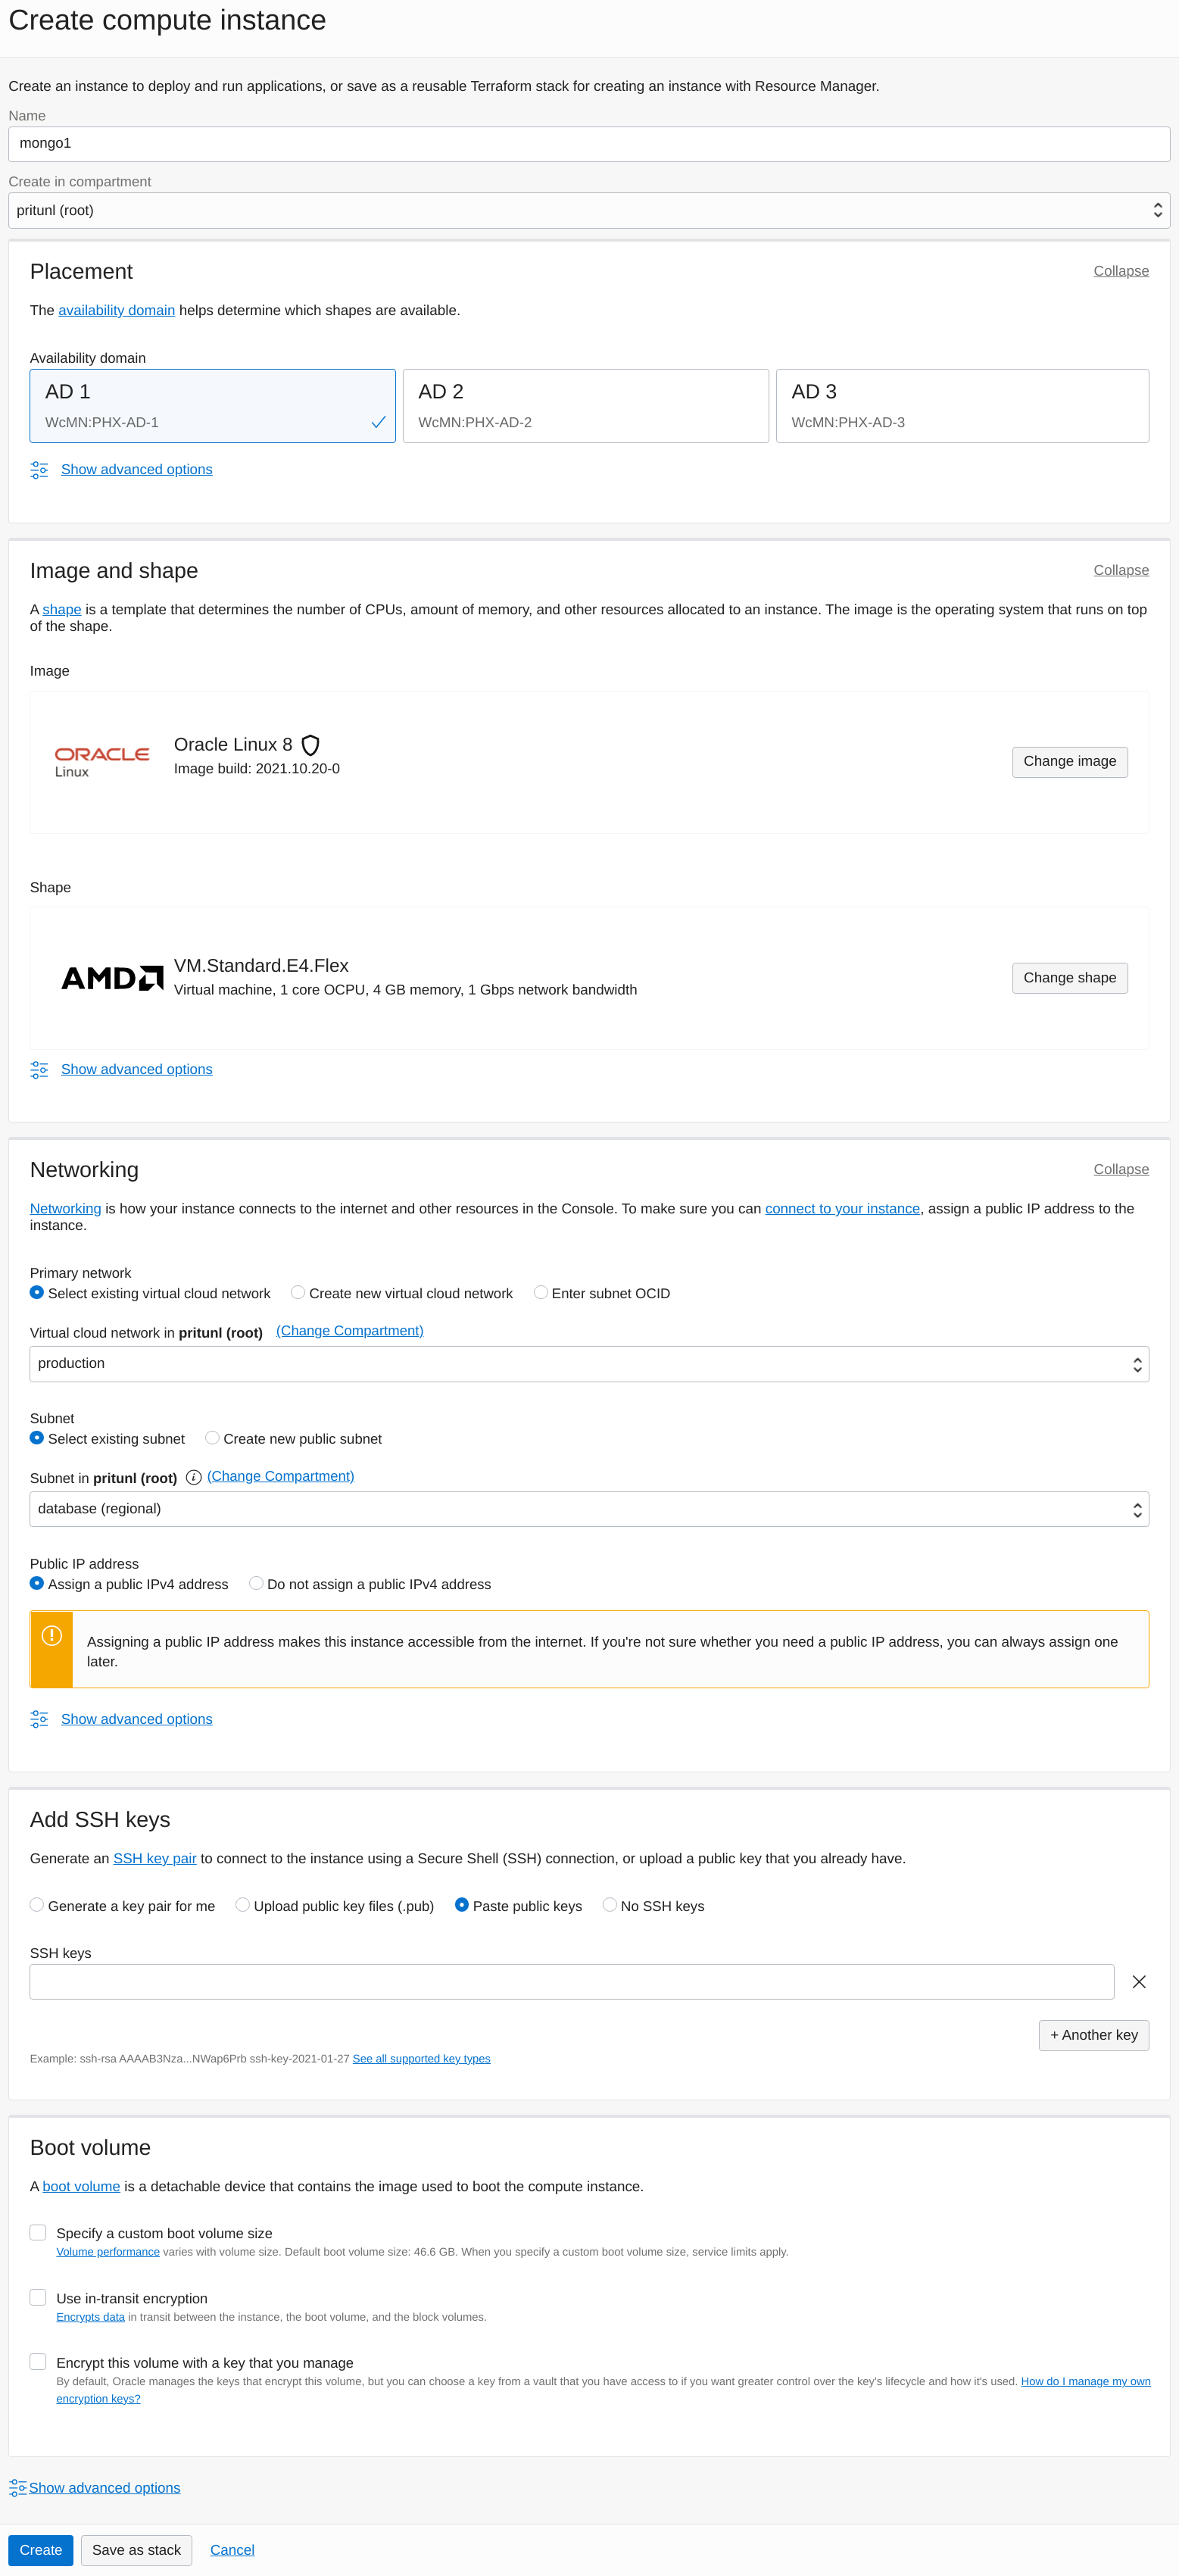
Click Create Instance then set the Name to mongo1 and Availability Domain to AD 1. Then select the VM.Standard.E4.Flex instance shape with 4 GB RAM and upload a public SSH key. Set the Virtual cloud network to the VCN created above and Subnet to database. Repeat this to create a mongo instance on each availability domain.
SSH on to all three instances using the username opc then run the commands below on all the servers to install MongoDB. The MongoDB configuration file will be modified to bind to all IP addresses and set the replica set name.
sudo systemctl disable firewalld
sudo systemctl stop firewalld

sudo tee /etc/yum.repos.d/mongodb-org-6.0.repo << EOF
[mongodb-org-6.0]
name=MongoDB Repository
baseurl=https://repo.mongodb.org/yum/redhat/9/mongodb-org/6.0/x86_64/
gpgcheck=1
enabled=1
gpgkey=https://www.mongodb.org/static/pgp/server-6.0.asc
EOF

sudo yum -y install mongodb-org

sudo sed -i 's/bindIp: 127.0.0.1/bindIp: 0.0.0.0/g' /etc/mongod.conf
sudo tee -a /etc/mongod.conf << EOF
replication:
   replSetName: "rs0"
EOF

sudo systemctl restart mongod
sudo systemctl enable mongod

ip addr
Next run the mongo command and copy the local VCN address from the ip addr command to each host in the configuration below. Then run the commands below to configure the replica set and check the status.
rs.initiate({
   _id : "rs0",
   members: [
      {_id: 0, host: "172.22.2.2:27017"},
      {_id: 1, host: "172.22.2.3:27017"},
      {_id: 2, host: "172.22.2.4:27017"}
   ]
});
rs.status();
Next run the commands below with a random password in the mongo console. This will create a user for the admin and Pritunl Cloud server.
use admin;
db.createUser({
  user: "admin",
  pwd: "zpdyKpA7Ds7MwcUWEEYVT8FS9FErXrtX",
  roles: ["root"]
});
db.createUser({
  user: "pritunl",
  pwd: "dI55QbiW5bpH6EWFhy9brS7lNbFUCP4x",
  roles: [{role: "dbOwner", db: "pritunl-cloud"}]
});
exit;
Once done run the commands below on all three MongoDB servers to require authentication. The command mongo -u admin can be used to access the MongoDB shell using the admin password.
sudo tee -a /etc/mongod.conf << EOF
security:
  authorization: "enabled"
EOF
sudo systemctl restart mongod
Create a MongoDB URI using the local VCN IP addresses and password above. This will be used for the Pritunl Cloud configuration.
mongodb://pritunl:dI55QbiW5bpH6EWFhy9brS7lNbFUCP4x@172.22.1.2:27017,172.22.1.3:27017,172.22.1.4:27017/pritunl-cloud?authSource=adminCreate Pritunl Cloud Host
Any number of Pritunl Cloud hosts can be created, quorum is not required for high availability. Only the MongoDB database will require quorum.
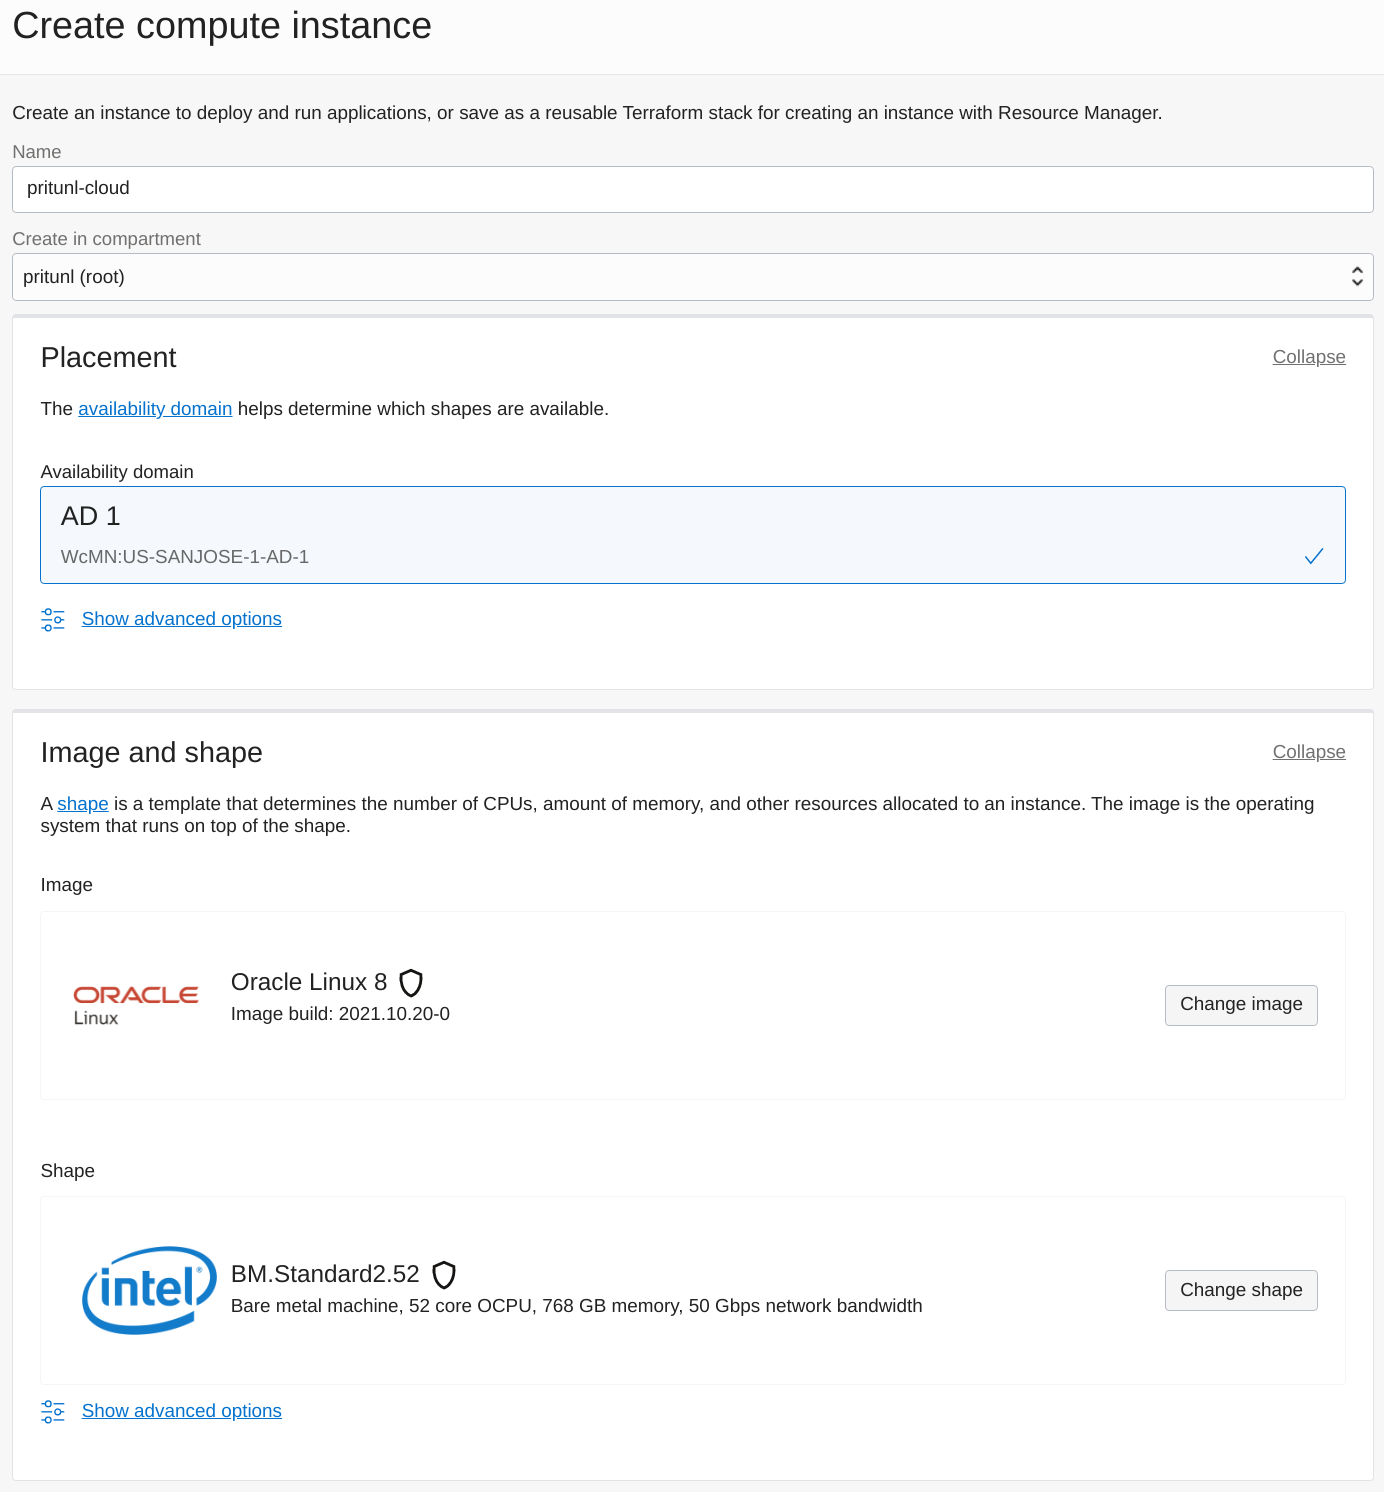
Open the Instances section of the Oracle Cloud console and click Create instance. Set the Name and Availability domain. ClickChange image and select Oracle Linux with OS version set to 9. Below are the hourly prices for each bare metal instance type. The BM.Optimized3.36 instance type will be billed when powered off the other instance types are billed only when running.
- BM.Optimized3.36 - $2.712
- BM.Standard.E4.128 - $6.272
- BM.Standard.E3.128 - $6.272
- BM.Standard2.52 - $3.318
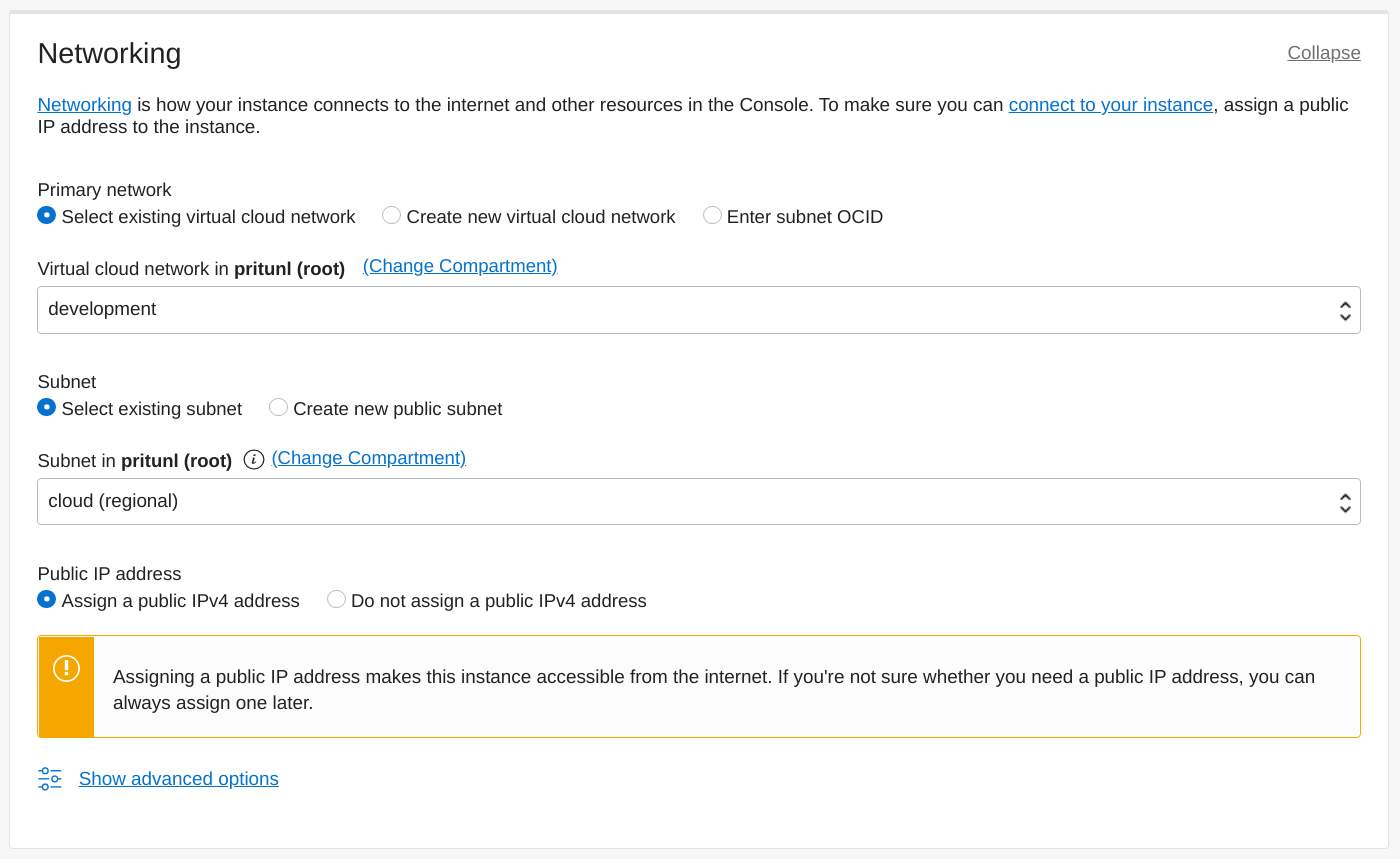
Set the Virtual cloud network and Subnet. Then enable Assign a public IPv4 address.
Add an SSH key that will be used to access the bare metal server under the Oracle Cloud opc username.

Set the boot volume size. For testing configurations a small volume can be used. For more advanced configurations an additional volume can be mounted at /var/lib/pritunl-cloud where all Pritunl Cloud instance data is stored. The block volume performance class can be customized from the Block Volume section in Oracle Cloud.
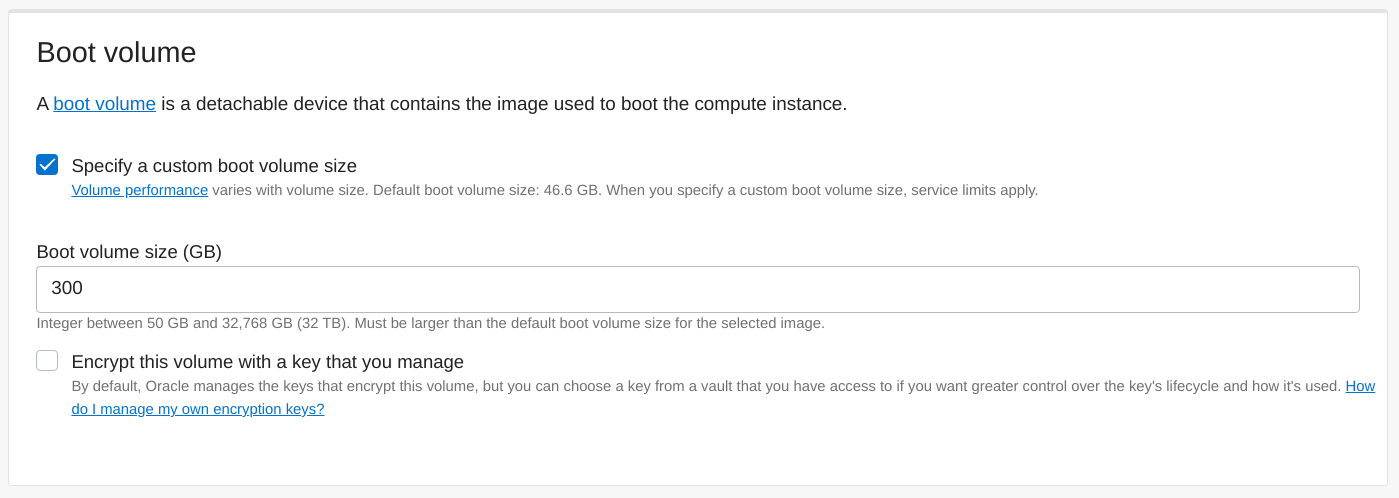
Once done click Create and ssh onto the server using the username opc.
ssh opc@123.123.123.123Install Pritunl Cloud
Pritunl Cloud will be installed with Pritunl Cloud Builder which will automate the installation of Pritunl Cloud. Verify the output of the checksum command is pritunl-builder: OK. Refer to the Pritunl Cloud Builder Readme to get the latest version and checksum to use for the commands below.
After running the Pritunl Cloud Builder use the default y response to all prompts. If a dedicated MongoDB server is used enter the MongoDB URI when prompted.
wget https://github.com/pritunl/pritunl-cloud-builder/releases/download/1.0.2653.32/pritunl-builder
echo "b1b925adbdb50661f1a8ac8941b17ec629fee752d7fe73c65ce5581a0651e5f1  pritunl-builder" | sha256sum -c -

chmod +x pritunl-builder
sudo ./pritunl-builder
After the installation is complete restart the server to apply the system changes.
sudo rebootLogin to Pritunl Cloud
Open the public IP address of one of the Pritunl Cloud servers in a web browser. Login with the default username and password pritunl.
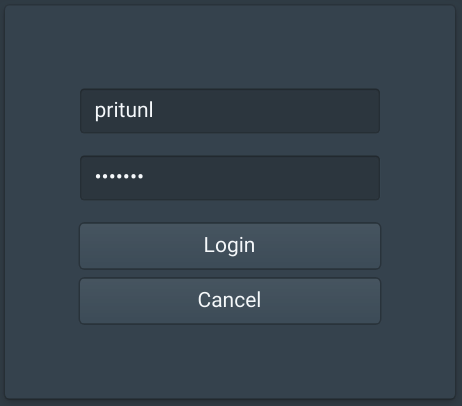
sudo pritunl-cloud default-passwordOpen the IP address of the Pritunl Cloud server in a web browser and enter the username and password from the command above. Then click Login.
Create Oracle Cloud User
A Oracle Cloud API user will be needed for the Pritunl Cloud server to use the Oracle Cloud API to create VNICs for the Pritunl Cloud instances on the Oracle Cloud server.
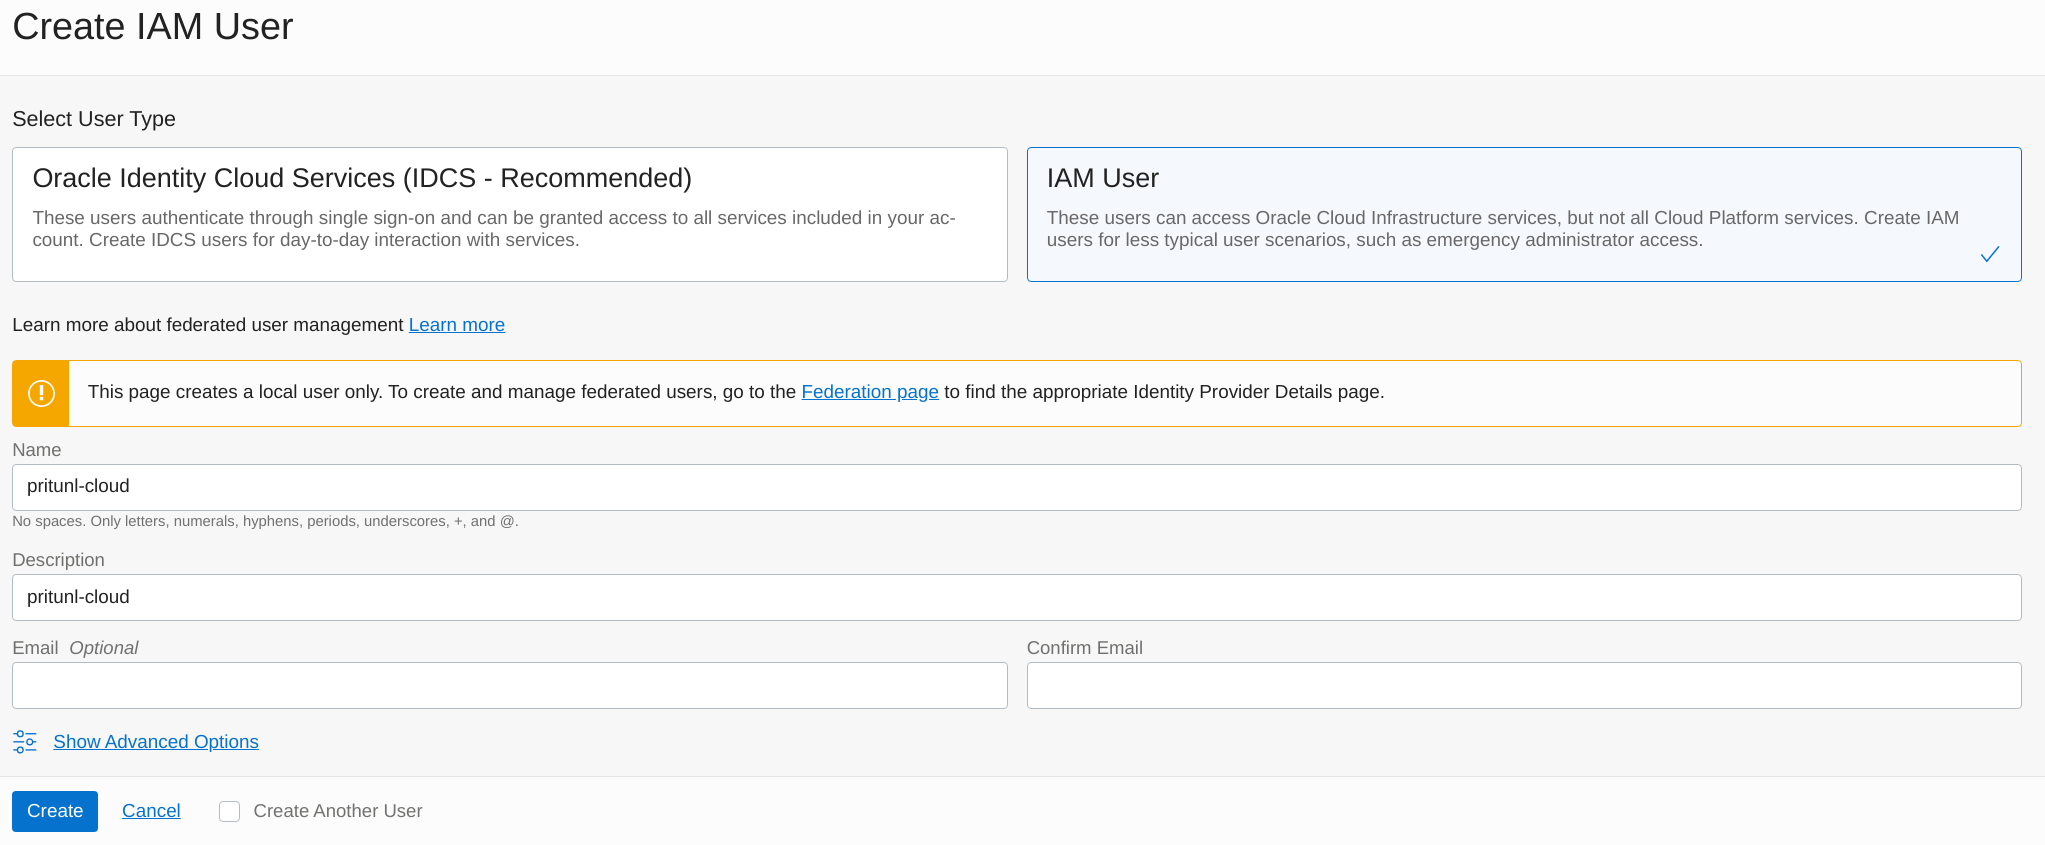
Open the Users section of Identity in the Oracle Cloud console. Click Create User and set the User Type to IAM User. Then set the Name to pritunl-cloud and set the Description to pritunl-cloud. Then click Create.
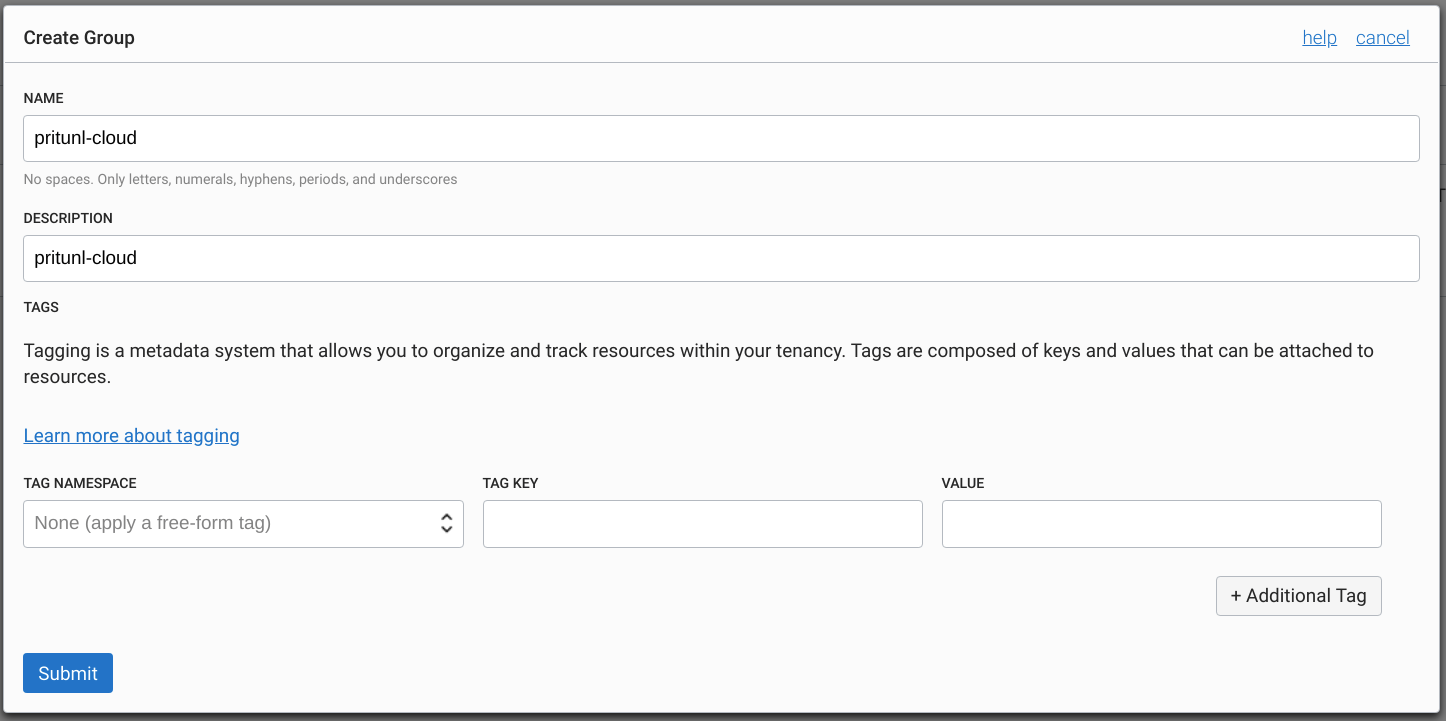
Open the Groups tab and click Create Group. Set the Name and Description to pritunl-cloud.
Open the Policies tab and click Create Policy. Set the Name and Description to pritunl-cloud. Then enable Show manual editor and add the policy below.
ALLOW GROUP pritunl-cloud to manage virtual-network-family IN TENANCY
ALLOW GROUP pritunl-cloud to manage instance-family IN TENANCY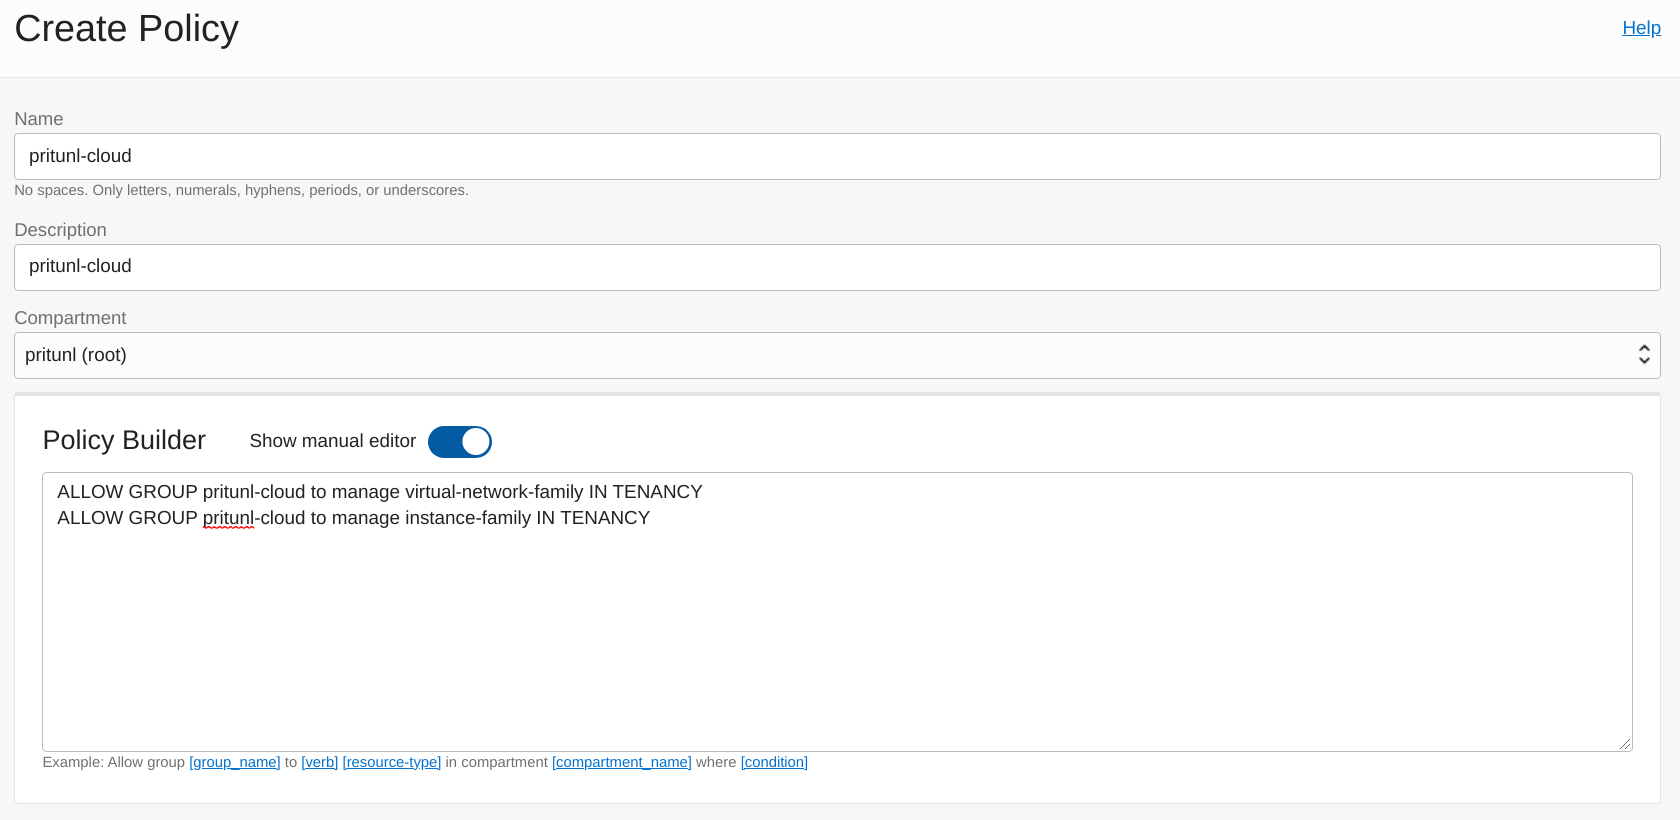
In the Users tab select the pritunl-cloud user and open the Groups tab. Then click Add User to Group. Select the pritunl-cloud group and click Add.

Open the Nodes tab then set the Zone to us-west-1a, this can be renamed later. Set both the Network IPv4 Mode and Network IPv6 Mode to Oracle Cloud. Enable Jumbo frames which are fully supported on Oracle Cloud networks between each Pritunl Cloud host. After the network mode is set the Oracle Cloud Public Key field will be shown with a public key, this will be needed for the next step. Before saving the node settings add the public key to the Oracle Cloud user with the steps below.
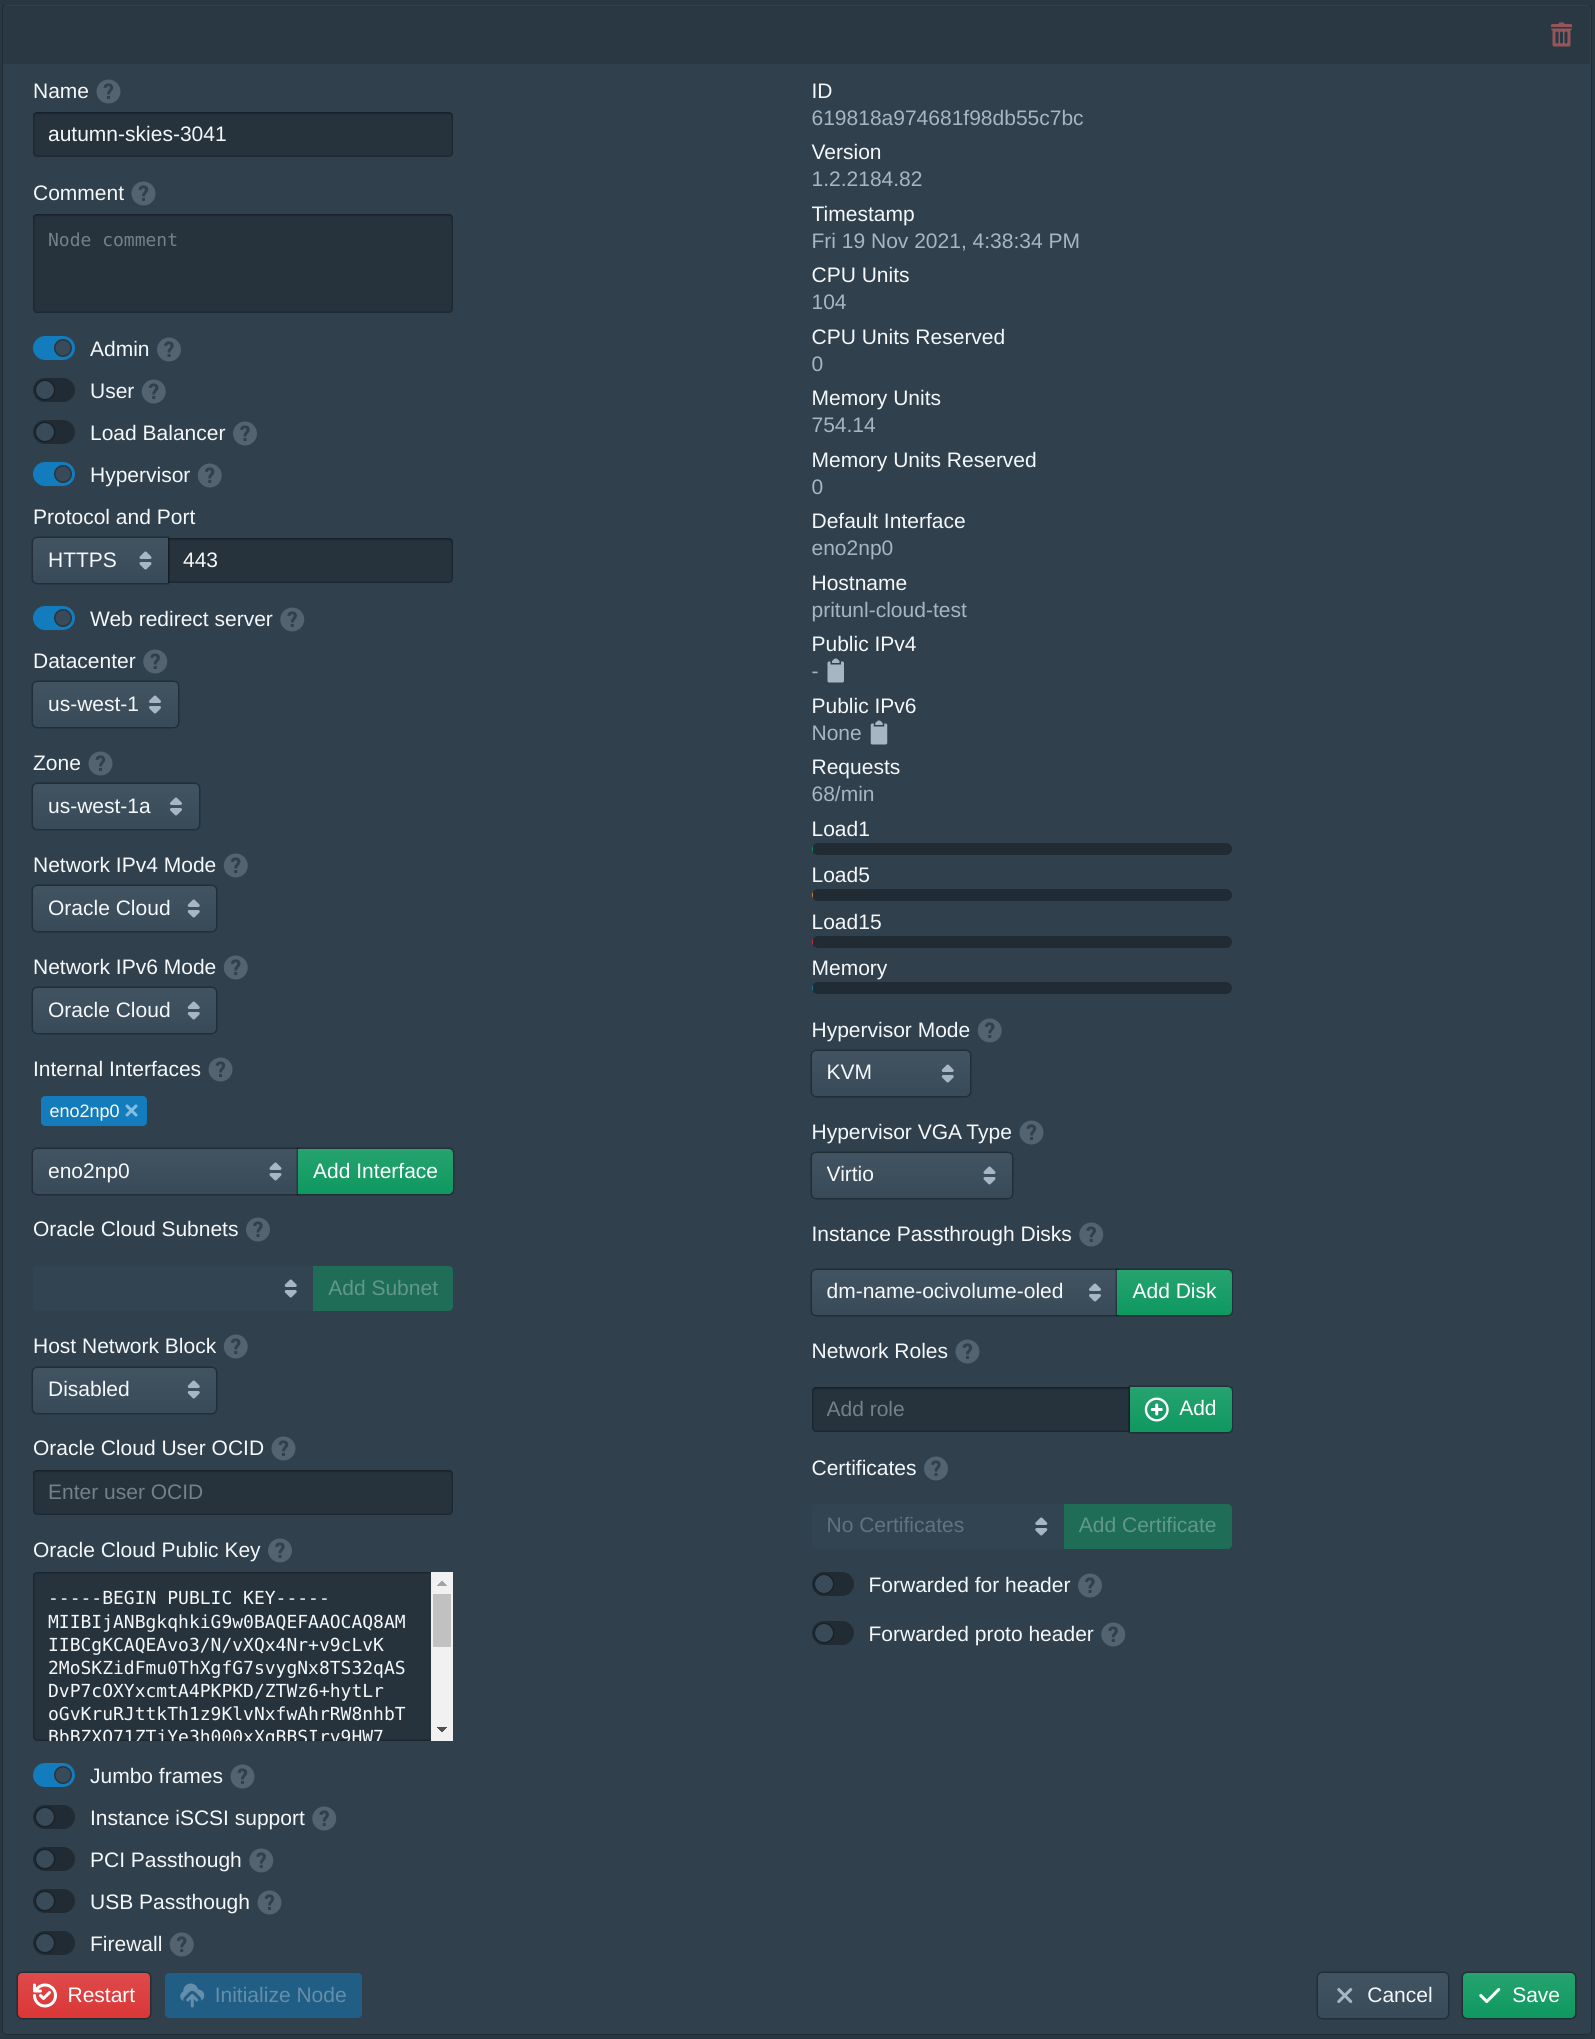
Open the API Keys tab in the Oracle Cloud user settings and click Add API Key. Then copy the Oracle Cloud Public Key from the node settings above and click Add.

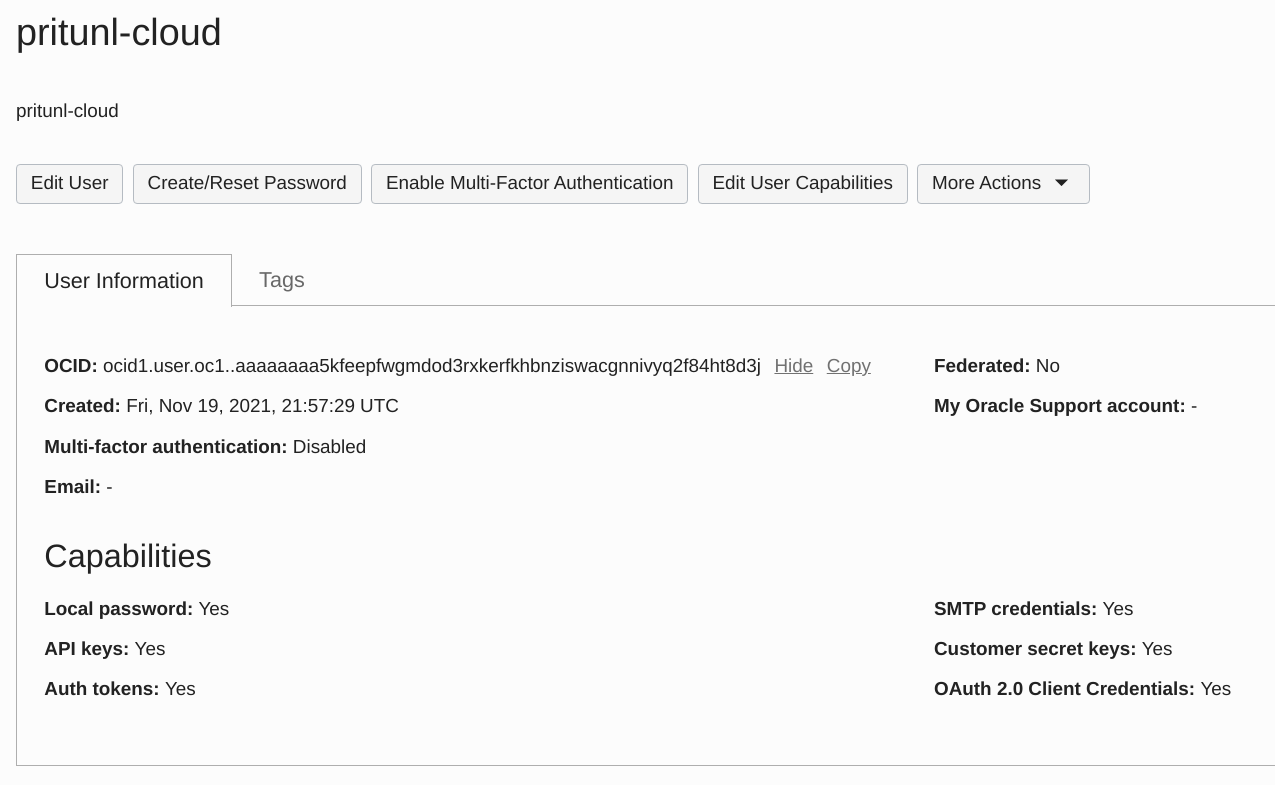
In the Oracle Cloud user information copy the OCID. Use this for the Oracle Cloud User OCID field in the node settings. After setting this field click Save in the node settings.
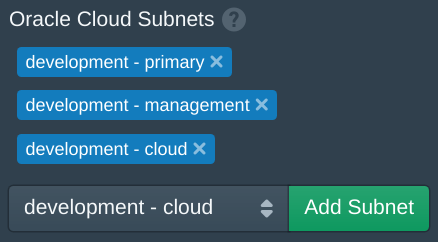
Wait a few seconds for the Pritunl Cloud server to refresh the Oracle Cloud Subnets. If it is not updated check the Logs tab for errors. Once the subnets are shown add the subnets that will be available to instances. The subnets added will be available to be selected when creating or modifying instances. After adding the subnets click Save.
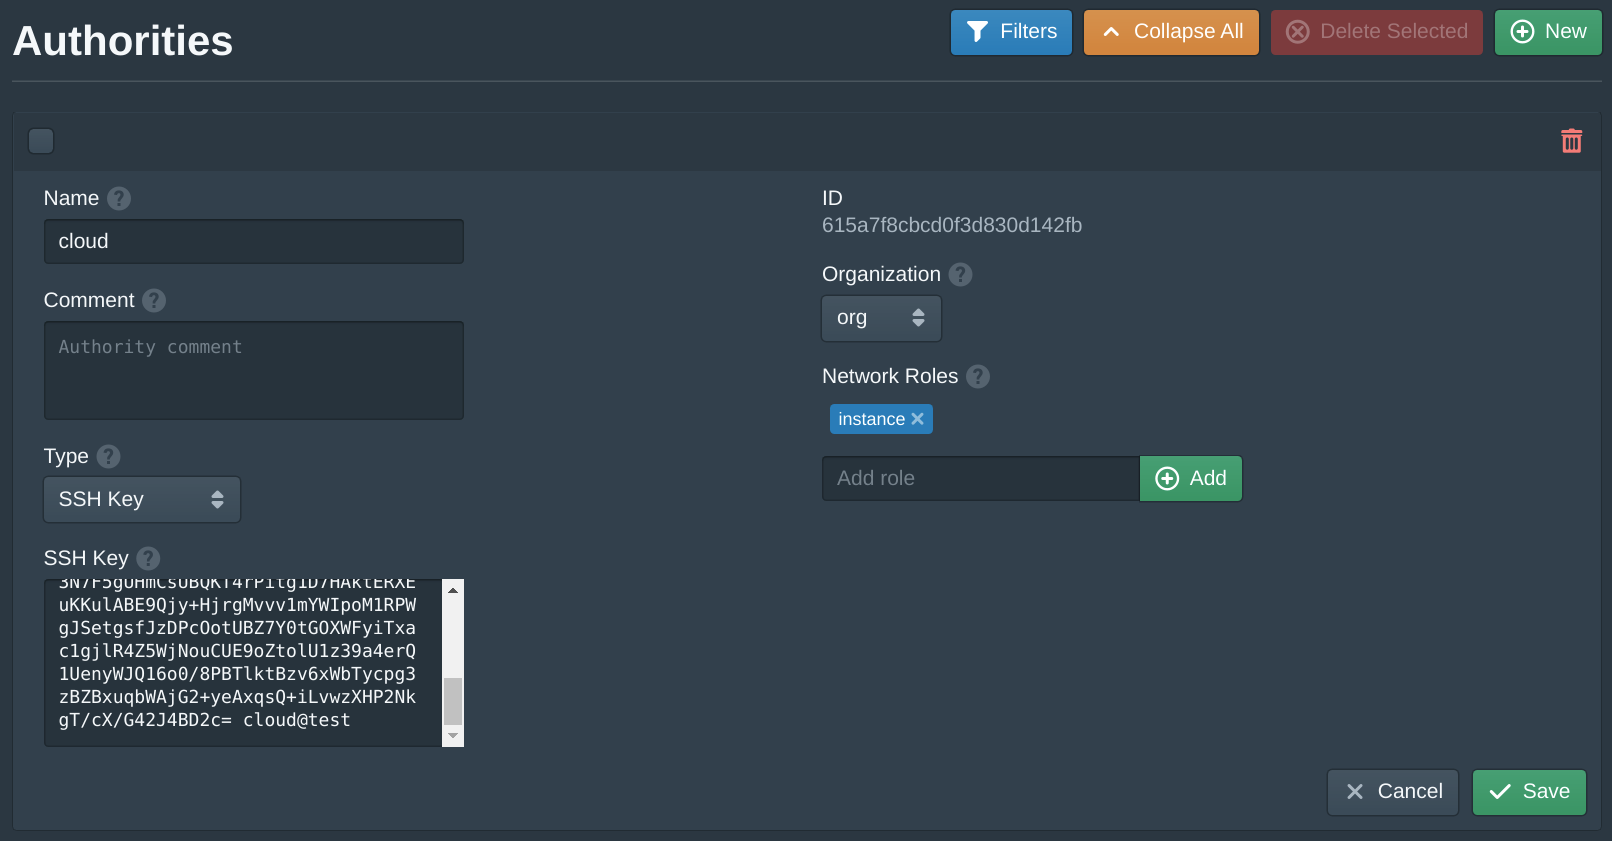
Next open the Authorities tab and set the SSH Key field to your public SSH key. Then click Save.
This default authority will associate an SSH key with instances that share the same instance role. Pritunl Cloud uses roles to match authorities and firewalls to instances.
Create Pritunl Cloud Instance
Both Oracle Cloud and Pritunl Cloud have firewalls. The VCN Security Lists firewall rules configured earlier for each Oracle Cloud subnet will apply to Pritunl Cloud instances. It is best to configure an open firewall configuration on Oracle Cloud then further restrict this using the firewalls in Pritunl Cloud. If network access to a Pritunl Cloud instance isn't working verify both the Oracle Cloud and Pritunl Cloud firewall rules allow access.
Open the Instances tab in Pritunl Cloud and click New. Set the Name to test, set the Organization to org, set the Datacenter to us-west-1, set the Zone to us-west-1a, set the Node to the current node, set the VPC to vpc, set the Subnet to primary. Set the Oracle Cloud Subnet to one of the subnets added earlier. Set the Image to Oracle Linux 8. Then enter instance and click Add to the Network Roles, this will associate the default firewall and the authority with the SSH key above. Then click Create. The create instance panel will remain open with the fields filled to allow quickly creating multiple instances. Once the instances are created click Cancel to close the dialog.
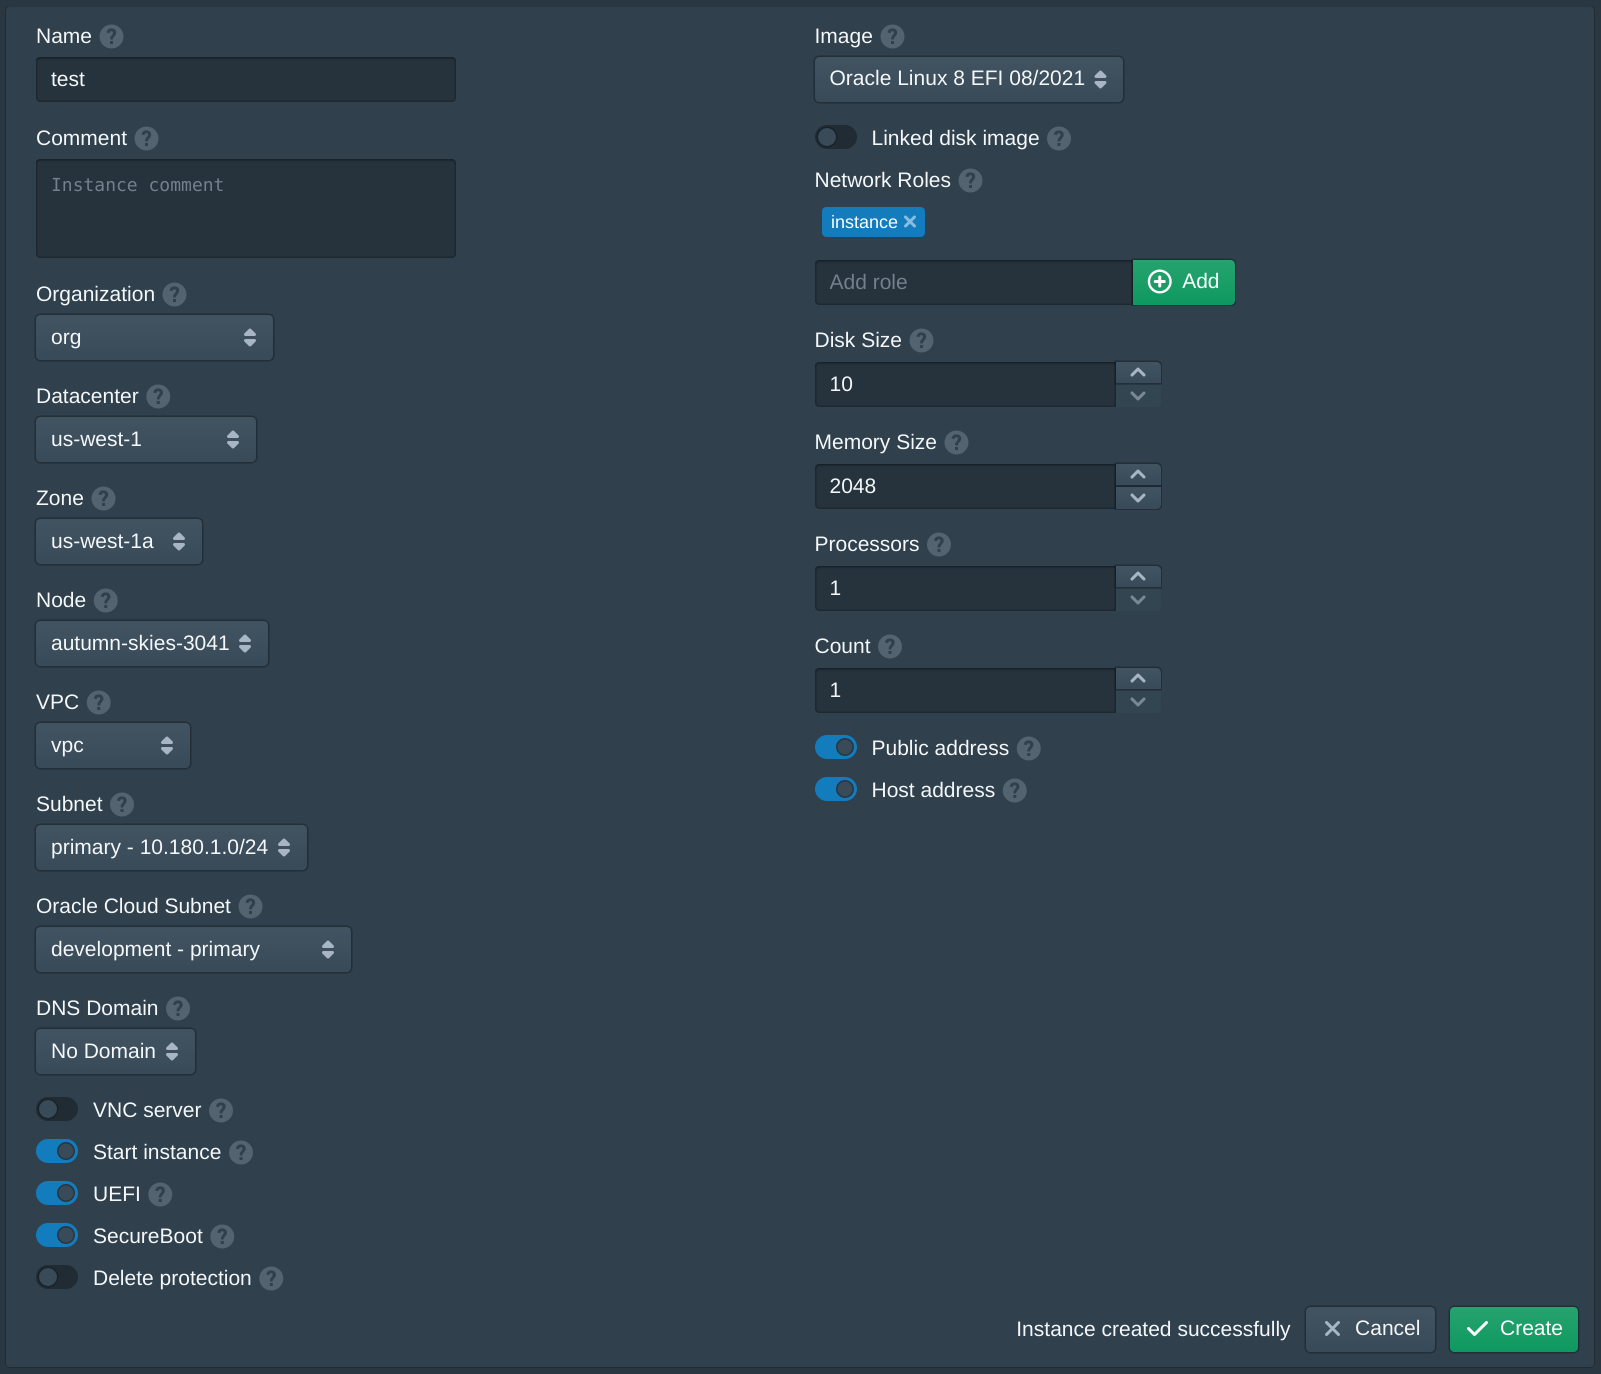
When creating the first instance the instance Image will be downloaded and the signature of the image will be validated. This may take a few minutes, future instances will use a cached image. After the instance has started the public IP address will be listed under Oracle Public IPv4.
If an instance fails to start refer to the Debugging section.
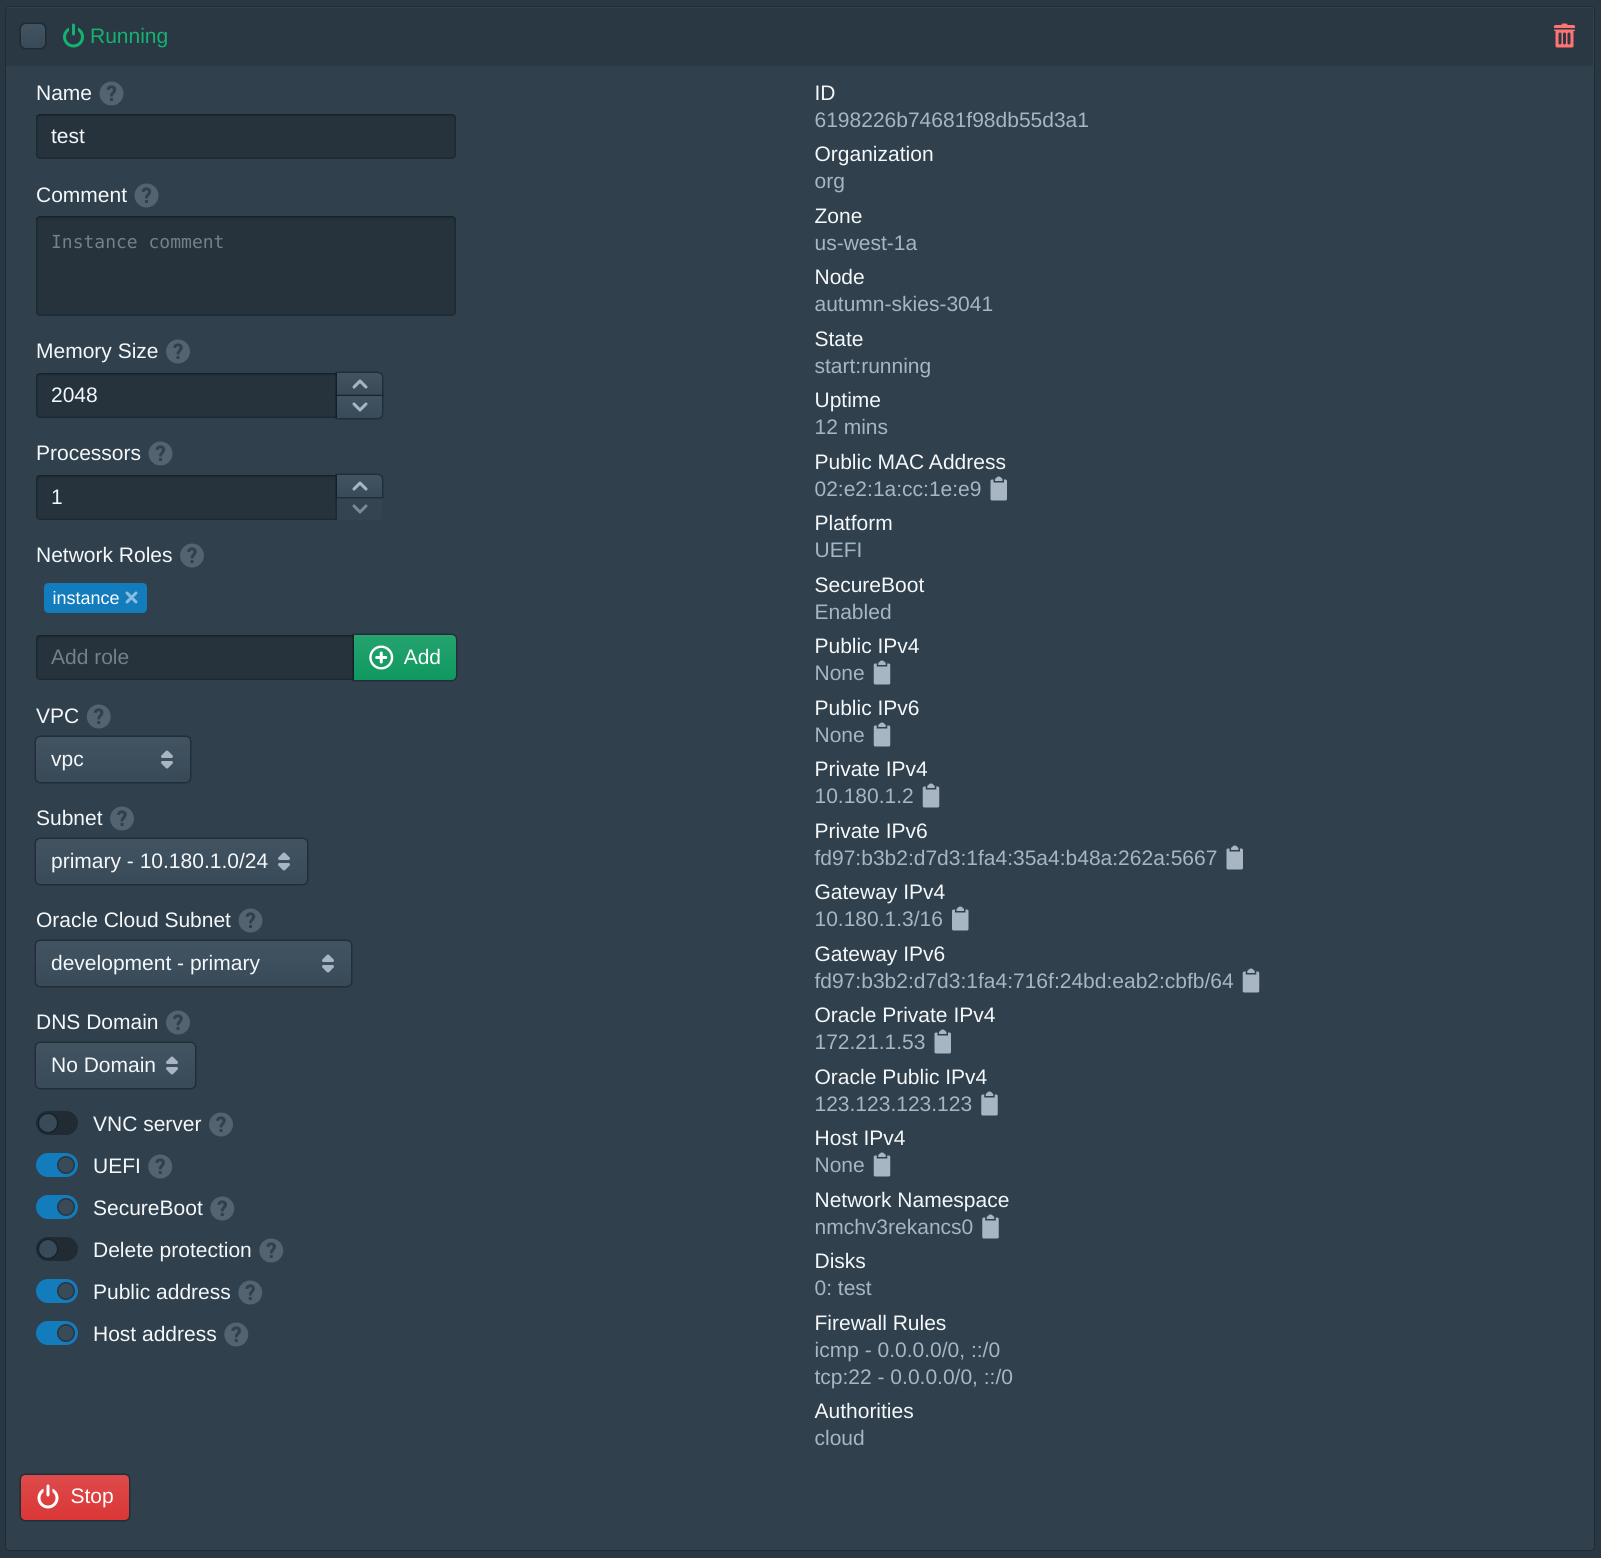
Use the Pritunl Cloud instance username cloud to ssh onto the instance with the Oracle Cloud public IP address.
ssh cloud@123.123.123.123After the instance is created the VNIC can be seen in the Oracle Cloud instance information. The Name of the VNIC will match the Pritunl Cloud instance ID. For more complex use cases such as multiple IP addresses or source/dest checking this VNIC can be modified. The VNIC will only be modified or recreated by Pritunl Cloud if it is deleted. Deleting a Pritunl Cloud instance will automatically delete the unused VNIC.

Updated 3 months ago
