Securing MongoDB
Securing MongoDB for Pritunl clusters
Note: This is not necessary for single Pritunl servers. MongoDB by default will only allow the localhost to connect. This applies to multi-server Pritunl clusters.
The first MongoDB User Authentication section will explain configuring MongoDB with password authentication. The next sections will explain configuring authentication with SSL. It is not necessary to configure SSL on private networks or cloud VPC networks.
MongoDB User Authentication
Create a admin and pritunl user for the prituinl database in the admin database. First connect with the mongo cli then switch to the admin database. Change the PASSWORD below to a secure random password. When authenticating from mongo cli tools use --authenticationDatabase admin.
mongo --ssl --host subnet.domain.com -u admin --authenticationDatabase admin

use admin;
db.createUser({
  user: "admin",
  pwd: "PASSWORD",
  roles: [{role: "root"}]
});
db.createUser({
  user: "pritunl",
  pwd: "PASSWORD",
  roles: [{role: "dbOwner", db: "pritunl"}]
});
Edit the /etc/mongod.conf configuration file and add the security section with authorization enabled. Then restart the mongodb service.
sudo nano /etc/mongod.conf
security:
  authorization: enabled

sudo systemctl restart mongod
To connect to the mongo cli with the admin account use the command below.
mongo --ssl --host 127.0.0.1 -u admin --authenticationDatabase adminTest the pritunl user using the command below.
mongo --ssl --host 127.0.0.1 -u pritunl --authenticationDatabase admin pritunlWhen configuring Pritunl the username and password option must be added to the MongoDB uri. Such as mongodb://pritunl:PASSWORD@127.0.0.1:27017/pritunl?authSource=admin
MongoDB User Authentication with SSL (Optional)
These instructions are for Oracle Linux 8. The commands for other distributions will be different. First install and start MongoDB.
sudo tee /etc/yum.repos.d/mongodb-org-5.0.repo << EOF
[mongodb-org-5.0]
name=MongoDB Repository
baseurl=https://repo.mongodb.org/yum/redhat/8/mongodb-org/5.0/x86_64/
gpgcheck=1
enabled=1
gpgkey=https://www.mongodb.org/static/pgp/server-5.0.asc
EOF

sudo yum -y install mongodb-org
sudo systemctl start mongod
sudo systemctl enable mongod
Then create an admin user by first connecting with the mongo cli. Once connected switch to the admin database and run the create user command. Change the PASSWORD below to a secure random password.
mongo
use admin;
db.createUser({
  user: "admin",
  pwd: "PASSWORD",
  roles: ["root"]
});
After the user has been created edit the MongoDB configuration to enable ssl and authorization. The net section should be replaced with the section below. The tls section can be excluded if only password authentication is needed. Then restart the mongodb service.
sudo nano /etc/mongod.conf
net:
  port: 27017
  bindIp: 0.0.0.0
  tls:
    mode: requireTLS
    certificateKeyFile: /etc/ssl/mongodb.pem

security:
  authorization: enabled

sudo systemctl restart mongod
Then install certbot to get a signed ssl certificate for the server.
sudo yum -y install oracle-epel-release-el8
sudo yum-config-manager --enable ol8_developer_EPEL
sudo yum -y install certbot
Route53 DNS Lets Encrypt Method
The Route53 DNS verification with certbot will make it easier to assign the DNS records for the MongoDB servers to private IP addresses. It will also allow running the MongoDB servers behind a NAT or without opening port 80.
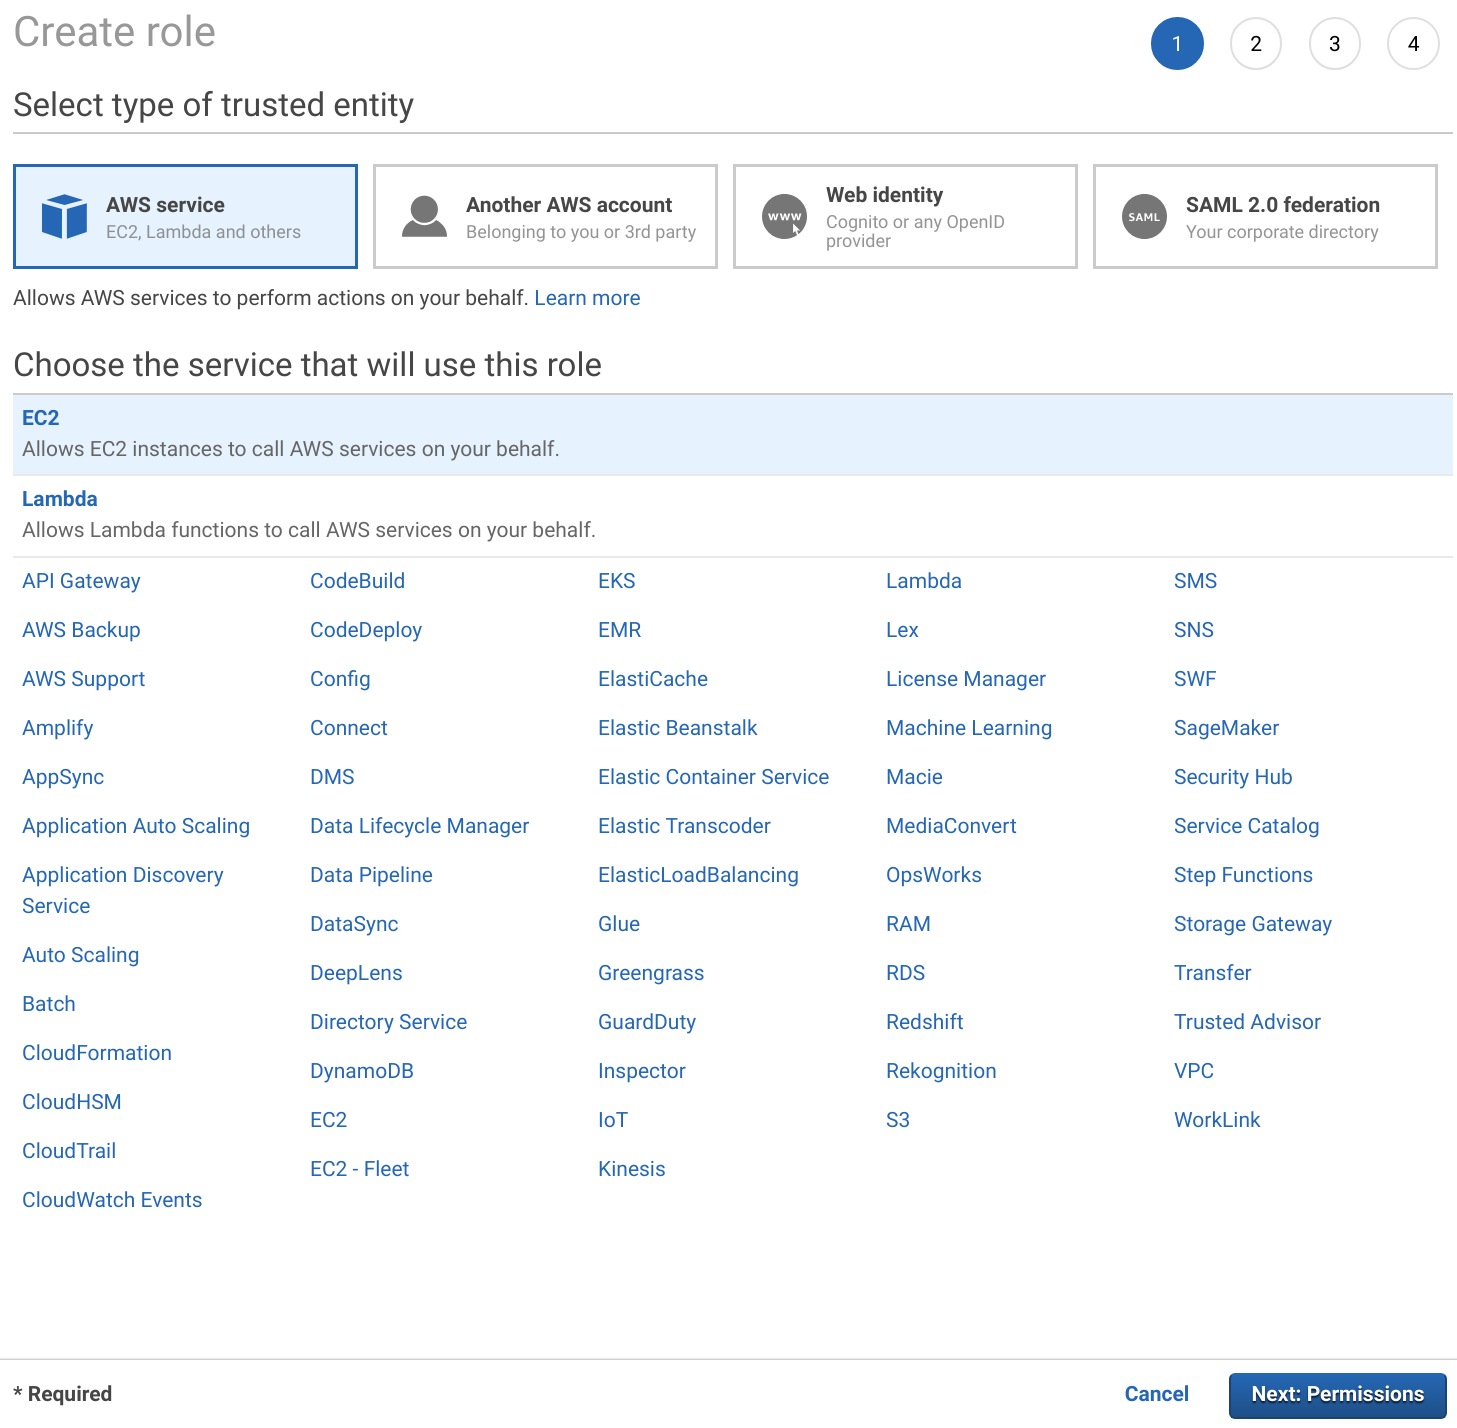
First open the IAM section in the AWS management console and select Roles. Then click Create Role. Select EC2 and click Next: Permissions.

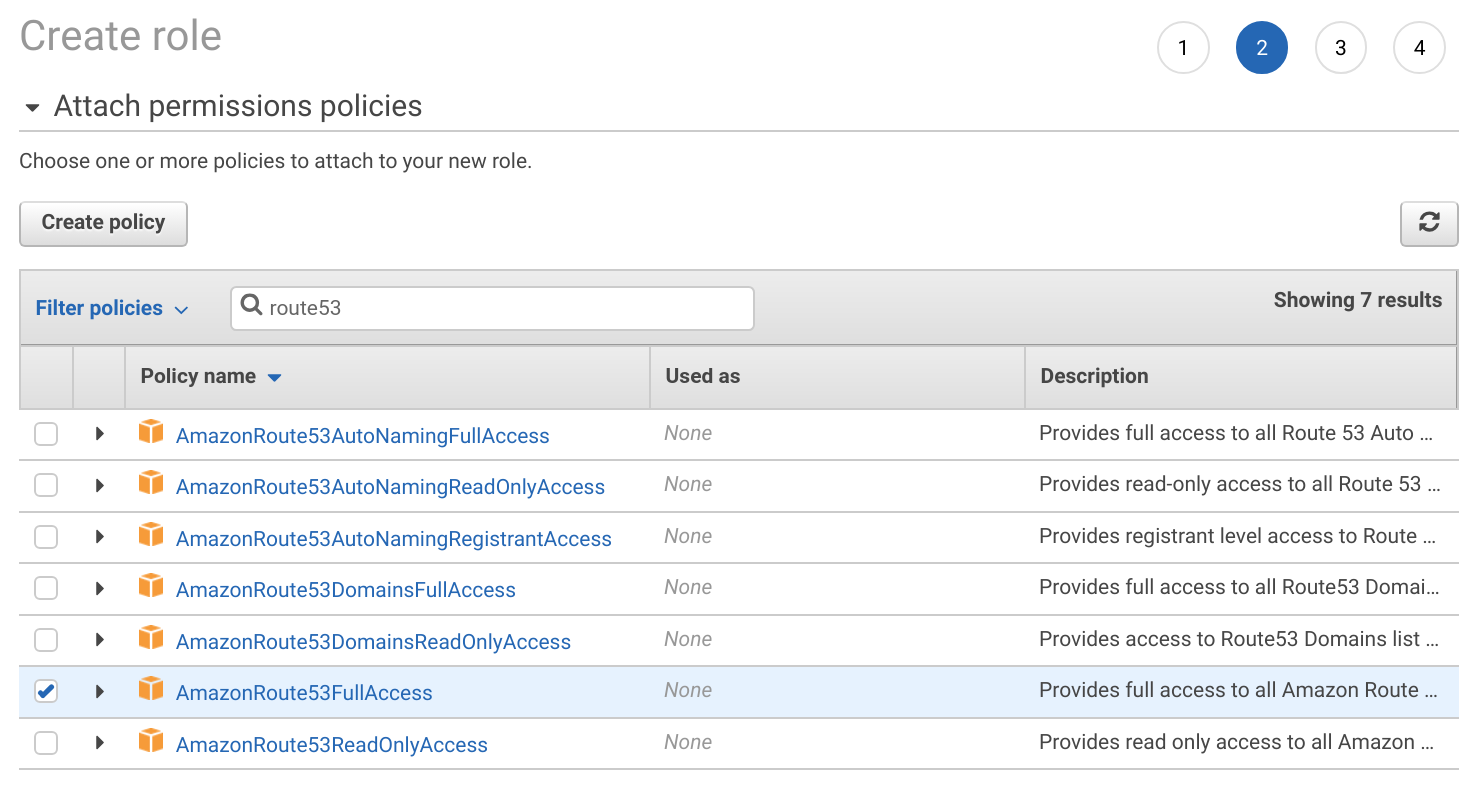
Search for route53 and select AmazonRoute53FullAccess. Then name the role and finish creating it.

Once done assign this role to the MongoDB instances. Then create Route53 records for the MongoDB servers pointing to the private IP of the instance.
Alternatively an AWS access key can be created and placed in /root/.aws/config.
sudo mkdir -p /root/.aws
sudo tee /root/.aws/config << EOF
[default]
aws_access_key_id=KEY_ID
aws_secret_access_key=KEY_SECRET
EOF
Create the cron script below to automatically renew the ssl certificate and restart the MongoDB service when the certificate is renewed. Set the EMAIL and DOMAIN fields below. The certificate will only be renewed when it is close to expiring.
sudo yum -y install --setopt=obsoletes=0 python2-certbot-dns-route53

sudo tee /etc/cron.daily/certbot << EOF
#!/bin/sh
EMAIL=email@domain.com
DOMAIN=subnet.domain.com
CUR_HASH=\`md5sum /etc/letsencrypt/live/"\${DOMAIN}"/fullchain.pem | cut -d ' ' -f 1\`
/usr/bin/certbot-2 --text --agree-tos --non-interactive --email "\${EMAIL}" -d "\${DOMAIN}" --dns-route53 --dns-route53-propagation-seconds 30 --preferred-challenges dns --expand --manual-public-ip-logging-ok certonly
NEW_HASH=\`md5sum /etc/letsencrypt/live/"\${DOMAIN}"/fullchain.pem | cut -d ' ' -f 1\`
if [ "\${CUR_HASH}" = "\${NEW_HASH}" ]; then
    exit 0
fi

cat /etc/letsencrypt/live/"\${DOMAIN}"/privkey.pem /etc/letsencrypt/live/"\${DOMAIN}"/fullchain.pem > /etc/ssl/mongodb.pem
chown mongod:mongod /etc/ssl/mongodb.pem
chmod 600 /etc/ssl/mongodb.pem
systemctl restart mongod
EOF
Once done enable the script and run it.
sudo chmod +x /etc/cron.daily/certbot
sudo sh /etc/cron.daily/certbot
Public HTTP Lets Encrypt Method
First create a DNS record for the MongoDB servers public IP address. If a replica set is being created each replica member must have a DNS record. Create a private hosted zone in Route 53 to allow Lets Encrypt to validate the DNS record with a public IP address while still accessing the MongoDB servers with private IP addresses. This private hosted zone will override the public zone with private IP addresses.
Create the cron script below to automatically renew the ssl certificate and restart the MongoDB service when the certificate is renewed. Set the EMAIL and DOMAIN fields below. The certificate will only be renewed when it is close to expiring.
sudo tee /etc/cron.daily/certbot << EOF
#!/bin/sh
EMAIL=email@domain.com
DOMAIN=subnet.domain.com
CUR_HASH=\`md5sum /etc/letsencrypt/live/"\${DOMAIN}"/fullchain.pem | cut -d ' ' -f 1\`
/usr/bin/certbot-2 --text --agree-tos --non-interactive --standalone --email "\${EMAIL}" -d "\${DOMAIN}" --preferred-challenges http --expand --manual-public-ip-logging-ok certonly
NEW_HASH=\`md5sum /etc/letsencrypt/live/"\${DOMAIN}"/fullchain.pem | cut -d ' ' -f 1\`
if [ "\${CUR_HASH}" = "\${NEW_HASH}" ]; then
    exit 0
fi

cat /etc/letsencrypt/live/"\${DOMAIN}"/privkey.pem /etc/letsencrypt/live/"\${DOMAIN}"/fullchain.pem > /etc/ssl/mongodb.pem
chown mongod:mongod /etc/ssl/mongodb.pem
chmod 600 /etc/ssl/mongodb.pem
systemctl restart mongod
EOF
Before running the script the domain used above must point to the MongoDB servers public address and port 80 must be opened on the firewall. After the script is created change the file mode to allow execution and run the script. The first time the script is run a new certificate will be created. Running the script additional times will check if the certificate is close to expiring and renew the certificate when needed. The domain is verified by temporarily creating an http server on port 443 to allow the letsencrypt verification servers to connect and verify the domain points to the correct server.
sudo chmod +x /etc/cron.daily/certbot
sudo sh /etc/cron.daily/certbot
Create Pritunl User
Then create a pritunl user for the prituinl database in the admin database. First connect with the mongo cli using the admin account then switch to the admin database. Change the PASSWORD below to a secure random password. When authenticating from mongo cli tools use --authenticationDatabase admin.
mongo --ssl --host subnet.domain.com -u admin --authenticationDatabase admin

use admin;
db.createUser({
  user: "pritunl",
  pwd: "PASSWORD",
  roles: [{role: "dbOwner", db: "pritunl"}]
});
Test the new use with the command below.
mongo --ssl --host subnet.domain.com -u pritunl --authenticationDatabase admin pritunlReplica Set Keyfile
A keyfile can be used to increase the security of replica sets. First generate a key on one replica member then copy this file to all other replica members.
sudo sh -c "openssl rand -base64 756 > /etc/mongod.key"
cat /etc/mongod.key
sudo chown mongod:mongod /etc/mongod.key
sudo chmod 600 /etc/mongod.key
Once the keyfile is on all replica members update the configuration file on each replica member.
sudo nano /etc/mongod.conf
security:
  authorization: enabled
  clusterAuthMode: keyFile
  keyFile: /etc/mongod.key

replication:
  replSetName: rs0
Connecting to MongoDB
When configuring Pritunl the username, password and ssl option must be added to the MongoDB uri. Such as mongodb://pritunl:PASSWORD@subnet.domain.com:27017/pritunl?authSource=admin&ssl=true
Authentication Database
If the authentication user is on a different database the authSource parameter must be included in the MongoDB uri. Such as mongodb://pritunl:PASSWORD@subnet.domain.com:27017/pritunl?ssl=true&authSource=admin
Custom CA Certificate
When using a custom CA certificate with MongoDB the ssl_ca_certs parameter must be included in the MongoDB uri. Such as mongodb://pritunl:PASSWORD@subnet.domain.com:27017/pritunl?ssl=true&ssl_ca_certs=/path/to/ca.pem
Updated 3 months ago
